I'll be honest — I ate half the batch before anyone else got to try it. There I stood in my kitchen at 11:47 PM, pretzel crumbs clinging to my pajama shirt like edible confetti, wondering how something so simple could hijack every rational thought in my brain. These peanut butter pretzel bites weren't supposed to be revolutionary. They were supposed to be a quick snack for tomorrow's picnic. Instead, they became the reason I locked the kitchen door and told my roommate the "oven was broken" when she asked what smelled so incredible.
Picture yourself pulling this out of the oven, the whole kitchen smelling like a Reese's cup married a soft pretzel and had tiny, perfect babies. That first bite — when the still-warm peanut butter filling melts against your tongue while the pretzel shell gives way with a satisfying snap — creates a moment so primal that speaking becomes optional. You might grunt. You might close your eyes. You will definitely reach for another before you've finished chewing the first.
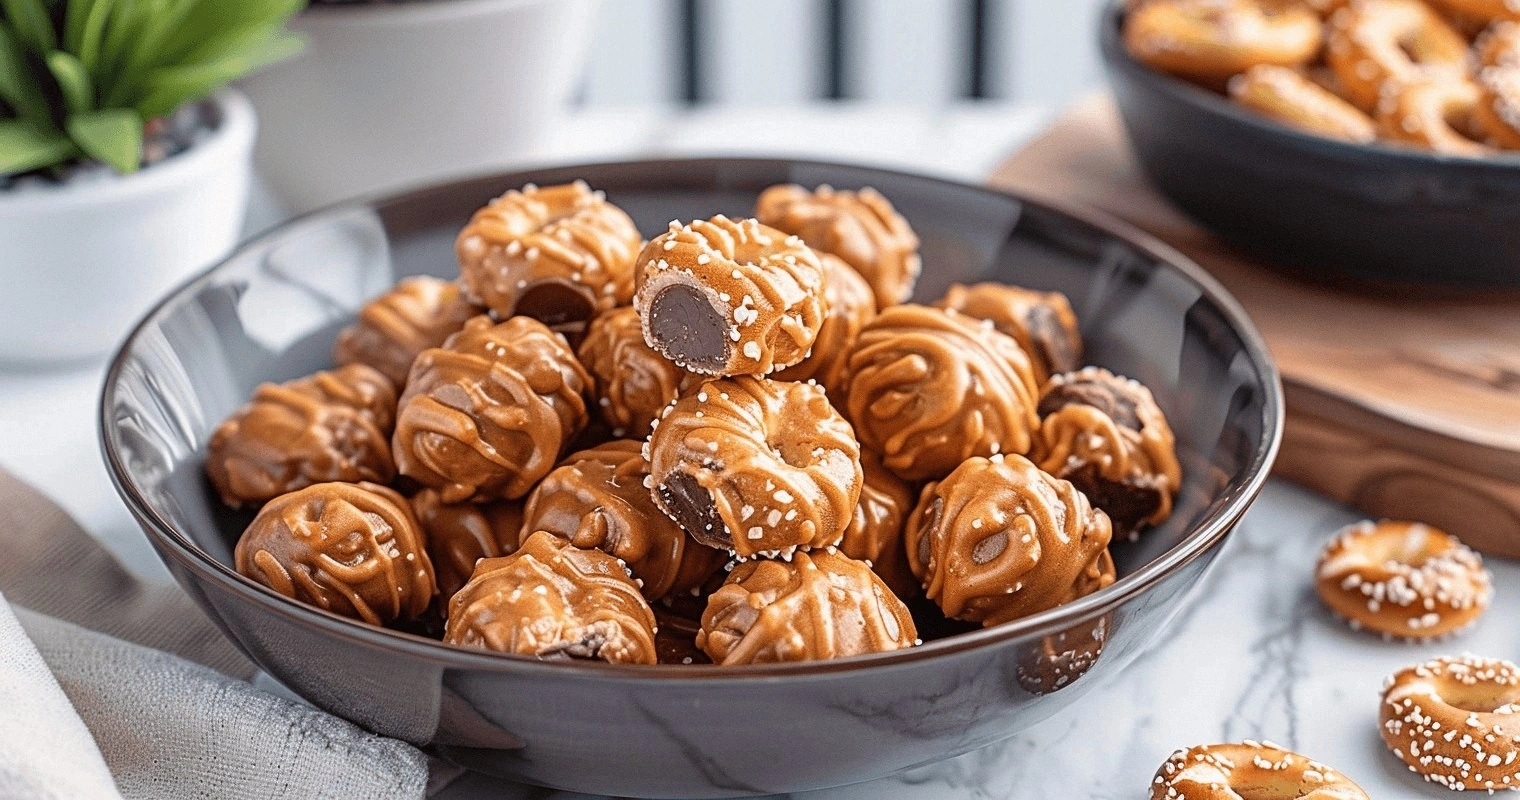
Most recipes get this completely wrong. They either make the pretzel coating so thick you feel like you're chewing through a bread bracelet, or they skimp on the filling until you're basically eating salted cardboard. Here's what actually works: a paper-thin pretzel wrapper that shatters like thin ice, revealing a peanut butter center so creamy it should come with a warning label. The secret? It's not actually pretzel dough at all — and that's where the magic begins.
Okay, ready for the game-changer? We're using actual soft pretzels that have been blitzed into the most flavorful breadcrumbs you've ever tasted, then binding them with a simple mixture that creates the perfect shell. If you've ever struggled with doughy, heavy pretzel bites that sit in your stomach like edible paperweights, you're not alone — and I've got the fix. Let me walk you through every single step — by the end, you'll wonder how you ever made it any other way.
What Makes This Version Stand Out
Flavor Bomb: These aren't just peanut butter balls wearing a pretzel costume. The pretzel coating gets toasted in butter until it develops those deep, nutty notes that make you question everything you thought you knew about snacking. The salt crystals on the pretzels caramelize slightly, creating little pockets of sweet-salty bliss that make your taste buds do a happy dance.
Texture Symphony: We're talking about crispy edges that shatter like thin ice, giving way to a peanut butter filling so silky it coats your mouth like velvet. The contrast isn't just good — it's what other snacks dream about becoming when they grow up. Each bite starts with a crunch and ends with a melt, keeping your mouth interested from first contact to last swallow.
Idiot-Proof Simple: No yeast, no rising time, no rolling pins, no special equipment beyond a food processor and your own two hands. If you can make a peanut butter sandwich, you can make these. The whole process takes about 45 minutes from "I want something amazing" to "I need to hide these from myself."
Unexpected Twist: Instead of traditional pretzel dough, we're using a technique that involves crushing real pretzels and binding them with a secret ingredient that creates the perfect texture. It's like discovering that your favorite jeans also make you look like a million bucks — familiar, but better than you ever imagined.
Crowd Reaction: I've taken these to office parties where grown adults actually gasped. Not polite little "mmm" sounds — full-on, hand-over-mouth, eyes-widening gasps. One guy proposed marriage. Another tried to pay me for the recipe. My neighbor's teenager offered to mow my lawn for a year. These bites create memories, not just snacks.
Make-Ahead Magic: These freeze beautifully for up to three months, which means you can always have the power to create instant joy in your freezer. They travel well, pack easily, and survive being jostled around in a backpack better than any cookie I've ever met. Road trip? Movie night? Emergency comfort food? Covered.
Ingredient Quality: Using natural peanut butter isn't just healthier — it creates a filling that's smoother, more peanut-forward, and less cloyingly sweet than the processed stuff. Combined with the right kind of pretzels (not all are created equal), you get layers of flavor that build on each other like a well-orchestrated symphony.
Alright, let's break down exactly what goes into this masterpiece...
Inside the Ingredient List
The Flavor Base
The peanut butter you choose here isn't just important — it's everything. Go natural or go home, because that layer of oil on top isn't a nuisance, it's liquid gold that keeps your filling from turning into peanut cement. I've tried this with every brand from the fancy organic stuff that costs more than my first car to the gas station packets that have been there since 1998. The sweet spot? Any natural peanut butter where the only ingredients are peanuts and salt. That's it. Anything else and you're eating frosting, not filling.
Butter gets melted and mixed with crushed pretzels to create something magical — think of it as edible glue that tastes like childhood. Use the good stuff here, not the bargain basement butter that tastes like it was made from sad cows. European-style butter with higher fat content makes the coating richer, but honestly, I've made these with whatever was on sale and nobody complained. The pretzels are the real star anyway.
The Texture Crew
Powdered sugar isn't just for sweetness — it's the secret weapon that gives our peanut butter filling that cloud-like texture that melts on your tongue. Regular sugar creates grit, honey makes it too runny, and maple syrup turns it into soup. Powdered sugar dissolves completely, leaving behind only sweetness and that perfect mouthfeel that makes people close their eyes when they taste it.
Vanilla extract might seem optional, but leaving it out is like forgetting to wear pants — technically you can do it, but why would you want to? Just a whisper transforms the peanut butter from one-note to symphony. I'm not talking about the artificial stuff that smells like a candle store either. Real vanilla, the kind that costs more than you'd like to admit, because these bites deserve the best. They're going to make people happy — shouldn't they make you happy too?
The Unexpected Star
Here's where things get weird: we're adding a tiny bit of cream cheese to the peanut butter filling. Not enough to taste it — just enough to add tang and body that takes these from good to "I need to sit down." The cream cheese acts like insurance against dryness, keeping the filling smooth even after refrigeration. If you're dairy-free, you can skip it, but don't come crying to me when your filling isn't quite as dreamy.
The pretzels themselves matter more than you'd think. Skip the flavored ones (nobody wants pizza-spiced peanut butter bites), but don't go too plain either. Regular salted pretzels have just enough personality to stand up to the peanut butter without stealing the show. I've tried this with everything from organic whole wheat pretzels (don't) to those tiny pretzel sticks (works but looks weird). Mini pretzels work best because they crush evenly and create the perfect coating texture.
The Final Flourish
Sea salt isn't just for finishing — it's the exclamation point at the end of every bite. Those little crystals hit your tongue and make everything else taste more like itself. The peanut butter becomes more peanut-buttery, the pretzel more pretzely, the sweet more perfectly balanced. It's like turning up the contrast on a photo, except it's in your mouth and way more fun.
Chocolate is optional but highly recommended. Not for coating the whole bite — that would make it a different creature entirely — but for drizzling. A few artistic swoops of dark chocolate across the top make these look like they came from a boutique candy shop, plus it gives you that chocolate-peanut butter combination that makes rational adults lose their minds. Use the good stuff here, because life's too short for waxy chocolate.
Everything's prepped? Good. Let's get into the real action...
The Method — Step by Step
- Start by crushing your pretzels, but don't go crazy here — you want small pieces, not pretzel dust. Think coarse breadcrumbs, not flour. I put them in a zip-top bag and whack them with a rolling pin because it's therapeutic after a long day, but a food processor works if you're feeling civilized. You'll need about two cups of crushed pretzels for this adventure, which translates to roughly four cups of whole mini pretzels. Don't measure after crushing — you'll end up with too much and spend the next week finding pretzel bits in your kitchen drawers.
- Melt four tablespoons of butter in a large skillet over medium heat. When it stops foaming and starts to smell nutty — that's your cue — toss in the crushed pretzels. Stir constantly for about three minutes, coating every piece in buttery glory. This step isn't just about binding; it's about toasting those pretzel bits until they develop deep, complex flavors that will make your kitchen smell like a German bakery. The color should deepen slightly, turning golden like late afternoon sunlight. Don't walk away here — butter goes from perfect to burnt faster than you can say "snack attack."
- While the pretzels cool, make the filling by combining one cup of natural peanut butter with four ounces of softened cream cheese and half a cup of powdered sugar. Add one teaspoon of vanilla extract and a pinch of salt, then beat until it looks like fluffy peanut butter clouds. This is the moment of truth — taste it. If your eyes don't close involuntarily, add another pinch of salt. The filling should be sweet but not cloying, peanut-forward but not aggressive, smooth enough to spread but thick enough to hold its shape.
- Chill the filling for fifteen minutes while you prepare your workspace. This isn't just busy work — chilling helps the mixture firm up so it doesn't turn into a gooey mess when you try to form the bites. Line a baking sheet with parchment paper and clear some space in your freezer. Trust me on this one; you'll thank me later when your bites aren't sticking to everything they touch like edible velcro.
- Scoop the chilled filling into small balls, about one inch in diameter. I use a small cookie scoop because I'm fancy like that, but two spoons work just as well. Roll them between your palms to make them round — this goes faster if your hands are slightly damp, which keeps the peanut butter from sticking to your skin like delicious barnacles. Place the balls on the parchment-lined sheet and freeze for ten minutes. They don't need to be rock solid, just firm enough to handle without turning into a melty disaster.
- Now comes the fun part: coating. Take your cooled pretzel mixture and pour it into a shallow bowl. Working quickly, roll each frozen peanut butter ball in the pretzel crumbs, pressing gently so they adhere. You're not breading chicken here — aim for an even coating that's substantial enough to provide crunch but not so thick it becomes a chore to chew. The goal is a thin shell that shatters when you bite into it, revealing the creamy center like a delicious geode.
- Place the coated bites back on the parchment-lined sheet and refrigerate for at least thirty minutes. This final chill sets everything, melding the coating to the filling so they don't separate when you pick them up. If you're adding chocolate drizzle — and you should be — melt two ounces of dark chocolate with half a teaspoon of coconut oil. The coconut oil helps it set quickly and gives it that professional-looking sheen. Use a fork to drizzle thin lines across the tops, or get fancy and pipe it in decorative patterns that make it look like you went to culinary school.
- Store the finished bites in an airtight container in the refrigerator for up to a week, or freeze them for up to three months. They taste best at room temperature, so pull them out about fifteen minutes before serving. The pretzel coating will soften slightly, creating that perfect textural contrast with the cold, creamy filling. If you can resist eating them all immediately, they actually get better after a day in the fridge as the flavors meld and mature like a fine wine, except it's peanut butter and that's way more fun.
- Clean up while the chocolate sets, which gives you something productive to do besides hovering over the tray like a protective parent. The pretzel crumbs that didn't make it onto the bites? Don't throw them away — they're incredible sprinkled over ice cream or stirred into yogurt. The peanut butter that stuck to the bowl? That's chef's treat, and anyone who tells you otherwise is lying or doesn't understand joy. Wash everything in hot water because peanut butter is stubborn and wants to stick around like that friend who doesn't get the hint when the party's over.
That's it — you did it. But hold on, I've got a few more tricks that'll take this to another level...
Insider Tricks for Flawless Results
The Temperature Rule Nobody Follows
Here's the thing that separates amateur snacks from professional-grade addiction: temperature management. Your peanut butter mixture needs to be cold when you form it, but not frozen solid. Too warm and it sticks to everything like a toddler with jam hands. Too cold and it cracks when you try to roll it. The sweet spot is refrigerator-cold but still pliable — think play-doh that's been in the fridge. If it starts getting soft while you're working, pop the bowl back in for five minutes. Your future self will thank you when you're not wearing peanut butter like edible mittens.
Why Your Nose Knows Best
That moment when you're toasting the pretzel crumbs in butter? Don't rely on timers — rely on your nose. When it starts to smell like popcorn and toasted nuts had a delicious baby, that's your cue. The color should deepen to golden brown, but the real indicator is that nutty aroma that makes your mouth water involuntarily. If you're not sure, err on the side of more toasting rather than less. Under-toasted pretzels taste like disappointment and broken dreams. Over-toasted ones can be saved by mixing with untoasted crumbs, but under-toasted ones just make everything taste like stale snack food.
The 5-Minute Rest That Changes Everything
After you coat the bites in pretzel crumbs, let them sit for five minutes before moving them to the fridge. This brief rest allows the residual heat from your hands to create a slight bond between the coating and filling, preventing separation later. It's like letting glue get tacky before sticking things together — a small step that prevents major heartbreak. A friend tried skipping this step once — let's just say it didn't end well. She ended up with naked peanut butter balls and a pile of pretzel crumbs, crying into her mixing bowl at 2 AM. Don't be like Sarah.
Size Matters (But Not How You Think)
Make these smaller than you think you need to. I know, I know — bigger seems better, but these are rich. Like, "I need to sit down and reconsider my life choices" rich. One-inch balls are perfect because they give you the ideal ratio of coating to filling in every bite. Anything larger and you risk pretzel overload on the outside while the center stays cold and firm. Plus, smaller bites mean you can eat more of them without feeling like you've swallowed a peanut butter brick. It's basic math: six small bites equals more happiness than three large ones, and you get to feel dainty while eating an entire tray.
Storage Secrets of the Pros
Here's what nobody tells you: these actually improve with age. Day one they're good, but day three they're transcendent. The flavors meld, the textures settle, and something magical happens in that container. Store them in layers separated by parchment paper, not because they'll stick (they won't) but because it makes you feel like you have your life together. Keep them in the coldest part of your fridge, usually the back bottom shelf, where they'll stay happy for up to a week. If they last that long, you're stronger than I am, and I salute your willpower.
Creative Twists and Variations
This recipe is a playground. Here are some of my favorite ways to switch things up:
The Elvis Remix
Add half a mashed banana to the peanut butter filling and substitute crushed honey-roasted peanuts for half the pretzels in the coating. The result tastes like the King's favorite sandwich but better because it's bite-sized and doesn't require utensils. The banana adds moisture and natural sweetness while the honey-roasted nuts bring caramel notes that play beautifully with the salt. Pro tip: these are incredible frozen, like tiny peanut butter banana ice cream bites that will make you question why you ever ate anything else.
S'mores Gone Wild
Mix mini chocolate chips and crushed graham crackers into the filling, then coat with the pretzel mixture as usual. Once set, give them a quick toast under the broiler for five seconds — just long enough to make the chocolate chips melty and the pretzels extra toasty. The result tastes like summer camp and sophisticated dessert had a beautiful baby. The graham crackers add texture while the chocolate provides little pockets of molten joy. Fair warning: these disappear faster than regular ones, which I didn't think was possible until I watched my neighbor eat twelve without breathing.
Spicy Thai-Inspired
Add a teaspoon of Thai curry paste and a tablespoon of coconut milk to the peanut butter filling, then roll the finished bites in toasted coconut mixed with a pinch of chili flakes. These have heat that builds slowly, hitting you after you've already committed to the second bite. The coconut adds tropical notes while the curry paste brings umami depth that makes these strangely addictive. They're perfect for people who claim they don't like sweet snacks — the spice keeps them interesting while the peanut butter provides familiar comfort.
White Chocolate Raspberry
Swirl raspberry jam into the peanut butter filling (don't mix completely — you want ribbons of fruit), then drizzle with white chocolate instead of dark. The tart raspberry cuts through the richness of the peanut butter while the white chocolate adds creamy sweetness that makes these taste like expensive candy. Use good jam here, not the fluorescent stuff that tastes like red food coloring. These look gorgeous on a dessert platter and have converted more white-chocolate-haters than I can count.
Savory Sesame
Substitute tahini for half the peanut butter, add a splash of soy sauce and rice vinegar to the filling, and roll the finished bites in toasted sesame seeds mixed with crushed wasabi peas. These are for the adventurous — salty, nutty, with a wasabi kick that clears your sinuses in the most pleasant way possible. They're like the sophisticated older cousin of the original, the one who studied abroad and came back with interesting stories and a refined palate.
Cookie Butter Dream
Replace half the peanut butter with cookie butter (speculoos spread) and add crushed speculoos cookies to the coating mixture. The result tastes like someone took the best parts of European cafes and compressed them into bite-sized form. The warming spices in the cookie butter — cinnamon, nutmeg, ginger — create depth that makes these perfect for fall gatherings. If you can find chocolate-covered speculoos, crush those for the coating and prepare to have your mind blown by the meta-cookie experience.
Storing and Bringing It Back to Life
Fridge Storage
These little beauties will keep in an airtight container in the refrigerator for up to a week, though I've never personally witnessed them survive that long. Store them in single layers separated by parchment paper — not because they'll stick, but because it prevents the chocolate drizzle from getting smudged and keeps them looking Instagram-ready. The cold actually improves their texture, allowing the flavors to meld into something greater than the sum of their parts. If they develop a slight sheen on the surface, don't panic — that's just the peanut butter's natural oils rising to the top. It actually helps keep them moist and delicious.
Freezer Friendly
These freeze like champions for up to three months, making them perfect for emergency dessert situations or surprise guests who expect you to have your life together. Freeze them on a tray first, then transfer to a freezer bag once solid — this prevents them from becoming one giant peanut butter pretzel brick that requires an ice pick to separate. Thaw in the refrigerator for an hour or at room temperature for fifteen minutes. Pro tip: they taste incredible slightly frozen, like peanut butter ice cream bonbons that will make you question why you ever ate them any other way. Just don't microwave them — you'll end up with a puddle of regret and melted dreams.
Best Reheating Method
While these are best served at room temperature, sometimes you need to bring back the magic after they've been in the fridge. The trick is gentle warmth — ten minutes on the counter usually does it. If you're impatient (and if you're making these, you probably are), hold one between your palms for thirty seconds while you contemplate your life choices. Never use direct heat — no ovens, no microwaves, no hair dryers (yes, I've tried). Too much heat and the peanut butter filling becomes lava while the pretzel coating turns soggy. Room temperature brings out the flavors best, letting the peanut butter soften to that perfect creamy consistency that makes people make inappropriate noises.