I still remember the night this recipe was born like it was yesterday — standing in my tiny apartment kitchen at 2 AM, staring at a sad container of leftover rice and a package of chicken thighs I'd forgotten to freeze. My roommate had just texted me a blurry photo of some gorgeous takeout from a fancy Asian fusion place downtown, and I was experiencing what can only be described as culinary FOMO mixed with stubborn pride. "I'll show them," I muttered, pulling out every condiment I owned and dumping them into a pan with reckless abandon. What emerged thirty minutes later was so ridiculously good that I actually called my best friend at 3 AM just to make her listen to me describe the sauce while she groggily threatened to block my number.
That first batch was pure chaos magic — honey from a bear-shaped bottle that had crystallized in the back of my pantry, garlic I'd minced with the patience of someone who definitely had a deadline in the morning, and butter that I may or may not have accidentally browned because I got distracted scrolling through food photos. But here's the thing: sometimes the best discoveries happen when you're not trying to be perfect. The honey caramelized just enough to create this glossy, sticky glaze that made the chicken taste like it came from a restaurant that charges thirty bucks for a main course. The garlic mellowed into these sweet, jammy bits that I kept stealing straight from the pan with a spoon. And that rice — oh, that rice absorbed every last drop of the sauce and transformed into something so luxurious that I literally stood over the stove eating it straight from the pot while doing a victory dance.
Fast forward through countless iterations, dinner party triumphs, and one particularly memorable date night where this dish basically secured me a second date (they proposed marriage after the third helping, but I told them I needed to see how they handled my spice drawer first). I've refined the technique, cracked the code on getting that restaurant-quality sheen, and discovered the secret to making the rice so ridiculously velvety that you'll want to write poetry about it. This isn't just another honey garlic chicken recipe floating around the internet — this is the one that'll ruin all others for you forever. Picture yourself pulling this out of the oven, the whole kitchen smelling like you hired a professional chef, while your family or roommates or very lucky pets hover nearby like you're some kind of kitchen wizard.
Let me walk you through every single step — by the end, you'll wonder how you ever made it any other way.
What Makes This Version Stand Out
Sticky-Sweet Perfection: The honey in this recipe isn't just there for sweetness — we hit it with high heat at exactly the right moment so it caramelizes into this glossy, lacquer-like coating that makes each piece of chicken look like it belongs in a food magazine. Most recipes just stir it in at the end, but we're going to coax out every last drop of flavor until it transforms into liquid gold that clings to every surface like edible jewelry.
Garlic Two Ways: Forget about those sad, single-note garlic situations you get from takeout. We're using both minced fresh garlic for that punchy sharpness and gently browned garlic for deeper, nuttier notes. The combination creates this incredible layered flavor that makes people close their eyes involuntarily when they taste it — I've seen it happen, it's like watching someone experience joy for the first time.
Butter Strategy: Instead of just melting butter and calling it a day, we're going to brown half of it for nutty complexity and leave half fresh for that rich silkiness. This creates a sauce that's both deeply flavorful and luxuriously smooth, coating each grain of rice like a buttery blanket that you'll want to wrap yourself in during winter.
Rice Revolution: The velvety rice isn't just a side dish — it's a co-star that deserves its own standing ovation. We're cooking it in the same pan after the chicken, letting it absorb all those gorgeous browned bits and sauce remnants. Every grain becomes this perfect vehicle for the honey garlic butter sauce, creating a one-pan situation that'll make you want to throw away all your other rice recipes.
Timing Magic: Most recipes have you cooking everything separately and then combining at the end, but we're building layers of flavor by using the same pan throughout. The chicken leaves behind these incredible fond bits that the rice soaks up, creating a dish that's way more complex than the sum of its parts. Plus, fewer dishes to wash, which means more time for that second helping.
Make-Ahead Champion: This dish actually gets better after sitting for a few hours — the flavors meld and deepen into something even more incredible. I've been known to make a double batch on Sunday and portion it out for the week, though honestly, it rarely lasts past Tuesday because people start "accidentally" eating it for breakfast.
Crowd Control: I've served this at everything from casual weeknight dinners to fancy dinner parties where people dressed up and used cloth napkins. It scales beautifully for a crowd, looks gorgeous on the plate, and has this magical ability to make everyone feel like you're an incredibly thoughtful host who planned something special just for them.
Inside the Ingredient List
The Flavor Base
The chicken thighs are the foundation of this whole operation, and here's where I'm going to get a little opinionated — thighs are non-negotiable. I've tried this with breast meat, and while it's perfectly edible, it lacks that rich flavor and stays juicy even if you accidentally overcook it. The fat content in thighs bastes itself from the inside out, staying tender while the outside gets crispy and golden. Look for boneless, skin-on if you can find them — the skin renders down and creates these incredible crispy bits that you'll fight over. If all you can find is boneless skinless, that's fine too, but do me a favor and keep the pieces nice and thick so they don't dry out.
Fresh garlic is absolutely essential here — none of that pre-minced stuff that tastes like disappointment and regret. We're using a whole head because we're worth it, and because different parts of this recipe need garlic at different stages. The fresh minced garlic goes in toward the end to keep that bright, sharp flavor, while we'll brown some separately for deeper notes. If you're one of those people who measures garlic with your heart rather than with measuring spoons, we're going to be great friends.
The Sweet and Sticky Crew
Honey is the star sweetener, but not just any honey — reach for something with character. Wildflower honey gives you these complex floral notes that pair beautifully with the garlic, while orange blossom honey adds this incredible citrusy perfume that'll make your kitchen smell like you've been cooking all day. Avoid the generic plastic bear stuff if possible — it's usually just corn syrup disguised as honey anyway. The honey goes through this incredible transformation when it hits the hot pan, bubbling and foaming like a tiny delicious volcano before settling into that perfect glossy finish.
Butter is where things get interesting — we're using both browned butter and fresh butter to create this incredible depth of flavor. The browned butter adds these nutty, caramel notes that make people ask "what is that amazing flavor?" while the fresh butter keeps everything silky and luxurious. Use good butter here, not the cheap stuff that tastes like you're eating a candle. European-style butter with higher fat content will give you an even richer sauce, but regular butter works beautifully too.
The Unexpected Star
Rice vinegar might seem like an odd addition, but trust me on this one — it cuts through the richness like a bright spotlight in a dark room. Just a splash at the end wakes up all the other flavors and keeps the sauce from being too cloying. It's like adding a squeeze of lemon to a rich pasta dish; you might not be able to identify it specifically, but you'd miss it if it wasn't there. If you don't have rice vinegar, you can use apple cider vinegar, but go easy — it's stronger and can take over if you're heavy-handed.
Sesame oil is my secret weapon for adding that restaurant-quality finish that makes people think you've been holding out on them with your cooking skills. Just a few drops at the very end transform the whole dish, adding this incredible nutty aroma that makes the honey and garlic taste like they're wearing tuxedos. Don't cook with it — heat kills the delicate flavor compounds — just drizzle it on right before serving and watch people's eyes light up when they smell it.
The Final Flourish
Green onions are more than just a pretty garnish — they add this fresh, sharp crunch that cuts through all the richness like a palate cleanser. The white parts get sprinkled on while the dish is still hot so they soften slightly, while the green parts stay bright and crisp. Save some of the darkest green bits for the very final sprinkle so they keep their color and texture. If green onions aren't your thing, chives work beautifully too, or even thinly sliced shallots if you want something with more bite.
Sesame seeds are the final jewelry for this dish — they add this delicate crunch and toasty flavor that makes each bite more interesting. Toast them lightly in a dry pan first (just until they start smelling amazing and turn golden) and they'll be ten times more flavorful than the raw ones. If you can't find sesame seeds, crushed peanuts or even slivered almonds can work in a pinch, though you'll lose some of that classic Asian-inspired flavor profile.
The Method — Step by Step
- Start by patting your chicken thighs absolutely dry with paper towels — I cannot stress this enough. Moisture is the enemy of browning, and we're going for maximum crispy edges here. Season them generously with salt and pepper on both sides, really pressing the seasoning into the meat so it adheres properly. Let them sit while you prep everything else; this gives the salt time to penetrate and season the meat all the way through. Heat your largest skillet over medium-high heat until a drop of water sizzles and evaporates immediately — this is your visual cue that the pan is properly preheated and ready to create magic.
- When the pan is screaming hot, add just enough oil to create a thin film — about a tablespoon should do it. Carefully lay the chicken thighs in the pan, skin-side down if they have skin, and don't you dare move them for at least four minutes. This is where the flavor foundation gets built; those gorgeous brown bits that form on the bottom of the pan are liquid gold, and they'll flavor everything that comes after. You'll know it's time to flip when the edges look golden and crispy, and the chicken releases easily from the pan without any tearing or sticking.
- Flip the chicken and continue cooking for another 3-4 minutes on the second side. You're not looking to cook them through completely here — we're just getting that beautiful color and flavor development. Transfer the chicken to a plate; they'll finish cooking later in the sauce, which keeps them incredibly juicy and ensures they don't dry out. Don't you dare wash that pan — those brown bits are about to become the backbone of the most incredible sauce you've ever tasted.
- Now for the fun part: lower the heat to medium and add your first batch of butter — about two tablespoons. Let it melt and start to foam, swirling the pan occasionally so it browns evenly. The moment it turns golden and smells like toasted nuts, add your minced garlic and stir constantly for about 30 seconds. This is where timing is everything — you want the butter browned but not burnt, and the garlic softened but not bitter. If it starts to smell acrid or look too dark, immediately remove from heat and keep stirring.
- Pour in your honey and watch the magic happen — it'll bubble up dramatically and start to caramelize around the edges. Resist the urge to stir constantly; let it sit for about 30 seconds so it can develop those complex caramel notes. Add the rice vinegar and watch as it deglazes the pan, lifting all those gorgeous browned bits into the sauce. The mixture will seize up slightly when the vinegar hits, but keep stirring and it'll smooth out into this glossy, amber-colored sauce that looks like liquid candy.
- Return the chicken to the pan, nestling each piece into the sauce so it can finish cooking and absorb all that incredible flavor. Lower the heat to medium-low and let everything simmer together for about 8-10 minutes, turning the chicken once halfway through. The sauce will thicken and become this gorgeous sticky glaze that coats each piece like edible lacquer. If it gets too thick, just splash in a tablespoon of water to loosen it up — you're looking for a consistency that coats the back of a spoon but still flows like warm caramel.
- While the chicken finishes cooking, start your rice in a separate pot using your favorite method — but here's the trick that's going to change everything: substitute half the water with chicken broth and add a generous pinch of salt. The rice will absorb all that savory flavor, creating the perfect neutral base for our sauce. Once it's cooked and fluffy, keep it warm while we create the final flourish that'll make this dish legendary.
- In the last two minutes of cooking, add your final tablespoon of cold butter to the sauce and swirl until it melts into glossy perfection. This is called mounting with butter, and it's what gives restaurant sauces that incredible velvety texture. Remove from heat and add your sesame oil, stirring just to combine — remember, we don't want to cook that delicate flavor away. Taste and adjust seasoning; you might want a pinch more salt to balance the sweetness, or a few cracks of black pepper for bite.
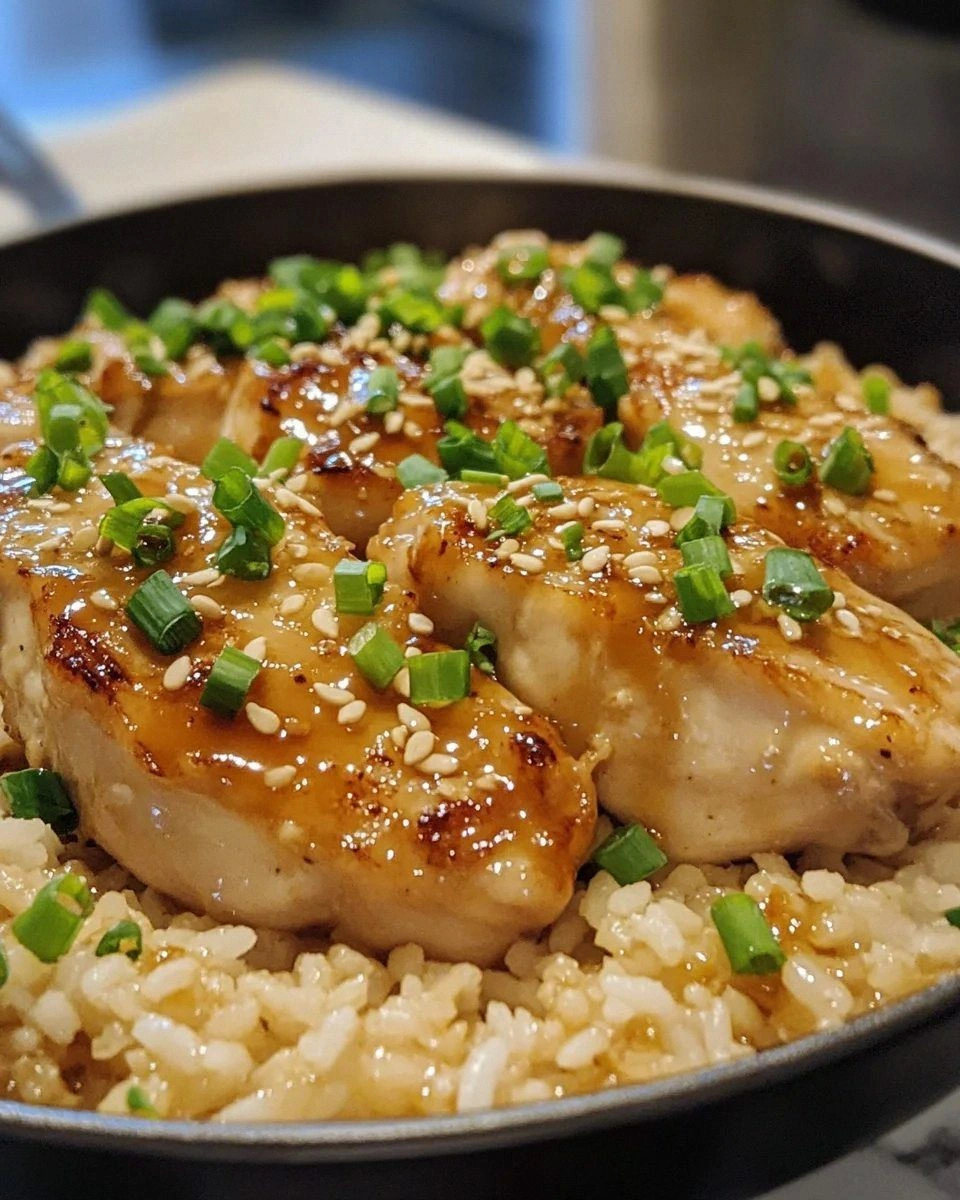
- Now for the grand finale: spoon that velvety rice onto serving plates, creating a fluffy bed for your gorgeous glazed chicken. Arrange the chicken pieces on top, then drizzle with every last drop of that incredible honey garlic butter sauce. Sprinkle with your toasted sesame seeds and both white and green parts of the green onions. Serve immediately while everything is still steaming and the sauce is at its glossy peak — this is not the time to let things sit around getting cold and sad.
That's it — you did it. But hold on, I've got a few more tricks that'll take this to another level...
Insider Tricks for Flawless Results
The Temperature Rule Nobody Follows
Here's where most home cooks go wrong: they cook everything at the same temperature. But honey has a very specific caramelization point — around 325°F — and if you go much hotter, it turns bitter and acrid. Start your chicken on medium-high heat for proper browning, but once you add the honey, back off to medium-low heat. This gives you that gorgeous caramel color without the burnt sugar bitterness that ruins so many honey-based dishes. Use your nose as much as your eyes — when it starts to smell like toasted marshmallows, you're in the sweet spot.
I learned this the hard way after ruining three batches in a row because I was cooking on high heat like I was in some kind of speed-cooking competition. A friend tried skipping this step once — let's just say it didn't end well, and she ended up ordering pizza while her smoke alarm serenaded the entire apartment building. The low and slow approach might test your patience, but it's the difference between restaurant-quality and "what did I do wrong?"
Why Your Nose Knows Best
Don't underestimate the power of aromatics in this dish. When your garlic hits the butter, it should smell amazing within 15 seconds — if it doesn't, your heat is too low or your garlic is past its prime. The honey should smell like warm flowers and caramel, never sharp or acrid. Trust your sense of smell as much as your eyes; it's often the first indicator that something is going wrong before you can see it. That moment when everything comes together and your kitchen smells like the best Asian restaurant you've ever been to? That's when you know you've nailed it.
The sesame oil test is another crucial moment — it should smell nutty and toasty, never rancid or flat. Good sesame oil has an incredible aroma that fills the room with just a few drops. If yours smells like old peanuts or has no scent at all, it's time for a new bottle. I keep mine in the fridge to preserve those delicate flavors, and it's worth buying smaller bottles more frequently rather than trying to use up a giant bottle that goes stale halfway through.
The 5-Minute Rest That Changes Everything
Here's a step that everyone skips but makes a massive difference: after you remove the chicken from heat, let it rest for five minutes before cutting into it. This allows the juices to redistribute throughout the meat instead of flooding your cutting board when you slice it. The sauce will thicken slightly as it cools, becoming even more glossy and clingy. Plus, this gives your rice time to steam and fluff up to its full potential. Use this time to set the table, pour yourself a drink, and bask in the anticipation of what's about to happen.
During this rest period, the chicken continues cooking gently from residual heat, so if you cut into it immediately, you're losing all that moisture and flavor you've worked so hard to build. I use this time to toast my sesame seeds if I haven't already, chop my green onions, and generally get everything ready for the grand finale. It's like the intermission before the big reveal, and trust me, the wait is always worth it.
The Rice Ratio Revelation
For the velvety rice that lives up to its name, use a ratio of 1 cup rice to 1.5 cups liquid, but here's the twist: replace half the liquid with the sauce from your chicken. This infuses every grain with that incredible honey garlic flavor and creates rice that's anything but boring. The starch from the rice helps thicken the sauce slightly, while the sauce flavors the rice in return. It's a symbiotic relationship that creates something greater than the sum of its parts. Rinse your rice first until the water runs clear — this removes excess starch that can make the final dish gummy.
The type of rice matters too — long-grain jasmine or basmati works best here because the grains stay separate and fluffy, creating more surface area for the sauce to cling to. Short-grain rice gets too sticky and can make the whole dish feel heavy. If you only have regular long-grain rice, that's fine too — just don't skip the rinsing step, and consider adding a bay leaf to the cooking water for extra flavor.
The Double Butter Technique
Mounting with cold butter at the end is a classic French technique that creates an emulsion so smooth and glossy it looks like liquid velvet. But here's what most recipes don't tell you: the butter needs to be cold, not just room temperature. Cold butter emulsifies better with the hot sauce, creating that incredible sheen that makes restaurant sauces look so appetizing. Cut it into small pieces so it melts quickly and evenly, and whisk constantly as you add it. The sauce should go from thin and separated to thick and glossy within seconds.
I keep a stash of frozen butter cubes in my freezer specifically for this technique — they melt even more slowly, giving you better control over the final consistency. If your sauce breaks and looks oily, you've either added the butter too quickly or your pan was too hot. Remove from heat and whisk in a tablespoon of warm water until it comes back together. This technique works on everything from pan sauces to soups, and once you master it, you'll never look at butter the same way again.
Creative Twists and Variations
This recipe is a playground. Here are some of my favorite ways to switch things up:
Spicy Honey Explosion
Add a tablespoon of gochujang or sriracha to the sauce for a sweet-spicy kick that'll make your taste buds do a happy dance. The fermented chili paste adds incredible depth and complexity that pairs beautifully with the honey. Top with sliced fresh chilies and extra sesame seeds for visual drama and textural contrast. This version is perfect for those who like their food with a little attitude and a lot of flavor. The spice cuts through the sweetness perfectly, creating this addictive balance that keeps people coming back for "just one more bite" until the whole pan is mysteriously empty.
Coconut Curry Dream
Replace half the butter with coconut milk and add a teaspoon of curry powder to the sauce. The coconut adds this incredible richness while the curry powder transforms the flavor profile into something that tastes like it came from a beachside restaurant in Thailand. Use coconut oil for browning the chicken and finish with fresh cilantro instead of green onions. This version is particularly amazing with jasmine rice and a squeeze of fresh lime right before serving. It's like taking your taste buds on vacation without leaving your kitchen.
Sesame Ginger Zing
Add two tablespoons of freshly grated ginger along with the garlic for a bright, zingy version that tastes incredibly fresh and energizing. The ginger adds this incredible warmth and complexity that makes the whole dish taste more sophisticated. Use toasted sesame oil more generously and finish with black sesame seeds for visual appeal. This variation is perfect for when you want something that tastes both comforting and invigorating at the same time. I've served this version at brunches and watched people who claimed they didn't like "sweet" dishes go back for thirds.
Orange Blossom Special
Use orange blossom honey and add the zest of one orange along with a splash of orange juice to create this incredible citrusy version that tastes like sunshine in food form. The orange notes pair beautifully with the honey and garlic, creating this bright, cheerful flavor that makes people smile involuntarily when they taste it. Finish with fresh orange segments and mint for a version that's perfect for summer dinner parties or when you need to pretend it's summer in the middle of winter. This one photographs beautifully for social media, if you're into that sort of thing.
Miso Marvel
Whisk a tablespoon of white miso paste into the sauce for an umami bomb that adds incredible depth and that mysterious "what is that amazing flavor" quality that keeps people guessing. The miso adds this incredible savoriness that makes the whole dish taste more complex and restaurant-quality. It's subtle but transformative — like adding a secret ingredient that makes everything taste better without being able to identify exactly what it is. This version keeps well and actually improves after a day in the fridge as the miso flavors develop and deepen.
Herb Garden Fresh
Add a handful of fresh herbs — basil, cilantro, and mint — right at the end for a version that tastes incredibly fresh and vibrant. The herbs add this incredible brightness that lifts the whole dish and makes it taste like something you'd eat in a garden restaurant in the Mediterranean. Use herb-infused oil for cooking the chicken and finish with herb flowers if you're feeling fancy. This version is perfect for when you want comfort food that doesn't feel heavy or when the weather is starting to warm up and you want something that tastes like spring.
Storing and Bringing It Back to Life
Fridge Storage
Store leftovers in an airtight container in the refrigerator for up to four days, though honestly, it rarely lasts that long in my house. The rice and chicken should be stored together so the rice can continue absorbing the sauce and flavors, but keep any extra sauce separate so you can add it when reheating. Let everything cool completely before storing — hot food in the fridge creates condensation that can make your rice soggy and sad. I like to portion it into individual containers for easy grab-and-go lunches that make coworkers jealous when you heat them up in the office microwave.
The sauce will thicken considerably when cold, almost to a honey-butter consistency, which is actually perfect for spreading on toast or stirring into hot rice. If you made extra sauce (which you should), store it in a jar and use it within two weeks. It solidifies into this incredible spread that's amazing on sandwiches, stirred into noodles, or even as a glaze for roasted vegetables. Just remember to let it come to room temperature before using — cold honey butter is delicious but hard to spread.
Freezer Friendly
This dish freezes beautifully for up to three months, making it perfect for meal prep or those nights when you need comfort food but don't want to cook. Freeze the chicken and rice separately for best results — the rice can get a bit mushy when frozen and thawed with the sauce. Use freezer-safe containers or bags, and squeeze out as much air as possible to prevent freezer burn. Label everything with the date and contents, because trust me, three months from now you won't remember if that container is honey garlic chicken or some mysterious curry experiment.
To thaw, transfer to the refrigerator overnight or use the defrost setting on your microwave if you're in a hurry. The sauce might separate slightly when thawed, but a quick reheat with a splash of water will bring it back together. If you're freezing just the sauce (which I highly recommend), freeze it in ice cube trays for perfect individual portions that thaw in minutes. Frozen sauce cubes are perfect for elevating quick weeknight meals or making instant fancy rice that tastes like you spent hours cooking.
Best Reheating Method
The key to reheating this dish is low and slow with a little added moisture. Add a tablespoon of water to the pan or container before reheating — this creates steam that helps rehydrate the rice and keeps everything from drying out. Microwave on 70% power in 30-second bursts, stirring between each burst, until everything is heated through. If reheating on the stove, use low heat and add a splash of water or chicken broth, stirring gently until everything is warm and the sauce is glossy again.
Never reheat at full power or high heat — this is how you end up with rubbery chicken and rice that's both mushy and crunchy in all the wrong ways. The sauce might look separated when cold, but it'll come back together beautifully with gentle heat and stirring. If you stored the sauce separately, warm it first and then drizzle it over the reheated chicken and rice for that fresh-made taste. And here's a pro tip: add a tiny pat of fresh butter when reheating — it brings back that just-cooked richness and makes everything taste like you made it fresh.