I still remember the day I ruined Thanksgiving dessert. There I was, covered in flour, staring at a collapsed pumpkin pie that looked like it had been sat on by an elephant. My sister-in-law took one bite of my backup cookies and politely suggested I stick to wine. Fast forward three years, and now I'm the person everyone begs to bring "those incredible pumpkin thingies" to every fall gathering. The twist? These aren't your grandma's pumpkin rolls or some fussy pastry that requires a culinary degree. They're the love child of a cinnamon roll and a palmier, with a pumpkin filling so addictive I once caught my neighbor eating it straight from the bowl with a spatula at 2 AM.
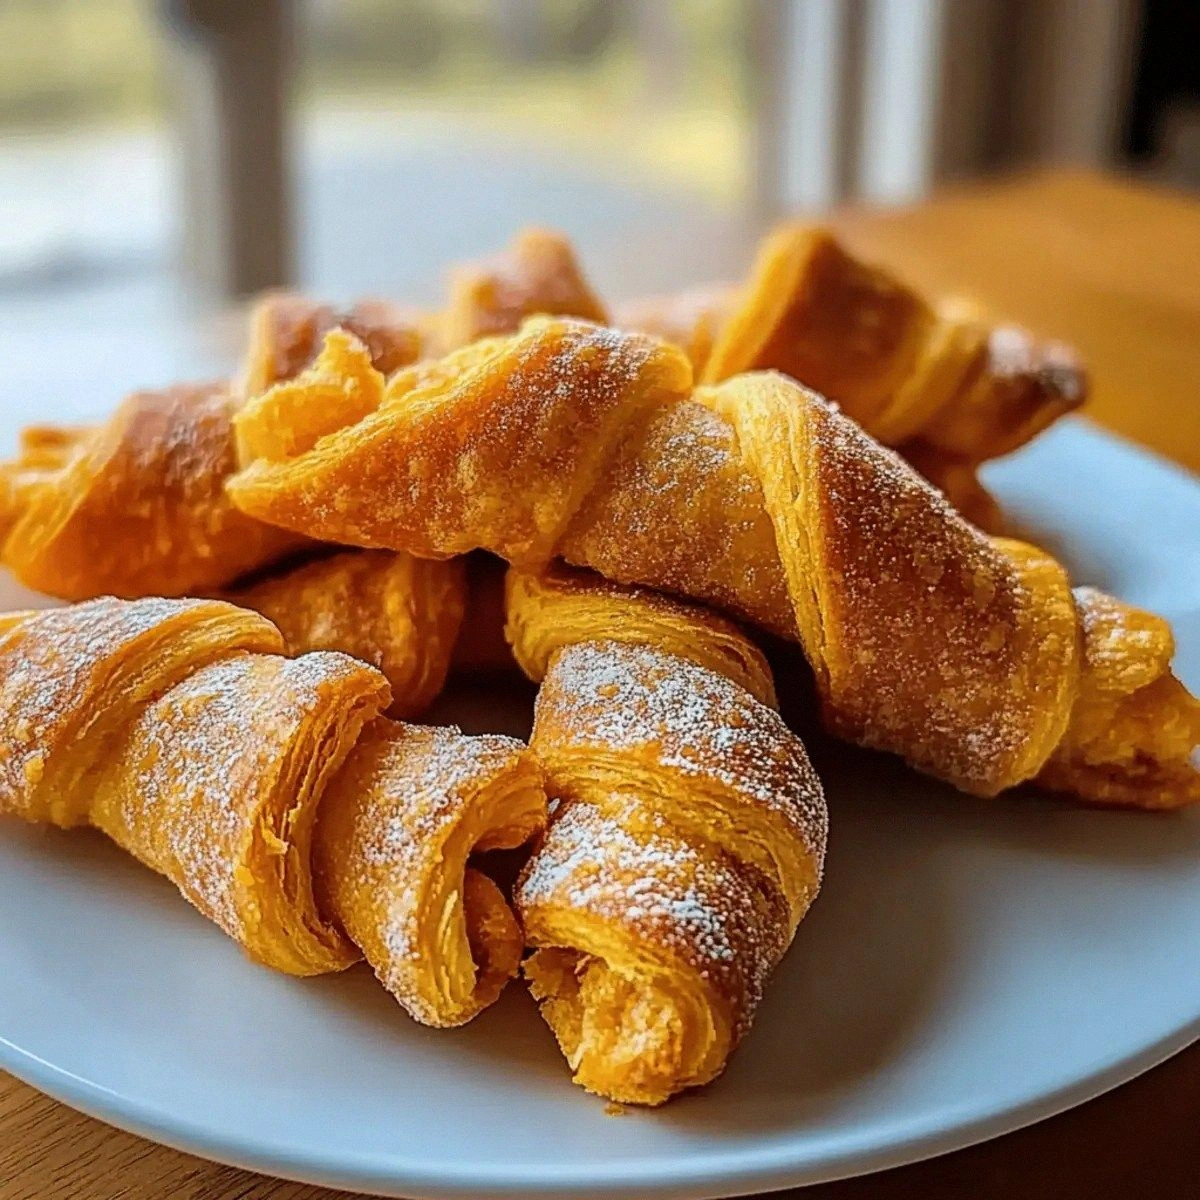
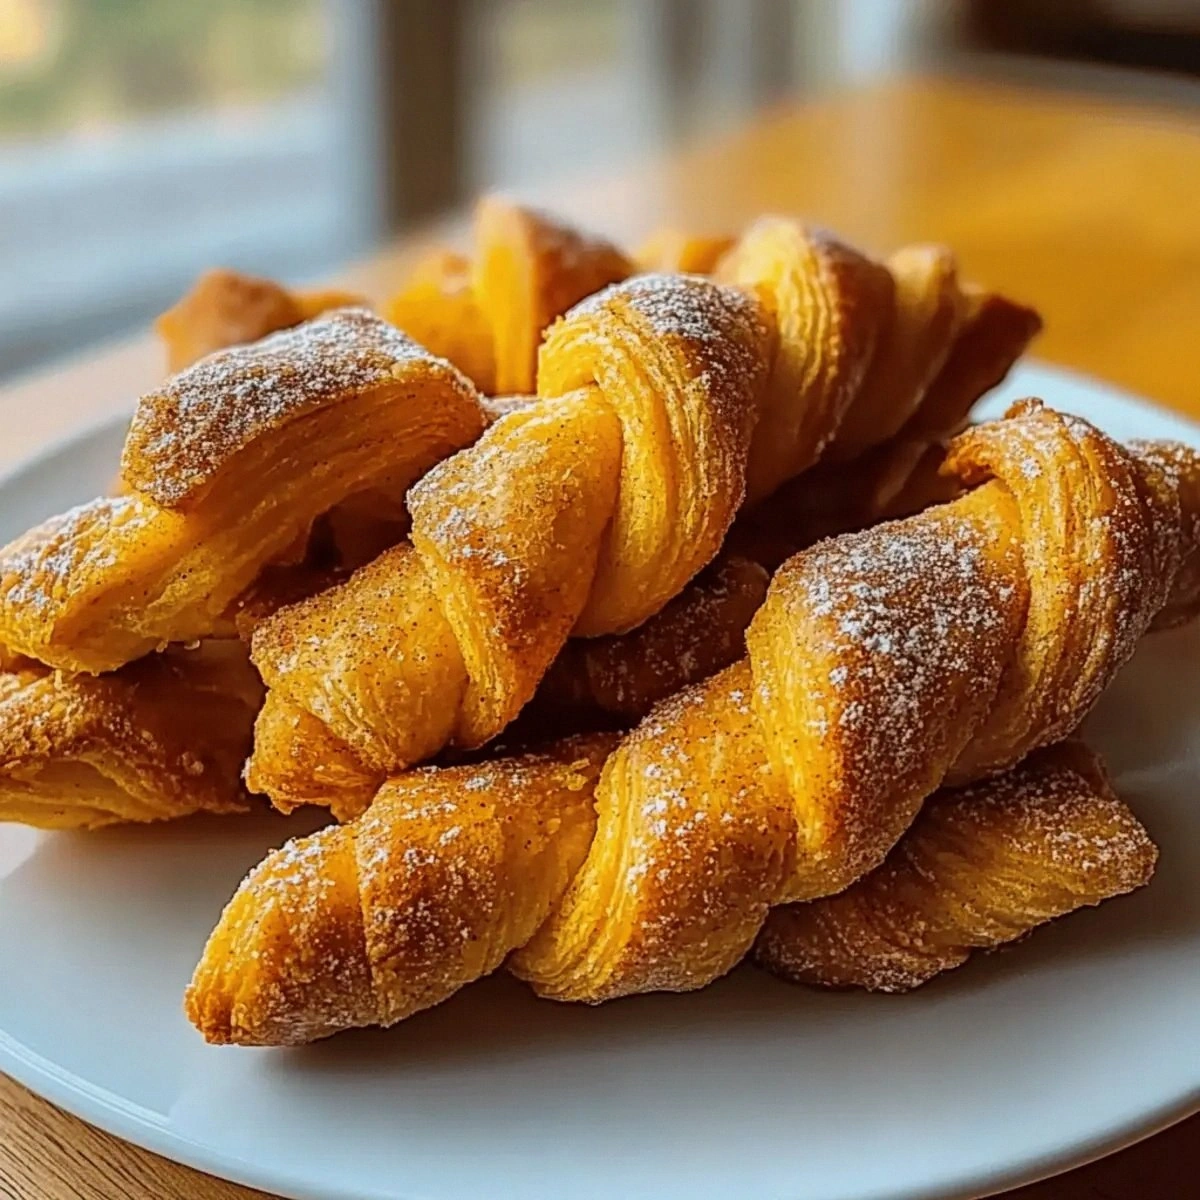
Picture this: golden puff pastry spirals that crackle like autumn leaves under your fork, revealing ribbons of spiced pumpkin so fragrant they make your entire kitchen smell like you've been hugged by a flannel blanket. The edges caramelize into delicate lace, while the centers stay lusciously creamy, creating this impossible contrast that has everyone fighting over the last piece. I dare you to taste these warm from the oven and not immediately start planning when you can make them again. The best part? They look like you spent hours slaving away, but they're easier than making toast once you know the secrets.
Most pumpkin desserts get it wrong — they're either too sweet, too bland, or have that weird gelatinous texture that makes you question your life choices. These twists solve every pumpkin dessert problem you've ever had. The filling hits that perfect balance where the pumpkin actually tastes like pumpkin, not just sugar with orange food coloring. The spices don't punch you in the face; they dance together like a perfectly choreographed waltz. And that texture? We're talking flaky layers that shatter into a thousand buttery shards, giving way to a warm, creamy center that makes grown adults close their eyes and sigh.
Okay, ready for the game-changer? The secret isn't in some exotic ingredient or complicated technique. It's about understanding how pumpkin behaves when it meets heat, sugar, and butter. Most recipes treat pumpkin like it's applesauce — just mix and bake. But pumpkin has this incredible ability to concentrate and intensify when you treat it right. I'm about to show you exactly how to coax out those deep, complex flavors that will make you swear off pumpkin spice lattes forever. Let me walk you through every single step — by the end, you'll wonder how you ever made it any other way.
What Makes This Version Stand Out
Flavor Bomb: While other recipes drown pumpkin in a tsunami of sugar, we let the vegetable (yes, it's technically a fruit, but let's not be that person at parties) speak for itself. The filling concentrates as it bakes, creating this incredible depth that tastes like pumpkin pie's sophisticated European cousin who studied abroad and came back with refined taste.
Texture Paradise: We're talking about layers so delicate they make croissants look clunky. The puff pastry creates these paper-thin strata that dissolve on your tongue, while the pumpkin filling sets into this custardy dream that makes you understand why people write poetry about food.
Weeknight Easy: Here's the beautiful truth — these look bakery-shop fancy but require zero special skills. If you can spread peanut butter on bread, you can make these twists. The puff pastry does all the heavy lifting while you take credit for being a pastry wizard.
Crowd Magic: I've served these at office parties where people who "don't like pumpkin" ended up hoarding them in napkins. They're the perfect size for grazing, they travel beautifully, and they reheat like champions. Plus, they make your house smell so good that your neighbors will find excuses to drop by.
Ingredient Integrity: We're using real pumpkin here, not that canned stuff that tastes like disappointment mixed with cinnamon. Okay, fine, you can use canned in a pinch (I won't tell), but I'm going to show you how to make even canned pumpkin taste like it came from your own garden.
Make-Ahead Wonder: These freeze before baking like absolute champs. Make a double batch on Sunday, freeze half, and you can have fresh-baked twists any weekday morning that'll make you feel like you've got your life together. Future you will thank present you profusely.
Seasonal Showstopper: They capture everything we love about fall without being basic about it. No artificial flavors, no neon orange color, no overwhelming spice that makes your tongue feel like it's been assaulted by a craft store. Just pure, honest autumn in pastry form.
Inside the Ingredient List
The Foundation Squad
Puff pastry is your canvas here, and quality matters more than you'd think. The cheap stuff from the bottom shelf behaves like cardboard that's been left in the rain — it puffs reluctantly and tastes like regret. Spring for the all-butter variety if you can find it; the flavor difference is like comparing a fast food burger to one grilled in your backyard. Keep it frozen until you're ready to use it, then let it thaw just enough to unfold without cracking. If you see any dark, oxidized spots, trim them off — they'll taste bitter and ruin your masterpiece.
The Flavor Powerhouses
Pumpkin puree is the star, but not all purees are created equal. The canned stuff works fine if you're in a hurry, but look for varieties that list only "pumpkin" as the ingredient. Some brands sneak in squash or add water, which gives you that weird, watery texture that makes pastry sad. If you're feeling ambitious, roast a sugar pumpkin yourself — cut it in half, scoop the seeds, roast cut-side down at 400°F for 45 minutes, then blend until smooth. The flavor is deeper, sweeter, and makes you understand why pumpkins became the fall mascot in the first place.
The Sweetness Balance
We're using two sugars here because they each bring something special to the party. Brown sugar adds that caramel, almost toffee-like depth that makes people ask "what's in these?" while granulated sugar provides clean sweetness that lets the pumpkin shine. The ratio is crucial — too much brown sugar and your filling tastes like someone spilled molasses in it. Too much white sugar and it's one-dimensional. We're after complexity, not a sugar coma.
The Spice Symphony
Cinnamon and nutmeg are the classic duo, but here's where most recipes go wrong — they use too much of everything. We're after subtlety here, not a spice rack explosion. Freshly grated nutmeg makes a difference you can taste; the pre-ground stuff tastes like pencil shavings. And please, for the love of all that's holy, don't use pumpkin pie spice. It's like using a sledgehammer when you need a feather — overwhelming and clumsy.
The Binding Agents
Vanilla extract might seem optional, but leaving it out is like forgetting to add bass to a song — everything feels off. It bridges the gap between the pumpkin and the sugar, creating this cohesive flavor that makes people unable to stop eating. The egg wash isn't just for pretty color (though it does give you that gorgeous golden shine). It creates a slight barrier that keeps the filling from making the pastry soggy, ensuring your twists stay crisp even after they've cooled.
Everything's prepped? Good. Let's get into the real action...
The Method — Step by Step
Start by clearing off your counter and grabbing a large cutting board. Unfold your puff pastry gently — if it cracks, let it sit for two minutes and try again. Using a sharp knife or pizza cutter, slice the sheet into eight equal strips, then cut those strips in half to make sixteen smaller rectangles. Don't stress about perfection here; slightly wonky twists taste just as good and add character. The key is working quickly so the pastry stays cold — if your kitchen is warm, pop the cut pieces in the freezer while you prep the filling.
In a medium bowl, whisk together the pumpkin puree, brown sugar, granulated sugar, cinnamon, nutmeg, and vanilla until it looks like autumn in edible form. The mixture should be thick but spreadable — if it's too thin, your twists will leak and burn. Give it a taste (I won't tell if you use a big spoon) and adjust the spices if needed. Some pumpkins are naturally sweeter than others, so trust your palate here. This filling should make you want to eat it with a spoon while standing in front of the fridge at midnight.
Now comes the fun part — assembly. Working with one rectangle at a time (keep the rest covered so they don't dry out), spread about a tablespoon of filling down the center, leaving a small border on all sides. Be tempted to overfill — resist that urge like you're resisting texting your ex. Too much filling will squeeze out during twisting and create a burnt sugar disaster on your baking sheet. Aim for a thin, even layer that just covers the center third of the pastry.
Pick up both ends of the rectangle and give it one gentle twist, like you're wringing out a towel. The goal is two to three twists max — any more and the filling starts escaping like prisoners from jail. Place it on a parchment-lined baking sheet, spacing them two inches apart because they puff dramatically. If any filling squishes out, wipe it away with a damp paper towel; exposed filling burns faster than your high school diary.
Beat your egg with a splash of water until it's completely smooth — no streaks of white or yolk should remain. Using a pastry brush (or a clean paintbrush in a pinch), gently paint the exposed pastry with a thin, even coat. This isn't just for color; it creates a protective seal that keeps the filling from seeping out and making everything sticky. Be careful not to let egg wash pool in the crevices — that's how you get those dark, overcooked spots that taste like disappointment.
Slide your baking sheet into a fully preheated 400°F oven and set your timer for 15 minutes. Don't peek for the first ten minutes — this is when the magic happens. The cold butter in the pastry hits the hot air and creates steam, which forces the layers apart. If you open the door, you release that precious steam and end up with dense, sad twists that taste like cardboard. Instead, enjoy the incredible smell that's about to fill your entire house.
Continue baking for another 12-15 minutes until the twists are deep golden brown and the filling looks set and slightly caramelized around the edges. They should have puffed dramatically and look like they're posing for a food magazine. The filling might bubble up slightly — that's perfect. Those caramelized edges are pure flavor gold and will make people fight over who gets the end pieces.
Remove from the oven and let them cool for exactly five minutes on the baking sheet. This is the hardest part because they smell incredible and you want to shove one directly into your mouth. But resist! The filling is basically molten lava at this point and will burn your tongue in ways that ruin the experience. Plus, this brief rest lets the layers set so they don't collapse when you move them.
Transfer to a wire rack if you have one, or a clean plate if you don't. They'll stay crisp for about an hour at room temperature, which is your serving window. After that, they start to soften but are still delicious — just pop them in a 350°F oven for five minutes to revive the crunch. Dust with powdered sugar if you're feeling fancy, or serve them naked and let the flavor speak for itself.
That's it — you did it. But hold on, I've got a few more tricks that'll take this to another level...
Insider Tricks for Flawless Results
The Temperature Rule Nobody Follows
Here's what separates the pros from the amateurs: temperature awareness. Your puff pastry should be cold enough that it feels firm but pliable — like a well-chilled stick of butter. Too warm and it becomes stretchy and refuses to puff; too cold and it cracks like your grandmother's china. Test it by gently pressing with your finger — it should leave a slight indentation but not feel soft. If you can leave a deep fingerprint, pop it back in the freezer for three minutes. This isn't being fussy; it's the difference between twists that rise like they're auditioning for Cirque du Soleil and ones that lie flat like they've given up on life.
Why Your Nose Knows Best
Forget timers — your nose is the most reliable tool in your kitchen. When these twists are nearly done, your house will start smelling like you've been hired to cater the best autumn wedding ever. It's this incredible mix of caramelized sugar, warm spices, and buttery pastry that makes neighbors knock on your door. The moment you catch yourself thinking "what is that amazing smell?" you've got about two minutes left. Trust this instinct — it's never wrong. My friend tried to rely solely on her timer once and ended up with twists that could've been used as hockey pucks.
The 5-Minute Rest That Changes Everything
I know I've mentioned cooling, but this bears repeating: those five minutes of rest aren't optional. They're when the magic happens — the steam trapped inside redistributes, the filling sets into that perfect custardy texture, and the layers achieve their final, shatteringly crisp state. Cut into them too early and you'll have a mess of collapsed pastry and runny filling. But wait too long and you'll miss that perfect warm temperature where the flavors are most vibrant. Set a timer and pace around the kitchen if you must, but don't cheat yourself out of perfection.
The Twist Technique That Prevents Disasters
When you're twisting, think gentle but confident — like you're wringing out a silk scarf, not a gym towel. The pastry should twist easily without tearing. If it starts to crack, you've twisted too tight. If it looks like a sad, flat ribbon, you haven't twisted enough. Aim for twists that look like they're holding hands but not strangling each other. And here's the pro tip: twist them on the baking sheet, not in your hands. This way, you don't stretch the pastry as you transfer them, and they keep their beautiful shape.
The Storage Secret That Keeps Them Amazing
These twists have a superpower — they reheat like they were just baked. The secret is in how you store them. Never, ever seal them in an airtight container while they're still warm. The trapped steam turns your crispy layers into sad, rubbery sheets that taste like they've been microwaved in plastic. Instead, let them cool completely, then store in a paper bag at room temperature for up to two days. When you're ready to serve, pop them in a 350°F oven for five minutes. They'll emerge just as crispy and delicious as day one, and you'll look like a wizard who can bend time and space.
Creative Twists and Variations
This recipe is a playground. Here are some of my favorite ways to switch things up:
The Savory Rebel
Swap the sweet filling for goat cheese mixed with caramelized onions and fresh thyme. Use the same twisting technique, but skip the egg wash and dust with everything bagel seasoning instead. These become the sophisticated cousin that shows up to brunch in designer sunglasses and makes everyone else feel underdressed. They're incredible with a glass of crisp white wine and make you look like you planned this sophisticated evening weeks ago.
The Chocolate Lover's Dream
Replace half the pumpkin with Nutella and add a pinch of espresso powder to the remaining pumpkin mixture. The coffee intensifies the chocolate while the pumpkin keeps things from being cloyingly sweet. These are dangerous — I've seen grown adults hide them from their children and claim they "accidentally burned the batch." The chocolate gets slightly gooey while the pastry stays crisp, creating this textural contrast that makes people close their eyes when they bite into them.
The Apple Orchard Special
Mix diced apples (the size of pencil erasers) into the pumpkin filling with a splash of apple brandy. The apples soften but maintain their shape, giving you these little bursts of fruit throughout. Add a crumble topping made from butter, flour, and brown sugar before baking. These taste like someone took the best parts of apple pie and pumpkin pie and created a super-dessert that should probably be regulated by the government.
The Tropical Escape
Add coconut milk to thin the pumpkin slightly, swap cinnamon for cardamom, and mix in some toasted coconut flakes. These transport you from autumn to a tropical beach where the biggest worry is whether your drink needs another umbrella. They're particularly amazing when you want to pretend it's not getting dark at 4 PM and your heating bill is higher than your grocery budget.
The Breakfast Champion
Mix cream cheese into the pumpkin filling and add maple syrup instead of some of the sugar. These become acceptable breakfast food because they have protein from the cream cheese, right? They're incredible with coffee and make getting out of bed on cold mornings slightly less painful. Plus, they reheat in the toaster oven while you're still trying to remember your own name.
The Holiday Showstopper
Add orange zest and a splash of orange liqueur to the filling, then drizzle with white chocolate that's been tinted green and red after baking. These look like Christmas ornaments and taste like someone bottled the holiday season into edible form. They're what you bring to the office party when you want to be known as the person who "really knows how to bake," not the person who brought store-bought cookies again.
Storing and Bringing It Back to Life
Fridge Storage
Despite what your grandmother told you, these twists do not need to live in the refrigerator. The cold actually makes the pastry weep and become soggy, like it's crying about its lost crispiness. Store them in a paper bag at room temperature for up to 48 hours. The paper absorbs excess moisture while letting them breathe. If your kitchen is particularly humid, you can add a piece of parchment paper inside the bag, but resist the urge to wrap them in plastic unless you enjoy eating things that taste like they've been left in a sauna.
Freezer Friendly
These twists are freezer superstars, but there's a right way and a wrong way. Freeze them after forming but before baking — arrange on a baking sheet, freeze until solid, then transfer to a freezer bag. They'll keep for up to three months and can go straight from freezer to oven, just add five extra minutes to the baking time. Already baked twists can be frozen too, but wrap them individually in parchment first, then foil. Thaw at room temperature for 30 minutes before reheating. Never microwave them unless you enjoy eating wet cardboard.
Best Reheating Method
The oven is your friend here — 350°F for five to seven minutes brings them back to their former glory. Add a tiny splash of water to the baking sheet before reheating; it creates steam that revives the pastry without making it soggy. If you're in a hurry, a toaster oven works too, but watch them like a hawk because they can go from perfect to burnt in under a minute. The air fryer is surprisingly effective — two minutes at 325°F and they emerge like they've been freshly baked. Just don't reheat them more than once or they start to taste tired, like they've been at a party too long.