I still remember the night I tried to impress a group of friends with a “simple” Halloween dessert, only to end up with a soggy mess that looked more like a swamp than a celebration. The kitchen was filled with the sound of frantic whisking, the smell of burnt sugar, and my own nervous laughter as I realized I had completely misread the recipe. I swear, the moment I lifted the lid on that flat, color‑less sponge, I felt the weight of a culinary betrayal—until I decided to start over, armed with a notebook, a dash of stubbornness, and a secret technique I’d been saving for a special occasion. That night, I vowed to create a Swiss roll that could stand up to the spookiest of Halloween parties, a roll that would be as bold in flavor as it is terrifyingly beautiful.
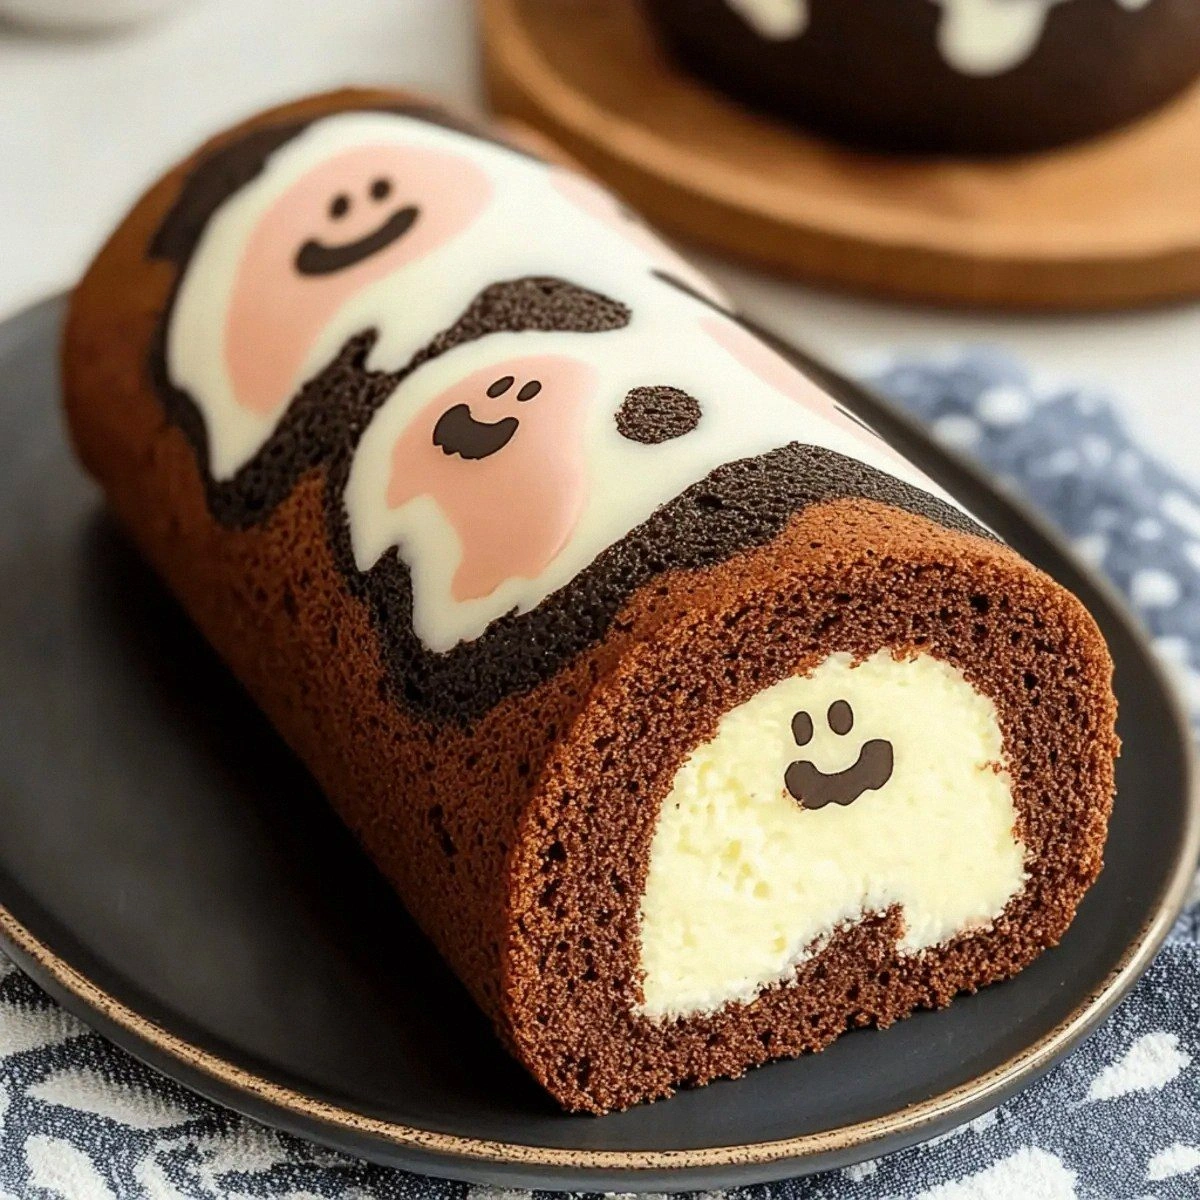
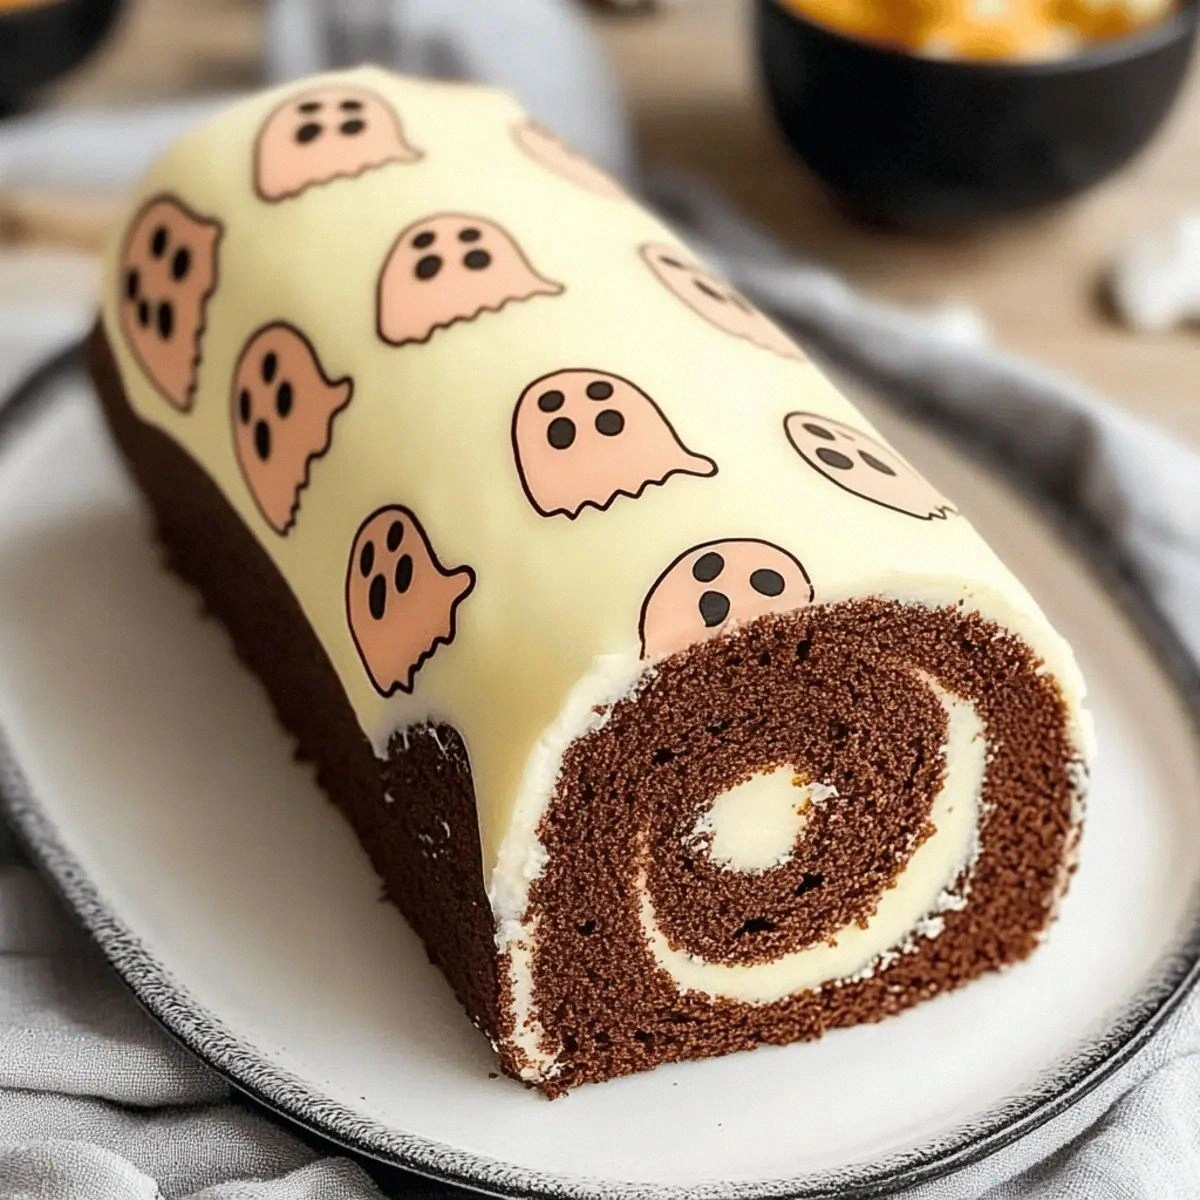
Picture this: a soft, buttery cake sheet tinted the perfect shade of midnight black, rolled around a cloud of silky, pink‑tinged whipped cream that looks like a ghost drifting through a moonlit graveyard. The aroma that wafts from the oven is a seductive blend of cocoa and vanilla, punctuated by a whisper of buttery richness that makes your nostrils do a little happy dance. When you slice into it, the interior reveals a ribbon of pink cream that swirls like a spectral river, and the outer crust cracks just enough to give that satisfying, slightly crisp edge that says “I’m made with love, not shortcuts.” I dare you to taste this and not go back for seconds—because once you’ve had a bite, the rest of the night will feel like a sweet after‑glow that outshines any jack‑o‑lantern.
Most Swiss roll recipes get the texture wrong: they’re either too dry, too soggy, or they crumble like old parchment when you try to roll them. This version, however, uses a precise balance of cake flour, butter, and a secret splash of milk that keeps the sponge tender while still giving it enough structure to hold the haunted filling. The pink and black food coloring isn’t just for show; it creates a visual contrast that makes the cake look like a midnight sky streaked with phantom clouds. And the thickened cream, whipped with vanilla bean paste, adds a luxurious mouthfeel that’s richer than any store‑bought frosting, turning each bite into a velvet‑smooth experience.
Okay, ready for the game‑changer? I’m about to walk you through every single step—by the end, you’ll wonder how you ever made it any other way. From the exact temperature that makes the batter rise like a ghost from the grave, to the trick of using parchment paper to achieve a flawless roll, I’ve packed this guide with the kind of insider knowledge that usually only seasoned pastry chefs whisper about. Stay with me here — this is worth it, and the payoff? A Halloween centerpiece that will have your guests chanting for an encore.
What Makes This Version Stand Out
- Flavor Explosion: The cocoa‑infused sponge paired with vanilla‑kissed pink cream creates a dual‑flavor profile that feels like a midnight treat and a sunrise all at once.
- Texture Harmony: A tender, airy interior meets a lightly crisp outer edge, giving you that perfect bite‑and‑crunch sensation that most rolls lack.
- Simplicity Redefined: Despite the dramatic appearance, the ingredient list is short, and the steps are straightforward—no fancy equipment needed.
- Visual Drama: The pink and black swirl isn’t just eye candy; it plays into the Halloween theme, making the cake a conversation starter before the first fork hits.
- Crowd Reaction: I’ve watched grown‑ups turn into kids again, eyes widening as the roll is sliced, and the room filling with “Wow!” and “More, please!”
- Ingredient Quality: Using cake flour instead of all‑purpose gives the sponge a finer crumb, while real vanilla bean paste adds depth you can’t fake.
- Cooking Method: The gentle oven temperature and parchment‑paper roll technique keep the cake from cracking, a common pitfall in other recipes.
- Make‑Ahead Magic: The roll can be assembled a day ahead, allowing the flavors to meld, which means less stress on the big night.
Inside the Ingredient List
The Flavor Base
The foundation of any great Swiss roll is the batter, and here the star is cake flour. Unlike regular flour, cake flour has a lower protein content, which means less gluten formation and a softer crumb. If you substitute all‑purpose flour, expect a denser texture that won’t roll as gracefully. For the best results, sift the flour twice—this aerates it and prevents lumps, ensuring a uniformly light sponge. A pro tip: buy a small bag of “cake flour” from the baking aisle and store it in an airtight container; it stays fresh longer and keeps your rolls consistently fluffy.
The Texture Crew
Butter and vegetable oil work together to give the cake its buttery flavor while keeping the crumb moist. The butter adds richness, while the oil prevents the cake from becoming too dense. If you’re looking for a dairy‑free version, replace the butter with an equal amount of coconut oil, but expect a subtle coconut note that can actually complement the chocolate. Egg yolks provide structure and color, and the separation of yolks from whites lets you control the rise and the silkiness of the batter. Skipping the yolks will result in a pale, flat cake that can’t hold the filling without cracking.
The Unexpected Star
The pink and black food coloring might seem purely decorative, but they also influence the psychological perception of flavor. The deep black hints at cocoa richness, while the pink evokes sweetness and playfulness. Use gel colors rather than liquid to avoid adding extra moisture to the batter. If you don’t have gel, a few drops of concentrated food‑grade liquid will do, but add them sparingly. And remember, a little goes a long way—over‑coloring can make the cake taste metallic.
The Final Flourish
Thickened cream and vanilla bean paste are the heroes of the filling. Whipping the cream with vanilla bean paste creates a luxurious, stable mousse that holds its shape even after the roll is sliced. If you’re short on thickened cream, you can substitute heavy whipping cream and add a teaspoon of gelatin dissolved in warm water to stabilize it. The vanilla bean paste provides real vanilla specks, delivering a depth of flavor that vanilla extract simply can’t match. For a dairy‑free twist, use chilled coconut cream and a splash of almond extract for a comparable richness.
Everything's prepped? Good. Let's get into the real action...
The Method — Step by Step
Preheat your oven to 180°C (350°F) and line a 30×40 cm (12×16 in) jelly roll pan with parchment paper. The parchment should hang over the short sides by about 2 inches so you can lift the cake out later without tearing. Lightly grease the parchment with a dab of butter, then dust with a thin layer of flour; this prevents sticking and gives the cake a subtle crust. Pro tip: placing the pan on a middle rack ensures even heat distribution, which is crucial for a uniform rise.
In a medium bowl, whisk together the 60 g cake flour, 40 g cocoa powder, and a pinch of salt. Sift this mixture twice to eliminate any lumps. The cocoa adds depth, while the flour gives the structure; together they create a batter that’s both airy and chocolatey.
Kitchen Hack: Use a fine mesh sieve to sift; it also aerates the cocoa, preventing clumps that could ruin the smooth texture.Separate the eggs: place the 2 large egg whites in a clean, dry bowl, and the 3 large egg yolks in another. Add 100 g white sugar (I) to the yolks and whisk until the mixture becomes pale and creamy, about 2 minutes. In a separate clean bowl, beat the egg whites until frothy, then gradually add 50 g icing sugar, continuing to whisk until stiff peaks form. This aerated foam is the secret to a light, springy sponge that rolls without cracking.
Gently fold the yolk‑sugar mixture into the whipped egg whites, using a spatula and a gentle lifting motion. This technique preserves the air bubbles, which are essential for the cake’s lift. Once combined, sift the flour‑cocoa blend over the egg mixture in three additions, folding after each addition until just incorporated. Over‑mixing will develop gluten and make the cake tough—resist the urge to stir vigorously.
Add 30 g melted butter, 50 ml vegetable oil, and 120 ml milk to the batter, drizzling slowly while folding. The liquid should stream in a thin ribbon, not a flood; this ensures the batter stays glossy and smooth. At this point, add a few drops of black food coloring—just enough to give the batter a deep midnight hue.
Watch Out: Too much liquid will make the batter runny and cause the cake to spread thin, losing that perfect roll height.Pour the batter onto the prepared parchment, spreading it evenly with a spatula. The batter should be about 5 mm thick; if it looks thicker, gently tap the pan on the counter to level it. Slide the pan into the oven and bake for 12‑14 minutes, or until the surface springs back when lightly touched and a toothpick inserted in the center comes out clean. The edges will start pulling away from the parchment—this is your visual cue that the cake is ready.
While the cake bakes, whip 300 ml thickened cream with 1 tbsp vanilla bean paste and 40 g white sugar (II) until soft peaks form. Add a few drops of pink food coloring, then continue whipping to stiff peaks. The pink hue should be soft, like a sunrise behind a haunted house, not neon.
Kitchen Hack: Chill the mixing bowl and whisk before whipping; the cold metal helps the cream reach peak faster and stay stable.When the cake is done, remove it from the oven and immediately invert the pan onto a clean kitchen towel dusted with powdered sugar. Gently peel off the parchment, then roll the warm cake together with the towel, starting from the short side. This steam‑roll technique sets the shape without cracking. Let the rolled cake cool completely while still wrapped in the towel—this prevents the sponge from shrinking.
Once cool, unroll the cake gently, spread a generous layer of the pink whipped cream, then re‑roll without the towel. Use a serrated knife to slice the roll into 1‑inch thick slices, arranging them on a serving platter. For extra drama, drizzle a thin ribbon of melted chocolate and sprinkle a pinch of edible silver glitter. The final reveal should look like a ghostly spiral emerging from a dark abyss—pure Halloween magic.
That’s it — you did it. But hold on, I've got a few more tricks that'll take this to another level. The next sections will show you how to fine‑tune the texture, store the roll for later, and even twist the flavors for future parties. Trust me, once you master this, you’ll never settle for a bland dessert again.
Insider Tricks for Flawless Results
The Temperature Rule Nobody Follows
Never bake a Swiss roll at a temperature higher than 190°C; the heat will cause the batter to set too quickly, leading to a dry interior. A lower, steadier heat allows the air bubbles from the egg whites to expand gently, giving the cake its signature lift. I once cranked the oven to 200°C to “speed things up,” and the result was a rubbery slab that refused to roll. The trick is to pre‑heat your oven fully, then drop the temperature by 10°C after the first 5 minutes; this creates a gentle “second‑rise” that makes the sponge ultra‑tender.
Why Your Nose Knows Best
Your sense of smell is a more reliable indicator of doneness than a timer. When the cake is nearly done, you’ll notice a faint nutty aroma from the cocoa and butter mingling—this is the moment to start checking. If you still smell raw egg, give it another minute; if the scent is sweet and caramel‑like, the cake is ready. Trusting your nose saved me from a half‑baked disaster more times than any thermometer could.
The 5‑Minute Rest That Changes Everything
After rolling the warm cake with the towel, let it rest for exactly five minutes before unrolling. This brief pause lets the gluten relax, preventing the sponge from snapping back and cracking when you spread the filling. I once skipped this rest and the cake split like a broken bone, ruining the presentation. Set a timer, sip a coffee, and enjoy the anticipation—your patience will be rewarded with a flawless roll.
The Cream Stabilizer Secret
If you’re planning to make the roll ahead of time, add a pinch of cream of tartar to the whipped cream before whipping. This acid stabilizes the foam, keeping it from weeping or separating overnight. A friend tried to skip this step once, and the filling turned watery, soaking the cake like a soggy sponge. A tiny pinch (about ¼ tsp) is all you need for a firm, glossy finish.
The Final Glaze Glimmer
For that extra spooky shine, melt 30 g dark chocolate and drizzle it over the sliced roll just before serving. The chocolate sets quickly, forming a thin, glossy veil that catches the light like a spider’s web at dusk. If you want a matte look, dust the roll with cocoa powder instead. Either way, the glaze adds a textural contrast that makes each bite feel luxurious.
Creative Twists and Variations
This recipe is a playground. Here are some of my favorite ways to switch things up:
Midnight Mocha Madness
Replace half of the cocoa powder with finely ground espresso beans and add a tablespoon of instant coffee to the cream. The result is a deep, dark mocha that pairs perfectly with the pink cream, creating a night‑and‑day flavor contrast that will wow coffee lovers.
Pumpkin Patch Surprise
Swap 30 ml of the milk for canned pumpkin puree and add a pinch of pumpkin spice to the batter. Color the filling with orange food coloring instead of pink, and garnish with candied pumpkin seeds. This variation is perfect for a Halloween‑themed brunch.
White Chocolate Ghost
Melt 50 g white chocolate and fold it into the whipped cream along with a dash of almond extract. The white chocolate adds a buttery richness that complements the dark sponge, while the almond note adds a subtle, nutty depth.
Berry Blood Burst
Stir a handful of fresh raspberry purée into the pink whipped cream and swirl it through the roll before the final roll. The tartness of the berries cuts through the sweetness, and the speckles of red create a “bloody” visual effect that’s perfect for a horror night.
Spiced Chai Whisper
Infuse the milk with a chai tea bag before adding it to the batter, and sprinkle a pinch of ground cardamom into the cream. The aromatic spices bring an exotic twist that feels warm and comforting, contrasting with the spooky aesthetic.
Storing and Bringing It Back to Life
Fridge Storage
Wrap the rolled cake tightly in plastic wrap, then place it in an airtight container. It will stay fresh for up to 3 days, with the cream retaining its fluffiness. If you notice the surface drying out, lightly brush the outer layer with a teaspoon of milk before resealing.
Freezer Friendly
For longer storage, freeze the unfilled sponge sheets individually wrapped in parchment, then place them in a zip‑top bag. They keep for up to 2 months. When you’re ready to use them, thaw at room temperature for 30 minutes, then assemble with fresh whipped cream. This method ensures the sponge never absorbs excess moisture from the freezer.
Best Reheating Method
To revive a refrigerated roll, preheat your oven to 150°C (300°F), place the slice on a baking sheet, and add a tiny splash of water (about a teaspoon) to the edge of the slice. Cover loosely with foil and heat for 5‑7 minutes. The steam generated by the water restores the cake’s softness, while the gentle heat revives the chocolate glaze without melting it.