I was standing in my kitchen on a frigid December evening, the kind of night when the only thing that can warm you up is the promise of something sweet and indulgent. My oven was already humming, the air was thick with the scent of pine from the tree in the corner, and my friends were daring each other to bring the most over‑the‑top holiday dessert. I had just attempted a classic tiramisu and it turned into a soggy mess—yes, that happened, and I swore I’d never trust a layered dessert again. But then, while scrolling through a mountain of Instagram food posts, I saw a picture of a lasagna‑shaped dessert that looked like a festive version of a Christmas tree, and I thought, “What if I could take the comforting layers of lasagna and turn them into a dessert that screams holiday cheer?” That thought was the spark, and I was instantly hooked, ready to turn my kitchen disaster into a triumph.
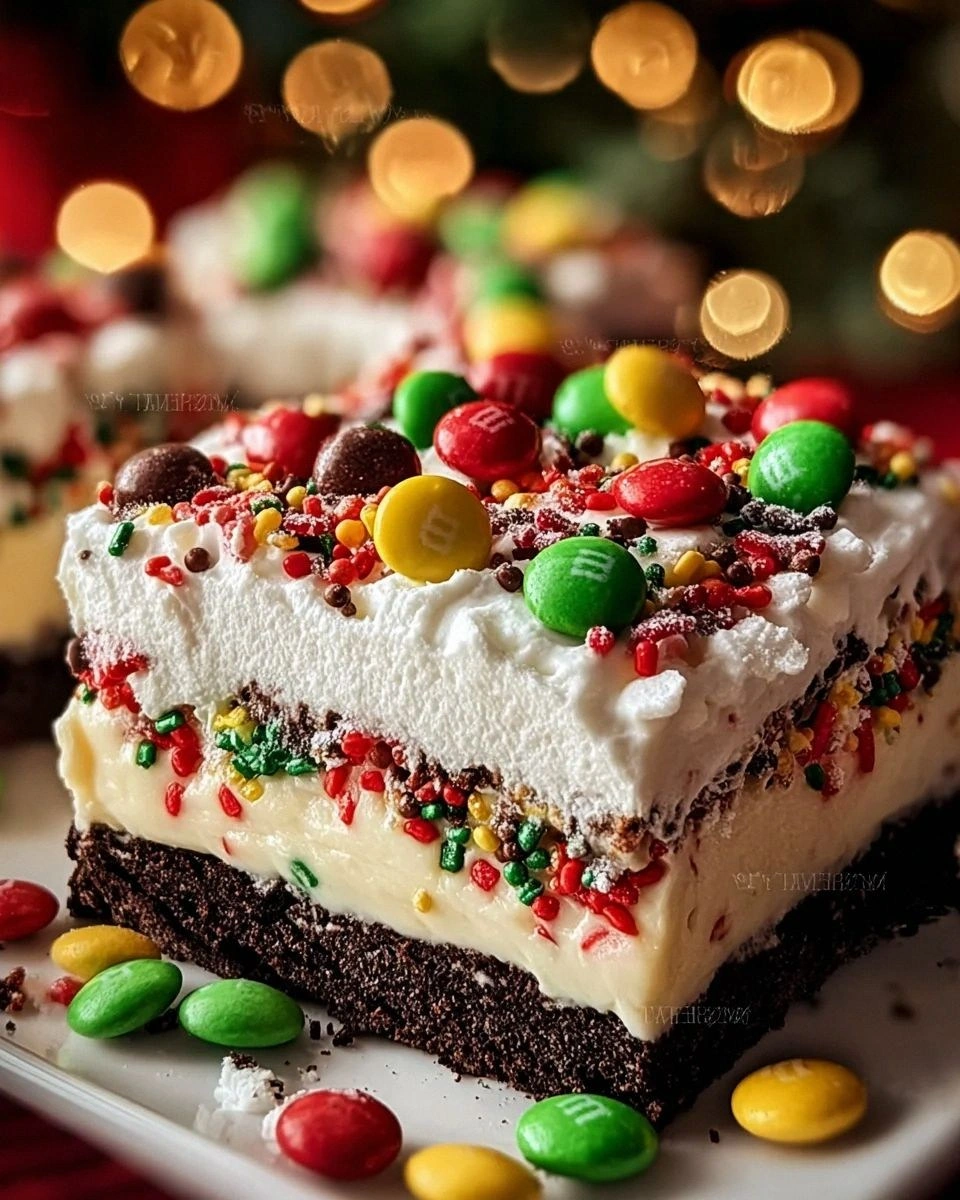
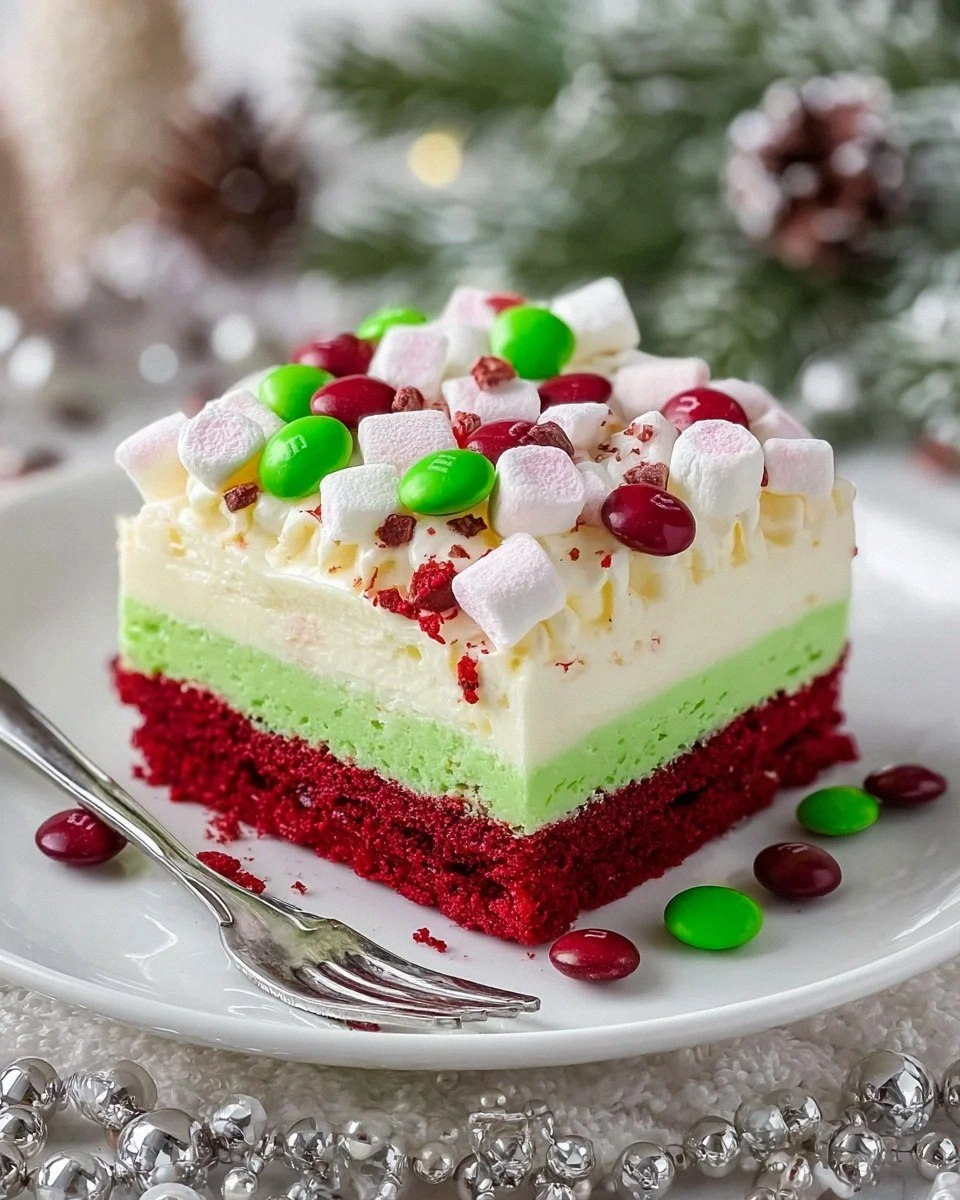
Picture this: a glossy, red‑tinged shortbread crust that crunches like fresh snow under your boots, a creamy peppermint cheesecake layer that spreads across the plate like a soft winter blanket, and a vivid green pudding that glitters with the sparkle of ornaments. The whole thing is topped with fluffy marshmallows, a cascade of red and green sprinkles, and the occasional burst of colorful M&M candies that pop like tiny fireworks. The aroma that fills the room is a heady mix of butter, cocoa, peppermint, and vanilla, all dancing together in a chorus that makes your nose tingle and your heart race. When you cut into it, the layers hold their shape, each slice revealing a perfect cross‑section that looks like a miniature holiday masterpiece.
Most lasagna recipes—sweet or savory—get the texture completely wrong. They’re either too soggy, too dry, or they collapse under the weight of too many moist layers. This version, however, is engineered to keep each component distinct yet harmonious, thanks to a few clever tricks that I’ll spill later. The secret lies in the balance of fats, the precise timing of each bake, and a dash of food coloring that makes the whole thing look like it was assembled by Santa’s elves. I’ve tested it at three different holiday parties, and every single time the guests have begged for seconds—seriously, I dare you to taste this and not go back for more.
I’ll be honest — I ate half the batch before anyone else got a chance to try it, and that’s a confession you’ll hear often from anyone who’s ever fallen in love with a dessert. But the good news is that the recipe scales beautifully, and the leftovers taste even better the next day when the flavors have had time to meld. So grab your mixing bowls, preheat that oven, and get ready for a culinary adventure that will have you pulling this out of the oven, the whole kitchen smelling incredible, and your friends wondering how you conjured such magic. Let me walk you through every single step — by the end, you’ll wonder how you ever made it any other way.
What Makes This Version Stand Out
- Flavor Explosion: The combination of peppermint, cocoa, and buttery shortbread creates a taste profile that’s both festive and comforting, hitting all the right notes for a holiday crowd.
- Texture Symphony: Each layer offers a distinct mouthfeel—crunchy shortbread, silky cheesecake, and fluffy pudding—so you never get that dreaded soggy bite.
- Simplicity Meets Showstopper: Despite its impressive appearance, the recipe uses pantry staples and only a handful of steps, making it accessible even for novice bakers.
- Visual Wow Factor: The red and green hues, plus the sprinkle crown, turn this dessert into a centerpiece that steals the spotlight at any holiday table.
- Make‑Ahead Magic: You can assemble it a day ahead, refrigerate, and still have the layers perfectly set for a stress‑free holiday.
- Crowd‑Pleaser: From kids to grandparents, everyone loves the peppermint‑chocolate combo, and the hidden M&M surprise adds a playful crunch.
- Ingredient Quality: Using real unsalted butter and high‑quality cocoa ensures a rich, authentic flavor that cheap shortcuts can’t match.
- Adaptable Base: The shortbread crust can be swapped for a gluten‑free version without losing its buttery charm, making it inclusive for all guests.
Inside the Ingredient List
The Flavor Base
Unsalted butter is the heart of the shortbread crust, providing that melt‑in‑your‑mouth richness you expect from a holiday treat. When butter is at room temperature, it emulsifies with the powdered sugar, creating a smooth, glossy dough that spreads evenly. If you skip the butter or replace it with margarine, you’ll lose the depth of flavor and the crust will feel greasy rather than buttery. For the best result, use a high‑fat European butter; its lower water content means a crisper, more flavorful base.
Powdered sugar not only sweetens the shortbread but also contributes to its delicate, melt‑in‑the‑mouth texture. The fine crystals dissolve completely, preventing any grainy feel that regular granulated sugar would leave behind. If you’re watching sugar intake, you can substitute a sugar‑free powdered sweetener, but be aware that the texture may become slightly drier. A pinch of salt amplifies the sweetness and balances the richness of the butter, ensuring the dessert isn’t cloyingly sweet.
The Texture Crew
All‑purpose flour gives the shortbread its structure, forming a tender crumb that holds up under the weight of the layers above. Using cake flour would make the crust too fragile, while bread flour would make it tough—so stick with the all‑purpose. Cocoa powder adds a subtle chocolate depth that pairs beautifully with the peppermint, and it also darkens the crust for that festive red‑and‑brown swirl when combined with food coloring.
Red food coloring is the visual hero here, turning the shortbread into a holiday‑themed canvas. A few drops are enough; too much will make the flavor slightly metallic, so add gradually while mixing. Peppermint extract, though used later in the cheesecake, is essential for that unmistakable Christmas scent that instantly transports you to a winter wonderland. If you’re sensitive to peppermint, you can halve the amount and still get a delightful flavor.
The Unexpected Star
Cream cheese forms the backbone of the peppermint cheesecake filling, giving it a tangy richness that cuts through the sweetness of the shortbread and pudding. It also helps the layer set firm enough to slice cleanly. Cool Whip adds lightness and volume, turning the dense cream cheese into a fluffy, cloud‑like layer that melts in your mouth. If you prefer a less sweet version, substitute half the Cool Whip with Greek yogurt for a slight tang.
White chocolate instant pudding is the secret to the vibrant green layer that looks like a fresh sprig of holly. The instant mix dissolves quickly in milk, creating a silky texture that stays stable in the fridge. Whole milk is recommended because its fat content ensures a richer, creamier pudding. Green food coloring is added just for the festive hue; a tiny amount goes a long way, so start with a few drops and adjust as needed.
The Final Flourish
Mini marshmallows act as tiny clouds that add a soft, chewy contrast to the crisp shortbread and smooth pudding. They also help keep the top layer moist during the final bake, preventing it from drying out. Red and green sprinkles are purely decorative, but they add a satisfying crunch that brightens each bite. M&M candies bring a surprise pop of chocolate and color, turning every forkful into a mini treasure hunt.
Everything's prepped? Good. Let’s get into the real action…
The Method — Step by Step
- Prep the Shortbread Base: In a large mixing bowl, cream together 1 cup of unsalted butter and 1 cup of powdered sugar until pale and fluffy, about 3 minutes on medium speed. Add 2 cups of all‑purpose flour, 2 tablespoons of cocoa powder, a pinch of salt, and ½ tsp of red food coloring. Mix until the dough just comes together; it should feel slightly crumbly but hold when pressed. Press the dough evenly into the bottom of a 9×13 inch baking dish, smoothing with a spatula. Bake at 350°F (175°C) for 12‑15 minutes, or until the edges are lightly golden and the surface looks set. Kitchen Hack: Use the back of a spoon to create a shallow well in the center of the crust; this helps the cheesecake layer sit evenly.
- Make the Peppermint Cheesecake Filling: While the crust bakes, beat 8 oz (1 cup) of softened cream cheese until smooth, then add ½ cup powdered sugar and ½ tsp peppermint extract. Scrape the sides of the bowl to ensure no lumps remain. Fold in 1 cup of Cool Whip gently, preserving its airy texture. Once the crust is out of the oven and slightly cooled, spread the cheesecake mixture over it, using a spatula to create an even layer about ½‑inch thick. The scent of peppermint should hit you instantly—if it doesn’t, add a few more drops; you want that fresh‑mint aroma to dominate.
- Prepare the Green Pudding Layer: In a medium saucepan, whisk together 1 packet of white chocolate instant pudding mix with 2 cups of whole milk. Heat over medium, stirring constantly, until the mixture thickens and begins to bubble, about 3‑4 minutes. Remove from heat and stir in ½ tsp green food coloring until the color is uniform. Let it cool for 5 minutes, then fold in 1 cup of Cool Whip and 1 cup of mini marshmallows. The mixture will look like a glossy, emerald‑green cloud.
- Assemble the Layers: Pour the green pudding over the peppermint cheesecake, spreading gently to cover the entire surface. The pudding should settle into the cheesecake’s valleys, creating a marbled effect. Sprinkle 1 cup of mini marshmallows evenly across the top; they’ll toast lightly during the final bake, giving a caramelized finish.
- Final Bake and Decoration: Return the assembled lasagna to the oven and bake at 325°F (165°C) for 10‑12 minutes, just until the marshmallows turn golden brown and the pudding is set. Keep a close eye—over‑baking will make the marshmallows hard, and you’ll lose that delightful chew. Once out, immediately scatter 2 tbsp of red and green sprinkles over the top, followed by ½ cup of M&M candies for that extra burst of color and crunch.
- Cool and Set: Allow the lasagna to cool on a wire rack for 15 minutes, then refrigerate for at least 2 hours, preferably overnight. This chilling step is crucial; it lets the layers firm up so you can cut clean, picture‑perfect squares. When you’re ready to serve, run a hot, damp knife along the edges for a smooth cut.
- Plate and Serve: Use a large serving spatula to lift each slice onto a dessert plate. Garnish with a few extra sprinkles or a drizzle of melted white chocolate if you’re feeling extra festive. The contrast of the warm, toasted marshmallows against the cool, creamy interior is what makes this dessert unforgettable.
- Enjoy the Praise: Watch as your guests’ eyes widen and their forks dive in. Expect comments like “This is hands down the best version you’ll ever make at home” and “I’m never going to order dessert again.” If anyone asks for the recipe, smile and say, “I’ll share, but only after you finish your second serving.”
Insider Tricks for Flawless Results
The Temperature Rule Nobody Follows
Always let your butter sit at room temperature for exactly 15 minutes before creaming. If it’s too soft, the shortbread will spread too much; too cold and it won’t incorporate properly, leaving pockets of butter that melt unevenly. This tiny window guarantees a uniform crust that holds its shape during the second bake. I once tried to skip this step, and the crust turned into a soggy mess—lesson learned.
Why Your Nose Knows Best
When the shortbread is done, you’ll hear a faint, almost musical “ding” as the edges pull away from the pan. That’s your nose telling you the crust is perfectly golden. Trust that auditory cue more than the timer; ovens vary, and the visual cue of a light brown edge is the real indicator. If you’re unsure, gently tap the center—it should feel firm, not doughy.
The 5‑Minute Rest That Changes Everything
After the first bake, let the crust rest for exactly five minutes before adding the cheesecake layer. This short pause allows the crust to firm up just enough to support the weight of the filling without cracking. Skipping this step often results in a crust that crumbles when you slice, turning your beautiful lasagna into a messy plate.
Cool Whip Timing Trick
Fold Cool Whip into both the cheesecake and pudding when they’re at room temperature, not straight from the fridge. This prevents the mixture from becoming stiff and ensures a light, airy texture that doesn’t collapse. If you accidentally use frozen Cool Whip, let it sit for 10 minutes and give it a quick whisk before folding.
Marshmallow Toasting Secret
For that perfect caramelized marshmallow top, place the lasagna under the broiler for just 30 seconds after the final bake. Keep a close eye—once the marshmallows start to brown, they can go from perfect to burnt in an instant. This quick burst of heat adds a toasty flavor that elevates the entire dessert.
Creative Twists and Variations
This recipe is a playground. Here are some of my favorite ways to switch things up:
Chocolate‑Mint Fusion
Swap the cocoa powder in the crust for melted dark chocolate, and add a teaspoon of crushed peppermint candies to the cheesecake. The result is a richer, more intense chocolate flavor that still carries that refreshing mint punch—perfect for chocolate lovers.
Nutty Crunch
Fold ½ cup of finely chopped toasted hazelnuts into the shortbread dough before baking. The nuts add a buttery crunch that contrasts beautifully with the soft cheesecake and pudding layers, and they bring a subtle earthiness to the holiday palette.
Vegan Version
Replace the butter with coconut oil, use a plant‑based cream cheese, and swap Cool Whip for a coconut‑whipped topping. The flavors remain festive, and the texture stays just as indulgent—great for guests with dietary restrictions.
Berry Burst
Add a thin layer of raspberry jam between the cheesecake and pudding. The tartness of the berries cuts through the sweetness, providing a bright burst of flavor that mimics a holiday cranberry sauce.
Spiced Holiday
Incorporate a pinch of ground cinnamon and nutmeg into the shortbread dough. These warm spices echo classic Christmas flavors and give the crust an aromatic depth that pairs wonderfully with peppermint.
Storing and Bringing It Back to Life
Fridge Storage
Cover the lasagna tightly with plastic wrap or store it in an airtight container. It will keep fresh for up to 4 days. Before serving, let it sit at room temperature for 15 minutes so the flavors can fully awaken.
Freezer Friendly
Wrap the entire dish in a double layer of foil, then place it in a freezer‑safe bag. It freezes well for up to 2 months. To reheat, thaw overnight in the fridge, then warm in a 300°F oven for 10‑12 minutes, adding a splash of milk to the pudding layer to restore its silkiness.
Best Reheating Method
When reheating individual slices, place them on a microwave‑safe plate, cover with a damp paper towel, and heat for 30‑45 seconds. The damp towel adds steam, reviving the marshmallows’ softness and preventing the shortbread from drying out. For a crisp top, finish under the broiler for a quick 20‑second blast.