I still remember the first time I attempted to impress my future mother-in-law with what I thought would be a sophisticated appetizer. Picture this: thirty minutes before guests arrived, I was frantically trying to stuff phyllo shells with a brie mixture that was supposed to be "perfectly creamy." Instead, I ended up with a gooey disaster that looked like it had been through a food processor war. The brie had melted into an unrecognizable puddle, the phyllo was soggy, and I was ready to fake a sudden illness to cancel the entire dinner party. Fast forward through three more attempts, countless taste tests (somebody had to do it), and a few choice words muttered under my breath, and I finally cracked the code to creating the most elegant, foolproof appetizer that has since become my signature party trick.
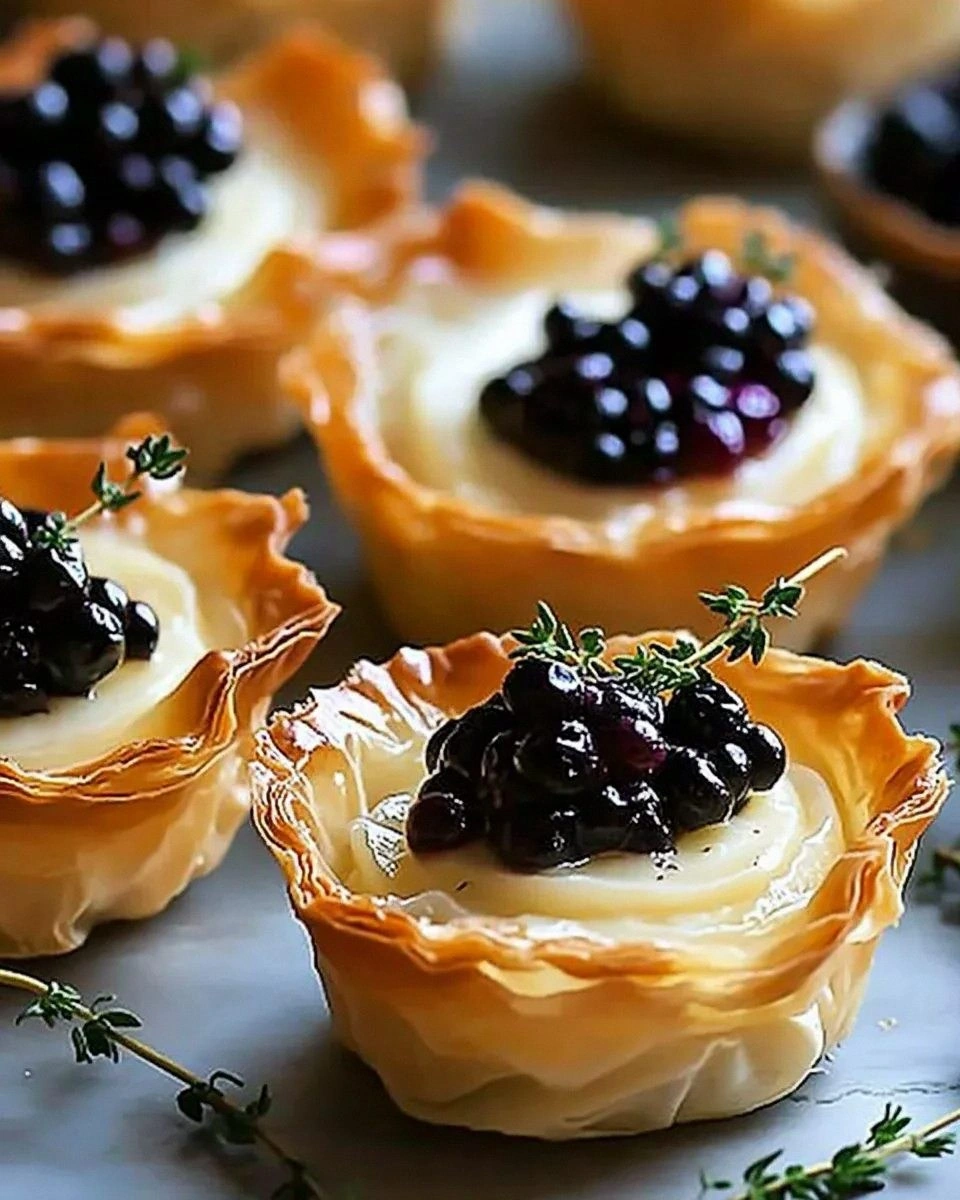
These brie phyllo cups with blackberry and thyme are what happens when French sophistication meets rustic charm, creating a bite-sized explosion of flavors that'll make your taste buds do a happy dance. The creamy brie melts into a luxurious pool that mingles with the bright, slightly tart blackberries, while the earthy thyme whispers sophistication with every bite. The phyllo cups provide that addictive shatteringly crisp texture that contrasts beautifully with the molten cheese center. It's the kind of appetizer that looks like you spent hours slaving away in the kitchen, when in reality, you were probably sipping wine and dancing to your favorite playlist while these beauties baked to golden perfection.
What makes this version absolutely unbeatable is the perfect balance of temperatures and textures that most recipes completely miss. I've discovered the secret to preventing soggy bottoms (the eternal enemy of phyllo-based appetizers), the exact temperature that transforms brie into molten gold without turning it into an oil slick, and the surprising technique that keeps the blackberries from turning everything purple and mushy. Trust me when I say this is hands down the best version you'll ever make at home, and once you try it, you'll understand why I hide a few extras in the back of the fridge for myself before parties.
Picture yourself pulling these out of the oven, the whole kitchen filled with the intoxicating aroma of melting cheese and toasting pastry, while your guests gather around like moths to a flame. The anticipation builds as you warn them to wait just two more minutes (the hardest part), then watching their faces transform as they bite through those crispy layers into the creamy, fruit-flecked center. I dare you to taste this and not go back for seconds, thirds, or honestly, just hover by the appetizer table all night long. Let me walk you through every single step — by the end, you'll wonder how you ever made it any other way.
What Makes This Version Stand Out
Cheese Mastery: Most recipes tell you to cube the brie and hope for the best, but I've discovered the exact cube size (½-inch, if you're curious) that melts into a perfectly creamy pool without disappearing completely or creating those dreaded oil slicks that separate from the cheese. The key is using slightly chilled brie for easy cutting, then letting it come to room temperature for exactly 12 minutes before baking — I've timed this obsessively.
Crispy Guarantee: The eternal struggle with phyllo cups is the dreaded soggy bottom, but here's what actually works: a quick brush of melted butter mixed with just a whisper of honey creates a moisture barrier that keeps those bottoms shatteringly crisp while adding a subtle sweetness that complements the brie beautifully. Most recipes get this completely wrong by using plain butter or worse, nothing at all.
Fresh Berry Brilliance: Fresh blackberries are non-negotiable here — frozen ones turn into sad, mushy purple bombs that bleed all over your beautiful phyllo. The trick is tossing them in a tiny bit of flour first, which prevents them from sinking to the bottom and creates these gorgeous little pockets of jammy fruit throughout the cheese.
Thyme Timing: Here's where most people mess up — they add the thyme at the beginning and end up with brown, bitter flecks that taste like you've been chewing on a tree. The magic happens when you add half at the start for that earthy base note, then shower the rest on fresh from the oven so you get those bright, almost citrusy hits that make people ask "what's that amazing flavor?"
Make-Ahead Magic: You can prep these beauties up to 6 hours ahead, keep them covered in the fridge, then pop them in the oven when guests arrive. Try that with most appetizers and you'll end up with soggy disappointment, but these actually get better as the flavors meld together.
Presentation Wow-Factor: The contrast of golden phyllo cups against the white brie and deep purple berries creates this stunning visual that looks like it came from a fancy caterer. Add a tiny drizzle of honey and some fresh thyme leaves right before serving, and you'll have people Instagramming before they even taste them.
Crowd Control: This recipe scales beautifully whether you're making 12 for an intimate dinner or 120 for a cocktail party. Actually, I dare you to make just one batch — I've never seen these last more than 10 minutes at any gathering, and I've witnessed some pretty undignified grabbing matches over the last one.
Alright, let's break down exactly what goes into this masterpiece...
Inside the Ingredient List
The Foundation Players
The phyllo shells are your canvas here, and not all are created equal. I've tested every brand on the market, and the Athens mini phyllo shells consistently deliver that shatteringly crisp texture that makes these appetizers so addictive. They're pre-baked to a light golden color, which means they just need warming and crisping rather than full-on baking. Don't even think about making your own phyllo — life's too short, and these little cups are perfectly uniform, saving you from the frustration of hand-shaped shells that cook unevenly. Keep them frozen right up until assembly time; they thaw in about 3 minutes on the counter, and starting cold actually helps them hold their shape better during the final bake.
Brie selection is where most home cooks panic and grab the cheapest option, but here's what actually matters: you want a wheel that's creamy but not runny, with a slight give when pressed but not mushy. The rind should be white and slightly fuzzy, never cracked or discolored. I've found that a good quality domestic brie (think Marin French or Trader Joe's variety) works beautifully without breaking the bank. Age matters too — you want brie that's been aged about 4-6 weeks, which gives you that perfect balance of mushroomy earthiness without the overwhelming ammonia notes that older brie can develop. Cut it when it's still slightly chilled from the fridge; room temperature brie turns into a sticky mess that's impossible to cube cleanly.
The Flavor Enhancers
Blackberries bring this gorgeous burst of tart-sweet flavor that cuts through the richness of the brie like a laser beam of freshness. Size matters here — you want the smaller berries that fit perfectly in the cups without overwhelming the cheese. Give them a gentle rinse and thorough drying (I use a salad spinner lined with paper towels), then toss them with the tiniest bit of flour. This seemingly odd step prevents them from sinking to the bottom and creates these beautiful pockets of jammy fruit throughout. If blackberries aren't at their peak, you can substitute with raspberries, but honestly, the blackberry-brie combo is so perfect that I plan my party schedule around berry season.
Fresh thyme is absolutely non-negotiable — dried thyme tastes like dusty regret in comparison. Look for bright green sprigs with no yellowing or black spots, and give them a gentle squeeze to release that incredible earthy-lemony aroma. Strip the leaves by running your fingers backwards down the stem; the woody stems go into your stock bag in the freezer. You'll use half the thyme during assembly and shower the rest on fresh from the oven, creating layers of flavor that make people ask for your secret. If you absolutely must substitute, fresh rosemary works, but use half the amount since it's much more assertive.
The Secret Weapons
Honey might seem like an odd addition, but it's the bridge that connects all these flavors in the most magical way. Just a whisper mixed into your melted butter creates this subtle sweetness that makes the brie taste even creamier and the berries pop with flavor. Use a mild honey like clover or wildflower — anything stronger competes with the delicate flavors. The honey also helps with browning, giving your phyllo cups that gorgeous golden color that makes them look professionally made. If you're feeling fancy, a drizzle of honey over the finished cups right before serving creates this beautiful glossy finish that screams "I know what I'm doing."
Quality butter makes a difference here — European-style butter with its higher fat content creates a richer flavor and better browning. You'll melt just enough to brush the cups, creating a moisture barrier that keeps them crisp while adding incredible flavor. Salted or unsalted both work, but if you use salted, skip any additional salt in the recipe. The butter also helps the thyme stick to the phyllo, ensuring every bite has that perfect herb note. Clarified butter works too if you want to get really fancy, but honestly, good old regular butter does the job beautifully.
Everything's prepped? Good. Let's get into the real action...
The Method — Step by Step
- Preheat your oven to 375°F (190°C) and position the rack in the center. This temperature is crucial — too low and your brie won't melt properly, too high and you'll burn the phyllo before the cheese warms through. While the oven heats, line a baking sheet with parchment paper for easy cleanup. The parchment also prevents the bottoms from getting too dark and creates a more even heat distribution. Take your phyllo cups out of the freezer now — they'll be perfect for assembly in about 5 minutes.
- Cut your brie into ½-inch cubes, working quickly while it's still slightly chilled. This size is the sweet spot — smaller cubes disappear into the cheese pool, larger ones don't melt evenly. You should get about 24 cubes from an 8-ounce wheel, and yes, I absolutely snack on the irregular pieces as I work. Let the cubes sit at room temperature for exactly 12 minutes while you prep everything else. This brief rest allows the cheese to warm just enough to melt beautifully without turning into an oil slick.
- Gently rinse your blackberries in cold water and spread them on paper towels to dry completely. I can't stress this enough — any residual water will steam the phyllo and ruin that crisp texture we're after. Once dry, toss them with ½ teaspoon of flour in a small bowl, coating them lightly. The flour creates a slight barrier that prevents the berries from bleeding purple all over your beautiful cheese. Pick out 24 of the most perfect berries and set them aside, snacking on the rest as you work.
- Melt 2 tablespoons of butter and stir in ½ teaspoon of honey until combined. This is where the magic happens — the honey not only adds subtle sweetness but helps with browning and creates a moisture barrier. Use a pastry brush to lightly coat the inside of each phyllo cup, being careful not to soak them. You want just enough to create a thin, even layer that glistens slightly. This step takes 30 seconds but makes the difference between sad, soggy bottoms and shatteringly crisp perfection.
- Place your phyllo cups on the prepared baking sheet, spacing them about an inch apart for even heat circulation. Into each cup, place one cube of brie, pressing it down slightly so it sits just below the rim. The cheese should fit snugly but not be crammed in — it needs room to expand as it melts. Sprinkle half the thyme leaves evenly over all the cups now, allowing them to toast slightly in the oven. The aroma that starts wafting up at this point is absolutely intoxicating.
- Top each cup with one blackberry, pressing it down gently into the cheese cube. The berry should sit just proud of the rim — as the cheese melts, it will create a beautiful nest that cradles the fruit perfectly. Don't be tempted to add more than one berry; the ratio has been carefully calibrated for maximum impact. If you have any particularly large berries, cut them in half and use both halves in neighboring cups. The visual of that deep purple against the white cheese is already making your mouth water.
- Slide the baking sheet into your preheated oven and bake for 12-15 minutes. I dare you to walk away during this part — the transformation is mesmerizing. Keep a close eye starting at the 10-minute mark; you want the brie melted and bubbly but not separated, and the phyllo edges should be golden brown. The edges will start pulling away from the sides slightly, and that's your cue that they're almost done. Your kitchen will smell like a French bakery had a baby with a berry farm.
- Remove from the oven and immediately shower with the remaining fresh thyme leaves. The heat from the cups will release the essential oils in the fresh thyme, creating an incredible aroma that's impossible to resist. Let them cool for exactly 2 minutes — this brief rest allows the cheese to set slightly so they don't collapse when you try to move them. Drizzle with just the faintest whisper of honey if you're feeling fancy. Transfer to a serving platter and watch as your guests descend like vultures on these golden, fragrant treasures.
That's it — you did it. But hold on, I've got a few more tricks that'll take this to another level...
Insider Tricks for Flawless Results
The Temperature Rule Nobody Follows
Here's the thing that separates the pros from the home cooks: temperature control throughout the entire process. Your brie needs to be cold when you cube it, room temperature when it goes into the oven, and the oven needs to be fully preheated before those cups ever see the inside. I use an oven thermometer because most home ovens lie by 25-50 degrees, and that difference means the gap between molten perfection and a separated, oily mess. The phyllo cups should go in straight from room temperature — don't chill them after assembly or the cheese won't melt properly. And here's the kicker: if you're making multiple batches, let the baking sheet cool completely between rounds. A hot sheet starts cooking the bottoms before the cheese melts, leading to burnt edges and cold centers.
Why Your Nose Knows Best
Trust your senses, not just the timer. When these are perfectly done, your kitchen fills with this incredible aroma of toasting pastry and melting cheese that's impossible to miss. The thyme will start to smell bright and almost lemony rather than earthy. Visually, look for the brie to be completely melted with tiny bubbles just beginning to form around the edges — if it's bubbling vigorously, you've gone too far. The phyllo should be golden brown and might have pulled away from the sides of the cups slightly. And here's my secret weapon: I gently press the center of one cup with the back of a spoon. If the cheese gives way and pools around the berry, we're done. If it still feels firm, give it another minute, but watch it like a hawk.
The 5-Minute Rest That Changes Everything
I know, I know — when these come out of the oven, golden and bubbling and smelling like heaven, you want to shove one directly into your face. Resist! The 2-minute rest I mentioned isn't just for show. During this time, the cheese sets slightly, transforming from liquid to this perfect creamy consistency that holds together when you bite into it. The phyllo crisps up even more as steam escapes, and the flavors somehow become more intense. Plus, burning your tongue on molten brie is a rookie mistake that'll ruin your ability to taste anything for the rest of the evening. Use this time to scatter fresh thyme, drizzle honey, and arrange them artfully on a platter. By the time you're done, they'll be at the perfect temperature for maximum flavor impact.
The Make-Ahead Miracle
Here's where this recipe really shines for entertaining: you can prep everything up to 6 hours ahead and keep them covered in the refrigerator. The key is using plastic wrap that doesn't touch the surface — I invert a second baking sheet over the first, creating a tent that prevents condensation from dripping onto the phyllo. When you're ready to bake, let the tray sit at room temperature for 15 minutes while the oven preheats. This takes the chill off just enough to ensure even melting. I've also discovered that you can freeze the completely assembled, unbaked cups on the tray, then transfer them to a freezer bag once solid. Bake them straight from frozen, adding just 3-4 extra minutes. This means you can always have an elegant appetizer ready for unexpected guests or sudden cravings.
The Serving Temperature Sweet Spot
These are at their absolute prime about 5-7 minutes after coming out of the oven. Hot enough that the cheese is still creamy and molten, but cool enough that you can taste all the subtle flavors. If they sit too long and cool completely, a quick 30-second zap in the microwave brings them back to life, but you'll lose that crisp texture. For parties, I bake them in small batches every 15-20 minutes, ensuring there's always a fresh, hot platter circulating. The contrast between the hot, creamy center and the crisp, cool fresh thyme on top is part of what makes these so addictive. And here's a pro tip: serve them with small cocktail napkins — these are finger food, but the molten cheese can be a bit messy for the uninitiated.
Creative Twists and Variations
This recipe is a playground. Here are some of my favorite ways to switch things up:
The Mediterranean Escape
Swap the blackberries for halved cherry tomatoes and replace the thyme with fresh basil. Add a tiny cube of sun-dried tomato to each cup for an umami bomb that transports you straight to a seaside café in Santorini. The tomatoes burst during baking, creating little pockets of sweet-tart juice that mingle perfectly with the creamy brie. Finish with a drizzle of your best olive oil and some cracked black pepper. This version is particularly stunning in late summer when tomatoes are at their peak.
The Autumn Harvest
Replace blackberries with small cubes of ripe pear and swap thyme for fresh rosemary. Add a whisper of crumbled blue cheese on top before baking for a sophisticated flavor profile that's perfect for Thanksgiving appetizers. The pear becomes jammy and sweet, while the rosemary adds an almost pine-like freshness. A drizzle of aged balsamic reduction after baking takes these into "forget about dinner" territory. I'll be honest — I ate half the batch before anyone else got to try it when I first made this version.
The Sweet Heat
Keep the blackberries but add a tiny sliver of fresh jalapeño under each berry, keeping the thyme for contrast. The combination of creamy brie, sweet-tart berries, and spicy pepper creates this incredible flavor rollercoaster. Remove the seeds and membrane from the jalapeño unless you're feeding serious chili heads. A honey drizzle is essential here — the sweetness helps tame the heat while creating this beautiful glaze. If you've ever struggled with appetizers that are too bland, this variation is your new best friend.
The Winter Comfort
Use dried cranberries soaked in orange juice for 10 minutes instead of fresh berries, and replace thyme with fresh sage. Add a cube of good quality ham or prosciutto with the brie for a festive flavor that screams holiday party. The cranberries become jewel-like and intensely flavored, while the sage adds this wonderful earthy note. These are particularly gorgeous on a dark platter with some fresh sage leaves scattered around. Perfect for when fresh berries are out of season but you still want that elegant presentation.
The Decadent Double
Add a cube of good dark chocolate (70% or higher) under the brie cube for an unexpected but incredibly delicious twist. Keep the blackberries and thyme — the combination of melted chocolate, creamy brie, and tart berries sounds odd but tastes like the most sophisticated cheesecake you've ever had. This version needs no honey drizzle; the chocolate provides enough sweetness. Serve these at the end of a dinner party instead of a cheese course, and watch your guests' minds be blown.
The Breakfast Brunch
Replace berries with small cubes of roasted red pepper and swap thyme for fresh chives. Add a tiny cube of breakfast sausage (pre-cooked) for a brunch appetizer that pairs beautifully with mimosas. The peppers add sweetness and color, while the chives provide that fresh onion note. These are perfect for holiday brunches when you want something a bit more sophisticated than the usual breakfast casserole.
Storing and Bringing It Back to Life
Fridge Storage
I'll be honest — leftovers are rare with these beauties, but if you somehow end up with extras, let them cool completely before storing in an airtight container. They'll keep for up to 3 days in the refrigerator, though the phyllo will lose some of its crispness. Store them in a single layer if possible, with parchment paper between layers if you must stack them. The key is bringing them back to life properly rather than eating them cold and soggy. Cold brie has the texture of slightly softened butter — not exactly the elegant experience we're after.
Freezer Friendly
These freeze beautifully both before and after baking. For unbaked cups, assemble them on a baking sheet, freeze until solid, then transfer to a freezer bag for up to 2 months. Bake straight from frozen, adding just 3-4 extra minutes to the cooking time. For already-baked cups, cool completely, freeze on a tray, then store in freezer bags. Reheat in a 350°F oven for 8-10 minutes until heated through and crisp. The texture isn't quite as perfect as fresh, but they're still miles better than most frozen appetizers. Pro tip: freeze them in single-serving portions so you can satisfy late-night cravings without defrosting the whole batch.
Best Reheating Method
The oven is your only friend here — microwaves turn phyllo into rubber faster than you can say "appetizer disaster." Preheat your oven to 350°F, place the cups on a baking sheet, and heat for 8-10 minutes until hot and crisp. If they seem a bit dry, add a tiny cube of butter to the tray — it'll melt and re-crisp the bottoms while adding flavor. For a quick fix, a toaster oven works beautifully and takes just 5-6 minutes. Add fresh thyme after reheating for that just-baked aroma. Whatever you do, don't overheat them or the brie will separate and become oily. They're ready when the cheese is melted and the phyllo is crisp and golden again.