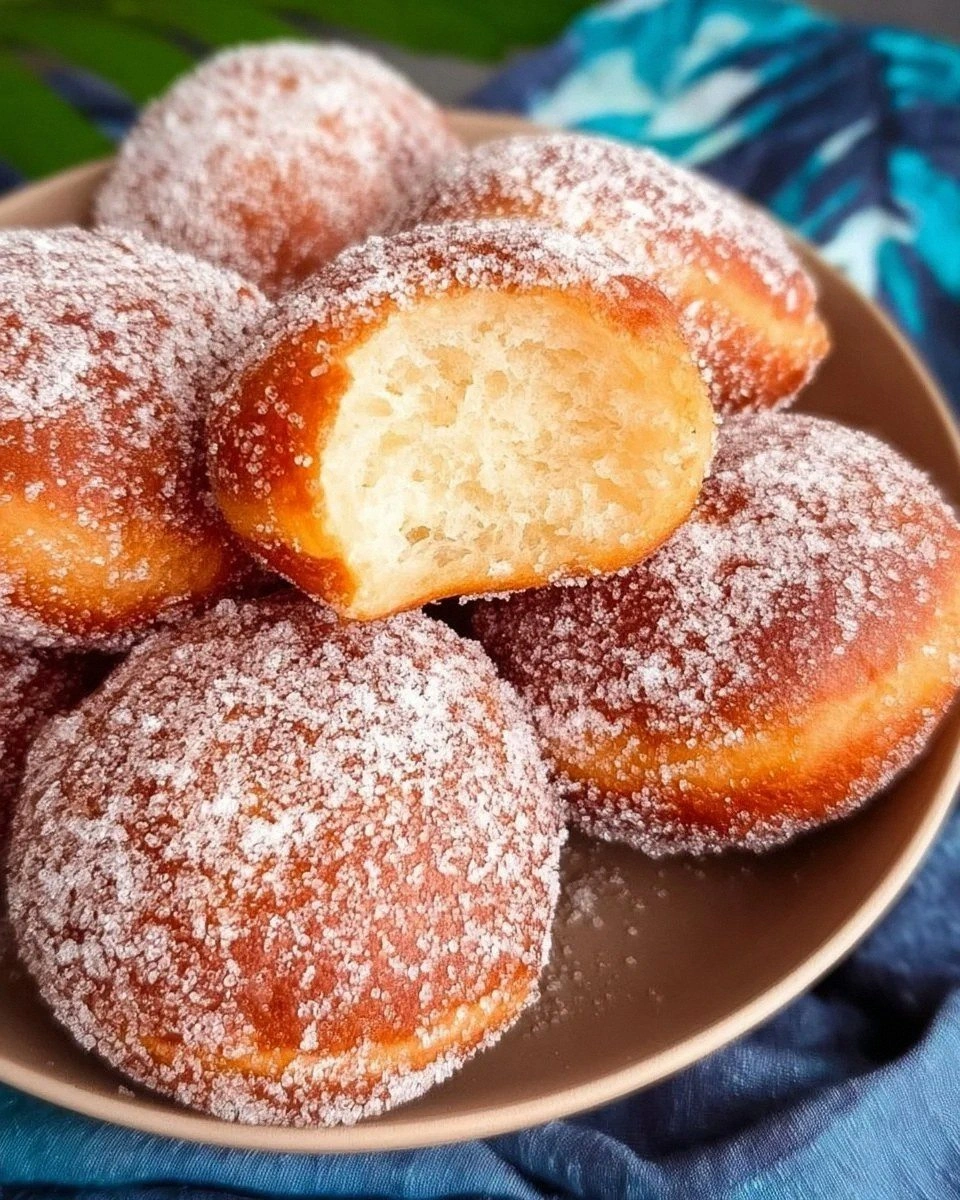
I was standing in my kitchen at 2 a.m., half‑asleep, with a bag of powdered sugar spilling onto the counter like a snowstorm. The clock ticked, the oven hummed, and my roommate dared me to make something that would make even the most seasoned pastry chef weep with joy. I grabbed the last of the flour, a packet of yeast, and a can of coconut milk, thinking I was about to create a disaster. Instead, what emerged was a golden, pillow‑soft sphere that sang a sweet lullaby to my taste buds. This is the moment I realized that the perfect malasada—plain or haupia‑filled—was not a myth, but a very real, very attainable masterpiece.
Picture this: the first bite is a crisp, caramelized crust that shatters like thin ice under a gentle tap, giving way to an interior so airy it practically floats. The aroma? A buttery, yeasty perfume that curls around your kitchen like a warm blanket, while a faint whisper of coconut drifts up from the filling, reminding you of tropical breezes on a lazy Sunday. The sound of the oil bubbling is the soundtrack of anticipation, a sizzle that says “you’re about to experience something unforgettable.” My hands were still sticky with sugar, but the smile on my face was wider than the pan itself.
Most recipes I've tried either leave the dough dense, the filling watery, or the coating uneven—like trying to paint a masterpiece with a broom. This version, however, uses a precise balance of warm milk, melted butter, and a touch of sugar to coax the yeast into a frothy frenzy, creating a dough that rises like a sunrise. The haupia filling is a silky, coconut‑infused custard that sets just enough to hold its shape without turning gummy, and the cinnamon‑sugar coating is calibrated to stick without clumping. I dare you to taste this and not go back for seconds; I’ll be honest—I ate half the batch before anyone else got a chance.
The secret weapon? A quick‑cool technique that stops the dough from over‑proofing, paired with a temperature‑controlled fry that locks in moisture while giving you that coveted crunch. I’m about to walk you through every single step—by the end, you’ll wonder how you ever made it any other way. Okay, ready for the game‑changer?
What Makes This Version Stand Out
- Flavor Explosion: The combination of a buttery dough and a coconut‑kissed haupia filling creates a sweet‑savory duet that dances on the palate like a well‑rehearsed tango.
- Texture Mastery: A crisp, caramelized exterior gives way to a pillowy, melt‑in‑your‑mouth interior, achieving the perfect contrast that most recipes miss.
- Simplicity Meets Sophistication: Only pantry staples are required, yet the result feels like something you’d order at a high‑end bakery.
- Unique Filling: Haupia, a traditional Hawaiian coconut pudding, adds an exotic twist that transforms a classic Portuguese treat into a tropical indulgence.
- Crowd‑Pleaser: Whether served plain or filled, these malasadas disappear faster than you can say “one more round,” making them perfect for brunches, parties, or midnight cravings.
- Ingredient Quality: Using real coconut milk and unsalted butter elevates the flavor profile, while the yeast ensures a light, airy crumb.
- Cooking Method: Deep‑frying at the exact temperature locks in moisture and creates that signature golden crust without greasiness.
- Make‑Ahead Potential: The dough can be refrigerated overnight, and the haupia filling can be prepared days in advance, giving you flexibility for busy schedules.
Inside the Ingredient List
The Flavor Base
All‑purpose flour is the backbone of any good dough; it provides structure while allowing the gluten to stretch and trap the gases produced by the yeast. If you substitute cake flour, the result will be too tender and may collapse, while whole‑wheat flour adds a nutty flavor but makes the texture denser. I recommend sifting the flour twice to aerate it—this tiny step adds a noticeable lift to the final product. Pro tip: Look for flour that feels slightly powdery to the touch; older flour can absorb more moisture, throwing off the balance.
Granulated sugar does double duty: it feeds the yeast for a robust rise and adds sweetness to the dough itself. If you’re watching sugar, you can cut it in half, but expect a milder flavor and a slightly slower rise. For a richer taste, try swapping half the white sugar for brown sugar; the molasses will lend a subtle caramel note that pairs beautifully with the coconut filling.
The Texture Crew
Active dry yeast is the magical organism that turns a simple mixture into a fluffy cloud. I always proof the yeast in warm milk (110‑115°F) with a pinch of sugar; you’ll see it foam like a miniature latte—if it doesn’t, your yeast is dead and you’ll need a fresh packet. The warm milk also adds richness and helps the dough stay tender during frying. Swap suggestion: Use buttermilk for a tangy twist, but reduce the added salt by a quarter teaspoon.
Eggs act as emulsifiers, binding the butter and milk together while adding color and lift. Large eggs are ideal; if you only have medium eggs, add an extra tablespoon of milk to maintain the liquid ratio. The melted unsalted butter contributes flavor and moisture, creating a dough that’s soft enough to roll but sturdy enough to hold its shape when fried.
The Unexpected Star
Coconut milk is the hero of the haupia filling, delivering that quintessential tropical creaminess. Choose a full‑fat version for the richest texture—canned coconut milk works best, while the “light” versions can make the filling watery. The cornstarch is the thickening agent; it gelatinizes when heated, giving the filling a custard‑like consistency that won’t ooze out of the malasada when you bite into it. A pinch of salt in the filling balances the sweetness and enhances the coconut flavor.
The Final Flourish
Vegetable oil for frying should have a high smoke point—canola, peanut, or sunflower oil are all excellent choices. The oil temperature is crucial; too low and the malasadas absorb oil, becoming greasy, too high and the exterior burns before the interior cooks. A candy thermometer is worth its weight in gold here. Finally, the cinnamon‑sugar coating adds that final layer of sweetness and spice; mix the two in a shallow dish and roll the hot malasadas while they’re still warm so the coating adheres perfectly.
Everything's prepped? Good. Let's get into the real action...
The Method — Step by Step
In a small bowl, combine the warm milk (110‑115°F) with the active dry yeast and a tablespoon of the granulated sugar. Stir gently, then let it sit for 5‑7 minutes until it becomes foamy and fragrant. That foam is the sign that the yeast is alive and ready to work its magic. If you don’t see bubbles, start over with fresh yeast—this is the moment of truth.
While the yeast awakens, whisk together the flour, the remaining granulated sugar, and the ½ tsp of salt in a large mixing bowl. Create a well in the center, then pour in the proofed yeast mixture, the melted butter, and the two large eggs. Using a wooden spoon or a stand‑mixer's dough hook on low speed, mix until a shaggy dough forms.
Turn the dough onto a lightly floured surface and knead for about 8‑10 minutes, or until it becomes smooth, elastic, and slightly tacky. This is where the gluten develops, giving the malasada its signature chew. Watch Out: Over‑kneading can make the dough tough, while under‑kneading leaves it crumbly—aim for a silky feel.
Place the dough in a lightly oiled bowl, cover with a damp kitchen towel, and let it rise in a warm spot for 1‑1½ hours, or until doubled in size. The kitchen should feel comfortably warm, like a summer afternoon; if it’s too cool, pop the bowl in an oven with the light on.
While the dough rises, prepare the haupia filling. In a saucepan, whisk together the coconut milk, water, sugar, cornstarch, and ¼ tsp salt. Cook over medium heat, stirring constantly, until the mixture thickens and becomes glossy—about 5‑7 minutes. Remove from heat, pour into a shallow dish, cover with plastic wrap (touching the surface), and refrigerate until firm, at least 30 minutes.
Once the dough has doubled, punch it down gently to release excess gas. Transfer it to a floured surface and roll it out to a ½‑inch thickness. Using a 3‑inch round cutter, cut out circles. Keep the scraps, roll them, and cut more circles—nothing should go to waste.
If you’re making filled malasadas, place a teaspoon of chilled haupia in the center of each circle, then fold the dough over to create a half‑moon shape. Press the edges with a fork to seal, ensuring no filling leaks during frying. For plain malasadas, simply set the circles aside, ready for the oil.
Heat vegetable oil in a deep, heavy‑bottomed pot to 350°F (175°C). Use a thermometer—this is non‑negotiable. Gently slide a few malasadas into the oil, being careful not to overcrowd the pot. Fry for 2‑3 minutes per side, or until they puff up and turn a deep golden brown.
Kitchen Hack: If the crust browns too quickly, lower the heat by 10‑15°F; the interior will have more time to cook through without burning the exterior.Using a slotted spoon, transfer the fried malasadas to a paper‑towel‑lined tray to drain excess oil. While still warm, roll each one in the cinnamon‑sugar mixture, ensuring an even coating that sticks like glue. Serve immediately, or let them cool and store in an airtight container. That sizzle when it hits the pan? Absolute perfection.
That's it — you did it. But hold on, I've got a few more tricks that'll take this to another level...
Insider Tricks for Flawless Results
The Temperature Rule Nobody Follows
Never rely on “medium heat” when frying; the exact temperature of 350°F ensures the crust sets instantly, trapping steam inside for that airy crumb. If you don’t have a thermometer, drop a small piece of dough into the oil—if it sizzles and rises immediately, you’re in the sweet spot. I once tried to eyeball it and ended up with soggy, oil‑laden malasadas that tasted like regret.
Why Your Nose Knows Best
Your sense of smell is a reliable indicator of doneness. When the oil starts to emit a buttery, nutty aroma, the malasadas are nearing the perfect golden hue. Trust that instinct; it’s more accurate than a timer because it accounts for variations in oil volume and pot material.
The 5‑Minute Rest That Changes Everything
After the first rise, let the dough rest uncovered for five minutes before rolling. This short pause relaxes the gluten, making the dough easier to shape and reducing the chance of tearing. One of my friends skipped this step and ended up with misshapen circles that looked like sad, deflated balloons.
Cold Filling, Hot Dough
Chill the haupia filling thoroughly before encasing it in dough. A cold center prevents the filling from melting too quickly during frying, which would otherwise leak out and create a greasy mess. If the filling is too warm, the dough may also become soggy where the two meet.
Cinnamon‑Sugar Mastery
Mix the cinnamon and sugar in a shallow dish, then lightly dampen the surface of each malasada with a quick spray of water before rolling. The moisture acts like a glue, ensuring the coating adheres uniformly without clumping. A dry roll often results in patches of sugar that fall off, leaving you with a bland bite.
Creative Twists and Variations
This recipe is a playground. Here are some of my favorite ways to switch things up:
Chocolate‑Swirl Malasadas
Add a tablespoon of cocoa powder to the dough and a drizzle of melted dark chocolate on top after frying. The bitterness of cocoa balances the sweetness, creating a sophisticated flavor profile that will wow coffee‑drinkers.
Lemon‑Zest Glaze
Replace the cinnamon‑sugar coating with a thin lemon glaze made from powdered sugar, fresh lemon juice, and a pinch of salt. The bright citrus cuts through the richness, perfect for spring brunches.
Spiced Pumpkin Filling
Swap the haupia for a pumpkin puree mixed with cinnamon, nutmeg, and a dash of maple syrup. This autumnal twist turns the malasada into a seasonal star, ideal for Thanksgiving leftovers.
Savory Cheese & Herb
Omit the sugar entirely and fill the dough with a mixture of shredded mozzarella, grated Parmesan, and fresh herbs. Fry until golden and serve as an appetizer with a side of marinara for dipping.
Berry‑Burst Filling
Stir fresh raspberries or blueberries into a thickened custard base, then chill and use as a filling. The burst of tartness contrasts beautifully with the sweet dough, making it a hit at summer picnics.
Storing and Bringing It Back to Life
Fridge Storage
Place cooled malasadas in an airtight container lined with parchment paper. They’ll stay fresh for up to three days. If you notice the coating getting soggy, give them a quick 30‑second blast in a 350°F oven to revive the crunch.
Freezer Friendly
Arrange the fully cooled malasadas on a baking sheet, freeze until solid, then transfer to a zip‑top bag. They’ll keep for up to two months. When you’re ready to enjoy, bake straight from frozen at 350°F for 8‑10 minutes, adding a splash of water to the pan to create steam and restore fluffiness.
Best Reheating Method
For the ultimate reheating, preheat a skillet over medium‑low heat, add a teaspoon of water, and cover with a lid. The steam will melt the interior while the pan crisps the exterior, delivering a near‑fresh experience. Skip the microwave—it turns the dough rubbery and the coating soggy.