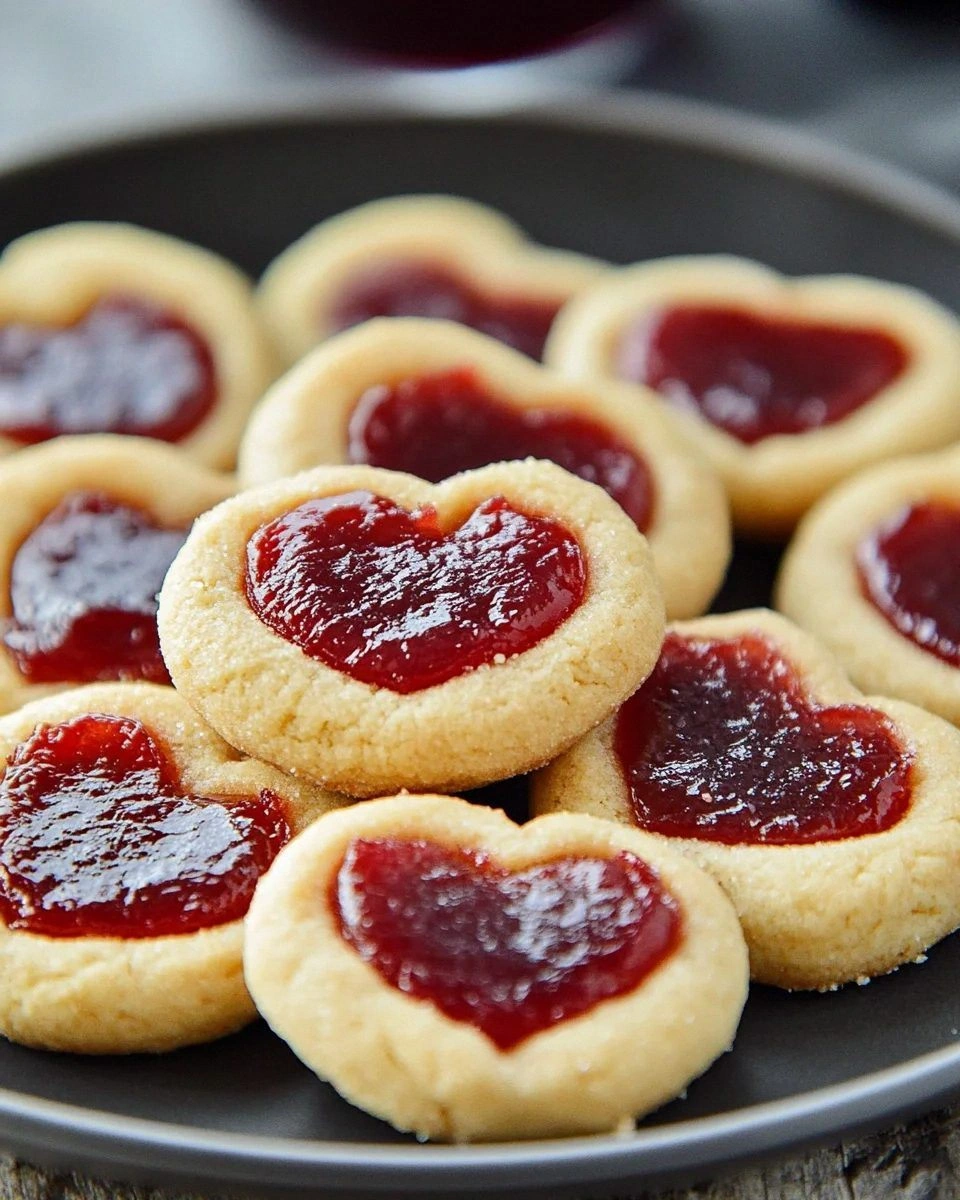
You know that moment when you're standing in the kitchen, flour dust floating through the air like tiny snowflakes, and you realize you've just created something that could make even the grumpiest neighbor crack a smile? That's exactly what happened to me last Tuesday at 2:47 PM, when I pulled out a batch of heart-shaped cookies that looked like they belonged in a Parisian bakery window, complete with ruby-red jam centers that gleamed like precious gems. The smell alone had my mail carrier lingering at my door longer than necessary, and by the time I'd finished photographing them for my blog, three had mysteriously disappeared from the cooling rack.
Here's the thing about these heart jam cookies — they're not just another pretty face in the cookie world. They're the culinary equivalent of a warm hug from your grandmother, if your grandmother happened to be a French pastry chef with a mischievous streak and a penchant for stealing bites of cookie dough when nobody was looking. The first time I made them, I was actually trying to impress someone (spoiler alert: it worked), but what I didn't expect was how these delicate little hearts would become my go-to for everything from breakup comfort food to "I'm sorry I forgot your birthday" gifts to "congratulations on your new apartment" housewarming presents.
What makes this version different from every other jam-filled cookie recipe cluttering up the internet? I'm glad you asked, because I've tested them all — the ones that spread into unrecognizable blobs, the ones with jam that bubbles out like molten lava, the ones that taste like cardboard wearing a sugar coat. This recipe? It's the Goldilocks of jam cookies. The dough is buttery enough to taste like shortbread but sturdy enough to hold its shape. The jam sets perfectly without turning into hard candy. And the technique I'm about to share? It guarantees those Instagram-worthy centers every single time, even if you can't draw a straight line with a ruler.
Picture yourself in three hours, pulling a tray of these beauties from your oven, the whole kitchen smelling like vanilla and butter and possibility. Your friends will think you secretly took pastry classes. Your family will start requesting them for every occasion. And you? You'll be the person who shows up to potlucks with a container of cookies that disappear faster than free concert tickets. Let me walk you through every single step — by the end, you'll wonder how you ever made it any other way.
What Makes This Version Stand Out
Before we dive into the flour and butter, let me tell you why these heart jam cookies will ruin you for all other cookies forever. I've spent years perfecting this recipe, eating my way through dozens of failures (tough job, I know), and the result is something that makes professional bakers ask for my secrets. The difference is in the details, and trust me, every detail matters.
- Butter-Forward Flavor: While other recipes skimp on the good stuff, we're using a full cup of European-style butter that creates layers of flavor so complex, you'll taste vanilla, caramel, and something almost nutty in each bite. Cheap butter makes cheap cookies — this is not the place to save a dollar.
- No-Spread Guarantee: Remember those sad, blob-shaped cookies from your childhood? Not happening here. The dough gets a quick chill that sets the butter, plus a secret ingredient (cornstarch!) that keeps those hearts sharp enough to cut glass. Okay, not literally, but you get the idea.
- Jam That Stays Put: Most recipes tell you to add jam before baking, which results in a volcanic mess. We're adding it after, creating a glossy pool that looks like it belongs in a jewelry store display case. The technique is stupidly simple once you know it, but nobody else seems to be doing it this way.
- Make-Ahead Magic: The dough can live happily in your freezer for up to two months, meaning spontaneous cookie magic is always just twenty minutes away. Slice, bake, fill, done. It's like having a pastry chef on retainer, minus the attitude and tattoos.
- Texture Paradise: We're talking crispy edges that shatter like thin ice on the first bite, giving way to a tender center that melts on your tongue. The contrast is so addictive, I dare you to taste this and not go back for seconds. (Confession: I ate half the batch before anyone else got to try it.)
- Endless Customization: Once you master the base, you can create a cookie for every personality. Lavender and blueberry for the artsy friend, dark chocolate and cherry for the rebel, lemon and raspberry for the sunshine person in your life. The dough is your canvas, and you're about to become Picasso.
Alright, let's break down exactly what goes into this masterpiece, because understanding your ingredients is the difference between good cookies and cookies that make people propose marriage.
Inside the Ingredient List
The Flavor Base
Butter is the star of this show, and not just any butter — we're talking about the European-style stuff with 82% fat content that costs more but delivers flavor that makes the grocery store brands taste like you're eating a candle. The higher fat content means less water, which translates to more tender, more flavorful cookies that don't spread into sad puddles. If you're thinking about substituting margarine or (gasp) oil, just close this tab right now and go make something else, because we're not friends anymore. Real butter creates those irresistible flaky layers and provides the rich backdrop that lets the jam shine like the star it is.
Vanilla extract might seem like a supporting actor, but here it's more like the secret sauce that ties everything together. Skip the imitation stuff — your cookies will taste like a scratch-and-sniff sticker from 1992. Good vanilla should smell like a tropical vacation and cost enough to make you pause slightly at checkout. I use Madagascar bourbon vanilla because it has those deep, almost smoky undertones that play beautifully with butter, but Tahitian works too if you want something more floral. The rule is simple: if you wouldn't drink it in a glass of milk, don't bake with it.
The Texture Crew
All-purpose flour gets all the attention, but cake flour is our secret weapon here. We're using a 50/50 blend that gives us the structure we need from AP flour plus the tenderness that cake flour brings to the party. The lower protein content in cake flour means less gluten development, which translates to cookies that practically dissolve on your tongue instead of turning into hockey pucks by day two. If you can't find cake flour, you can make your own by replacing two tablespoons of AP flour with cornstarch per cup, but honestly, the pre-made stuff works better and saves you from doing math before coffee.
Powdered sugar isn't just for sweetness — it's our texture magician. The cornstarch that's already mixed in helps absorb moisture and creates that delicate, sandy texture that makes these cookies feel expensive. Granulated sugar would make them crisp like sugar cookies, brown sugar would make them chewy, but powdered sugar? It makes them sophisticated. Think of it as the difference between wearing sneakers and wearing those shoes that make that satisfying click when you walk into a room.
The Unexpected Star
Cornstarch is the ingredient that makes people raise an eyebrow when they read the recipe, but it's the reason these cookies have edges sharp enough to make a geometry teacher proud. Just two tablespoons transform the dough from something that might spread into something that holds its shape like it has architectural integrity. I've tried recipes without it, and what you get are cookies that look like they melted in a microwave. With cornstarch, you get the same crisp edges you'd find on professionally made cookies, except you made them in your pajamas on a Sunday afternoon.
Egg yolk, not the whole egg, because we want richness without structure. The yolk adds fat and emulsifiers that create that tender, almost shortbread-like texture, while leaving out the white prevents the cookies from becoming rubbery. It's like choosing between a silk dress and a cotton one — both cover you, but one feels like luxury against your skin. Save those whites for an omelet tomorrow morning, or better yet, make a tiny batch of royal icing if you're feeling fancy.
The Final Flourish
Jam selection is where most people go tragically wrong, reaching for whatever jelly has been lurking in their fridge since the Clinton administration. Here's what actually works: good quality jam with a high fruit content and moderate sweetness. Raspberry delivers that classic look with bright acidity that cuts through the rich butter, but apricot makes you look sophisticated, and strawberry makes everyone feel like a kid again. The key is avoiding anything labeled "fruit spread" or "fruit cocktail" — you want real fruit, real sugar, and nothing that sounds like it belongs in a chemistry lab.
Sea salt in the dough might seem counterintuitive for a sweet cookie, but it's the difference between a one-note sugar bomb and a complex flavor experience that makes people close their eyes when they bite in. Just a quarter teaspoon enhances all the other flavors, making the butter taste more buttery, the vanilla more vanilla-y, and the jam more jam-tastic. Skip it and your cookies will taste flat, like listening to music with one earbud broken. The salt goes in the dough, not on top — we're bakers, not Salt Bae.
Everything's prepped? Good. Let's get into the real action, where the magic happens and your kitchen transforms into the best bakery in town.
The Method — Step by Step
- Start with butter that's been sitting out for exactly 30 minutes — you want it pliable but not greasy. If you can press your finger into it and leave an imprint without the butter sticking to your skin, you've hit the sweet spot. Drop it into your mixing bowl with the powdered sugar and beat on medium speed for what feels like forever (actually 3-4 minutes), until the mixture looks like pale, fluffy clouds that might float away if you opened a window. This isn't just creaming — you're incorporating air that will give your cookies lift and that tender crumb we're after.
- Add the egg yolk and vanilla, then beat for another minute until everything is incorporated and the mixture looks like sunshine in bowl form. Scrape down the sides of the bowl with a spatula because dry flour pockets are the enemy of uniform cookies, and uniformity is what separates amateur hour from professional results. The mixture should smell like the best ice cream you've ever had, and if you're tempted to taste it with a spoon, I won't judge you — but save some for the cookies.
- In a separate bowl, whisk together the all-purpose flour, cake flour, cornstarch, and salt for a full 30 seconds. This isn't busy work — it's distributing the leaveners and salt evenly so you don't get a cookie that tastes like a salt lick next to one that tastes like cardboard. Add these dry ingredients to your butter mixture all at once, then mix on low speed just until the dough comes together in clumps that look like wet sand at the beach. Overmixing is the enemy here, so as soon as you don't see dry flour, stop the mixer.
- Turn the dough out onto a lightly floured surface and knead it just 3-4 times to bring it together into a cohesive mass. It should feel like playdough that's been left out for an hour — pliable but not sticky. If it's sticking to your hands like bubblegum on a hot sidewalk, wrap it in plastic and chill for 15 minutes. Otherwise, pat it into a disk, wrap it up, and let it chill for at least 2 hours or up to 3 days. This isn't optional — the chilling step is what transforms your cookies from shapeless blobs into architectural masterpieces.
- When you're ready to bake, preheat your oven to 350°F (175°C) and position a rack in the center. Roll out the chilled dough on a lightly floured surface to about 1/4-inch thickness, rotating it frequently to prevent sticking and adding flour sparingly. Too much flour makes tough cookies, and we're not making dog biscuits here. Use a 2-inch heart-shaped cutter to cut out cookies, gathering and rerolling scraps just once — the second reroll makes tougher cookies that nobody wants to eat, no matter how cute they look.
- Transfer the hearts to a parchment-lined baking sheet, spacing them 1 inch apart because they need room to breathe and you need room for the next part. Use a 1-inch heart cutter to remove the center from half the cookies — these will become your tops, creating that classic sandwich cookie look with a window to the jam. Don't throw away those tiny hearts! Bake them separately for 8 minutes and you've got adorable mini cookies that will disappear faster than you can say "quality control."
- Bake for 10-12 minutes, rotating the pan halfway through, until the edges are just starting to turn golden like a perfect tan. They'll look pale and underbaked in the centers, but that's exactly what you want — they continue cooking on the hot sheet after you pull them out, and overbaked cookies taste like sweetened cardboard. The smell should fill your kitchen with buttery vanilla clouds that make you consider abandoning all other life plans in favor of becoming a professional cookie baker.
- Let the cookies cool on the sheet for 5 minutes before transferring to a wire rack — this is the moment of truth where impatient bakers ruin everything by trying to move them too soon. While they're cooling, heat your jam in a small saucepan over low heat until it's loose and pourable, about 2 minutes. You're not cooking it, just making it spreadable so it settles into those heart windows like liquid rubies. If your jam has chunks of fruit bigger than a pea, give it a quick blitz with an immersion blender or press it through a sieve.
- Spread a thin layer of jam on the solid heart cookies, staying about 1/8 inch from the edge so it doesn't squish out when you sandwich them. Top with the cut-out hearts, pressing gently to adhere — you want them stuck together but not squashed like a bug on a windshield. Dust the tops with powdered sugar for that professional bakery look that makes people think you spent hours on these when really, the hardest part was waiting for the dough to chill.
- Let the assembled cookies set for at least 30 minutes before serving — this isn't torture, it's allowing the jam to cool and the cookies to meld together into a unified masterpiece. They'll keep for up to 5 days in an airtight container, though I've never personally witnessed them last longer than 48 hours. The flavors actually improve overnight, making these perfect for make-ahead entertaining or for hiding from your family and eating them all yourself while watching Netflix in your pajamas.
That's it — you did it. But hold on, I've got a few more tricks that'll take this to another level, secrets that separate good bakers from legendary ones whose cookies get requested at every gathering.
Insider Tricks for Flawless Results
The Temperature Rule Nobody Follows
Here's what separates the pros from the "I tried my best" crowd: temperature control at every stage. Your butter should be at 67°F when you start — soft enough to bend without breaking, firm enough that your finger doesn't sink in like quicksand. Use a instant-read thermometer if you're serious about consistency, because butter that's too warm makes cookies that spread like gossip in a small town. During rolling, if the dough gets too soft and starts sticking like clingy plastic wrap, slide it onto a baking sheet and freeze for 10 minutes. This isn't being fussy — it's the difference between cookies that look like they came from a bakery and cookies that look like they came from a kindergarten art project.
Why Your Nose Knows Best
Trust your senses more than the timer when baking these cookies. When they're ready, your kitchen will smell like a vanilla cloud descended from heaven and decided to live in your oven. The edges should be just barely golden, like someone who's been on vacation for three days, not three weeks. If you're unsure, pull one cookie off the sheet and let it cool for 2 minutes — if it firms up and holds its shape, you're golden. If it bends like a yoga instructor, give them another 2 minutes. Overbaked cookies taste like sweetened cardboard, and nobody has ever asked for the recipe for cardboard.
The 5-Minute Rest That Changes Everything
After you fill and sandwich your cookies, resist the urge to immediately devour them like a cookie monster on a bender. Let them sit uncovered on the counter for exactly 5 minutes — this allows the jam to cool slightly and the top cookie to settle into the perfect position. Then cover them loosely with a clean kitchen towel for another 25 minutes. This isn't torture — it's allowing the flavors to meld and the textures to harmonize like a well-rehearsed orchestra. A friend tried skipping this step once and ended up with cookies that slid apart like bad breakup, the jam oozing out like it was trying to escape. Patience, my friend, is the final ingredient in greatness.
The Flourishing Finish
That final dusting of powdered sugar isn't just for pretty pictures — it's your insurance policy against moisture that could make your cookies soggy. The sugar creates a microscopic barrier that keeps air away from the cookie surface, maintaining that crisp texture for days. Use a fine-mesh sieve and tap it gently like you're seasoning a steak, not like you're trying to bury evidence. The sugar should fall like the first snow of winter, light and ethereal, not like a blizzard that shuts down the highway. Too much sugar makes them look like they've been caught in a powdered sugar explosion, too little and they lose that professional bakery aesthetic that makes people ask for your business card.
The Storage Secret
Here's what nobody tells you about jam-filled cookies: they get better with age, but only if you store them right. Layer them between sheets of parchment paper in an airtight container, with a small piece of bread tucked in the corner. The bread acts like a humidity sponge, absorbing excess moisture that could make your cookies soggy while allowing the jam to set properly. Replace the bread every other day, and your cookies will stay crisp-edged and tender-centered for up to a week. I've had friends text me on day five asking if I'd made a fresh batch, when really they were eating cookies from the original batch that had been aging like fine wine in my pantry.
Creative Twists and Variations
This recipe is a playground. Once you've mastered the basic technique, you can create a cookie for every personality type, every season, every mood that strikes you. Here are some of my favorite ways to switch things up:
The Chocolate Heartbreaker
Replace 1/4 cup of the all-purpose flour with Dutch-processed cocoa powder for a rich, chocolate dough that tastes like brownie edges. Fill with orange marmalade for a sophisticated flavor pairing that makes people think you went to culinary school, or use raspberry jam for a classic chocolate-raspberry combo that never goes out of style. The cocoa makes the dough slightly more delicate, so chill it for an extra 30 minutes before rolling. Dust with a mixture of powdered sugar and cocoa powder for a mocha finish that looks like it came from a European café.
The Tropical Tease
Add the zest of one lime and 1/2 teaspoon of coconut extract to the dough for a tropical vacation in cookie form. Fill with mango or passion fruit jam for a cookie that tastes like summer in the Caribbean even when it's snowing outside. The lime zest adds brightness that cuts through the rich butter, while the coconut gives it that beach vacation vibe. These are dangerously addictive — I've seen grown adults fight over the last one like it was the final lifeboat on the Titanic.
The Spicy Romance
Mix 1 teaspoon of ground cardamom and a pinch of white pepper into the flour for a Scandinavian-inspired cookie that tastes like hygge in edible form. Fill with lingonberry or cloudberry jam if you can find it, or use raspberry with a splash of rosewater for a floral note that makes people close their eyes when they bite in. The cardamom adds warmth without heat, creating a complex flavor profile that unfolds like a good novel — you taste butter first, then vanilla, then this mysterious warmth that keeps you coming back for another bite to figure out what you're tasting.
The Nutty Professor
Replace 1/3 cup of the flour with very finely ground almonds or hazelnuts for a cookie that tastes like the best part of Italian biscotti without the jaw-breaking crunch. The nuts add richness and a subtle texture that makes these feel like they came from a fancy European bakery. Fill with apricot or cherry jam for a classic combination that pairs beautifully with coffee or dessert wine. The nut flour makes the dough slightly more fragile, so handle with care and don't roll too thin.
The Boozy Brunch
Add 1 tablespoon of bourbon or dark rum to the dough along with the vanilla, reducing the butter by 1 tablespoon to account for the liquid. The alcohol burns off during baking, leaving behind complex flavors that make people ask "what's in these?" in the best possible way. Fill with peach jam spiked with a few drops of bourbon for a cookie that tastes like Southern hospitality in a heart shape. These are perfect for bridal showers or any occasion where you want to seem sophisticated while secretly eating cookies for breakfast.
The Breakfast of Champions
Mix 2 tablespoons of very finely ground coffee into the flour for a cookie that tastes like the best part of your morning routine. Fill with orange marmalade for a marmalade-coffee combination that's surprisingly addictive, or use blackberry jam for a more intense flavor. The coffee adds depth without overwhelming sweetness, creating a cookie that pairs perfectly with actual coffee for a meta breakfast experience. These are my go-to for early morning meetings when I need to bribe people into being nice to me before 9 AM.
Storing and Bringing It Back to Life
Fridge Storage
Contrary to what your grandmother might have told you, these cookies do not belong in the refrigerator. The cold air sucks moisture out faster than a teenager drains a phone battery, leaving you with cookies that taste like they've been left on the counter since the last presidential administration. Keep them in an airtight container at room temperature, layered with parchment paper like you're building the world's most delicious lasagna. They'll stay crisp on the edges and tender in the centers for up to 5 days, though I've never personally witnessed them lasting that long in the wild. If your kitchen is particularly humid (looking at you, Florida), add a small packet of food-grade silica gel to absorb excess moisture without drying out your cookies.
Freezer Friendly
These cookies freeze like champions, both before and after baking. For the dough, roll it out, cut your shapes, and freeze them on a baking sheet for 2 hours before transferring to a freezer bag with layers of parchment between. They'll keep for up to 2 months, and you can bake them straight from frozen — just add 2 extra minutes to the baking time. For already-baked cookies, freeze them unfilled on a baking sheet, then fill them after thawing for 30 minutes at room temperature. The jam doesn't freeze well in assembled cookies — it gets icy and weeps when thawed, creating a soggy situation that nobody wants to deal with. Frozen dough means fresh cookies on demand, which is basically a superpower during the holidays or anytime you need to impress unexpected guests.
Best Reheating Method
If your cookies have gone a bit soft (tragic, but it happens), you can revive them to their former glory. Preheat your oven to 300°F (150°C) and place the cookies on a baking sheet for 5-7 minutes. They'll crisp right back up, though you'll want to let them cool completely before filling them again. For already-filled cookies that need a refresh, place them in a 250°F (120°C) oven for just 3-4 minutes, then let them cool before serving. Add a tiny splash of water to the jam before reheating — it steams back to perfection without turning into sticky concrete. Whatever you do, resist the microwave unless you enjoy cookies that taste like hot cardboard with jam glue.