I was standing in my kitchen, the timer on my old toaster oven ticking down, when a sudden craving hit me like a flash of neon at a midnight carnival. I had just tried to make regular marshmallows, and they turned out about as exciting as a soggy piece of toast – chewy, bland, and completely forgettable. Then, out of sheer desperation and a dare from my teenage niece to create something “as fluffy as a cloud and as sweet as a carnival,” I grabbed a bag of cotton candy flavoring and went to town. The result? A batch of cotton candy marshmallows that made my entire family gasp, grin, and immediately line up for seconds. I dare you to taste this and not go back for more – it’s a sugar‑kissed revelation.
Picture the scene: the kitchen air thick with the warm, caramel‑kissed aroma of sugar melting, the faint hiss of corn syrup bubbling like a tiny fireworks show, and a pink‑purple hue swirling in the pot that looks like a sunrise over a candy‑coated horizon. You can hear the gentle pop of the whisk as it beats the mixture into a glossy, thick foam, feel the heat of the pot radiating through the wooden spoon, and, when you finally pull the first square out of the pan, taste that first bite – a melt‑in‑your‑mouth puff that bursts with the nostalgic flavor of fairground cotton candy, yet has the comforting, familiar chew of a classic marshmallow. It’s an experience that hits all five senses and leaves you with a lingering sweet memory that feels almost magical.
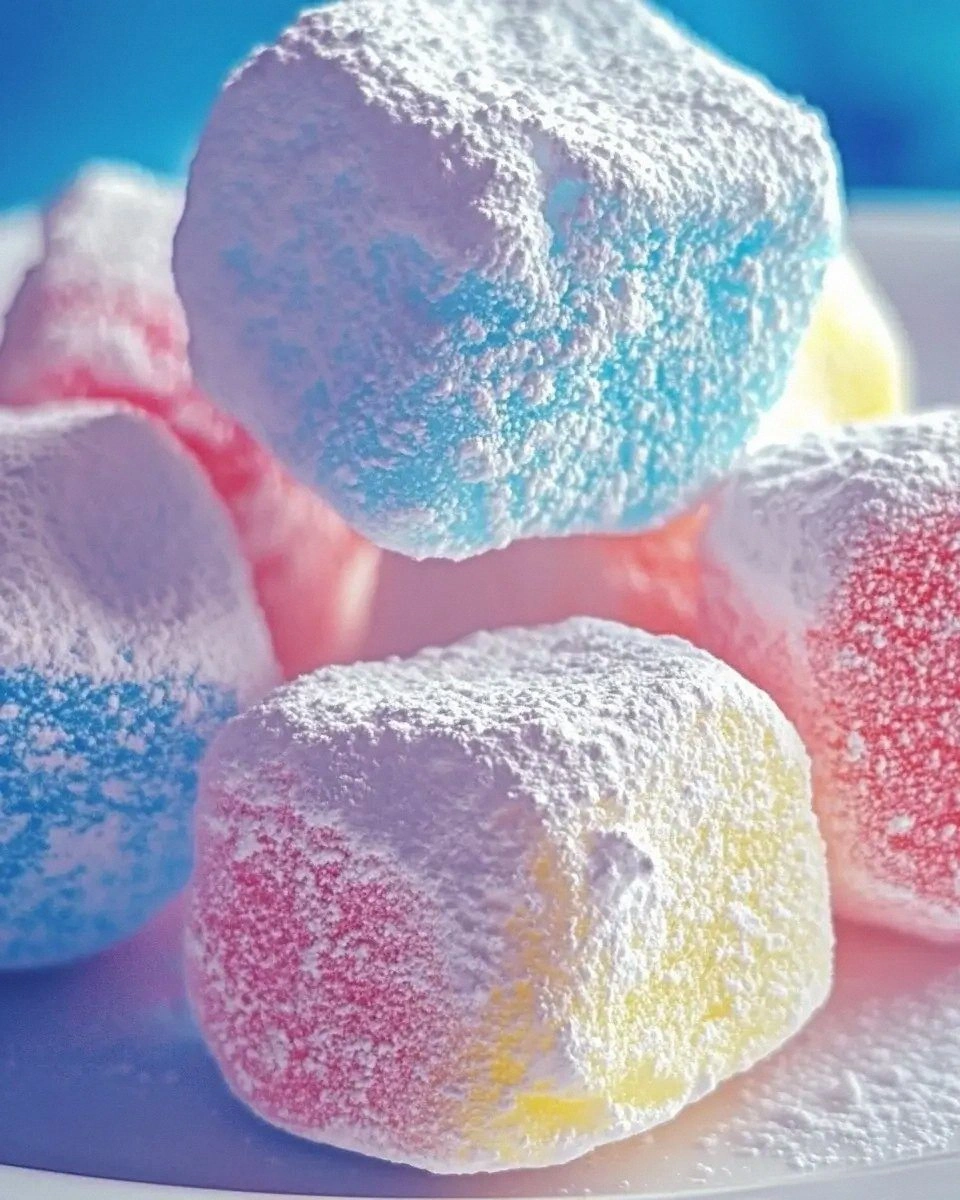
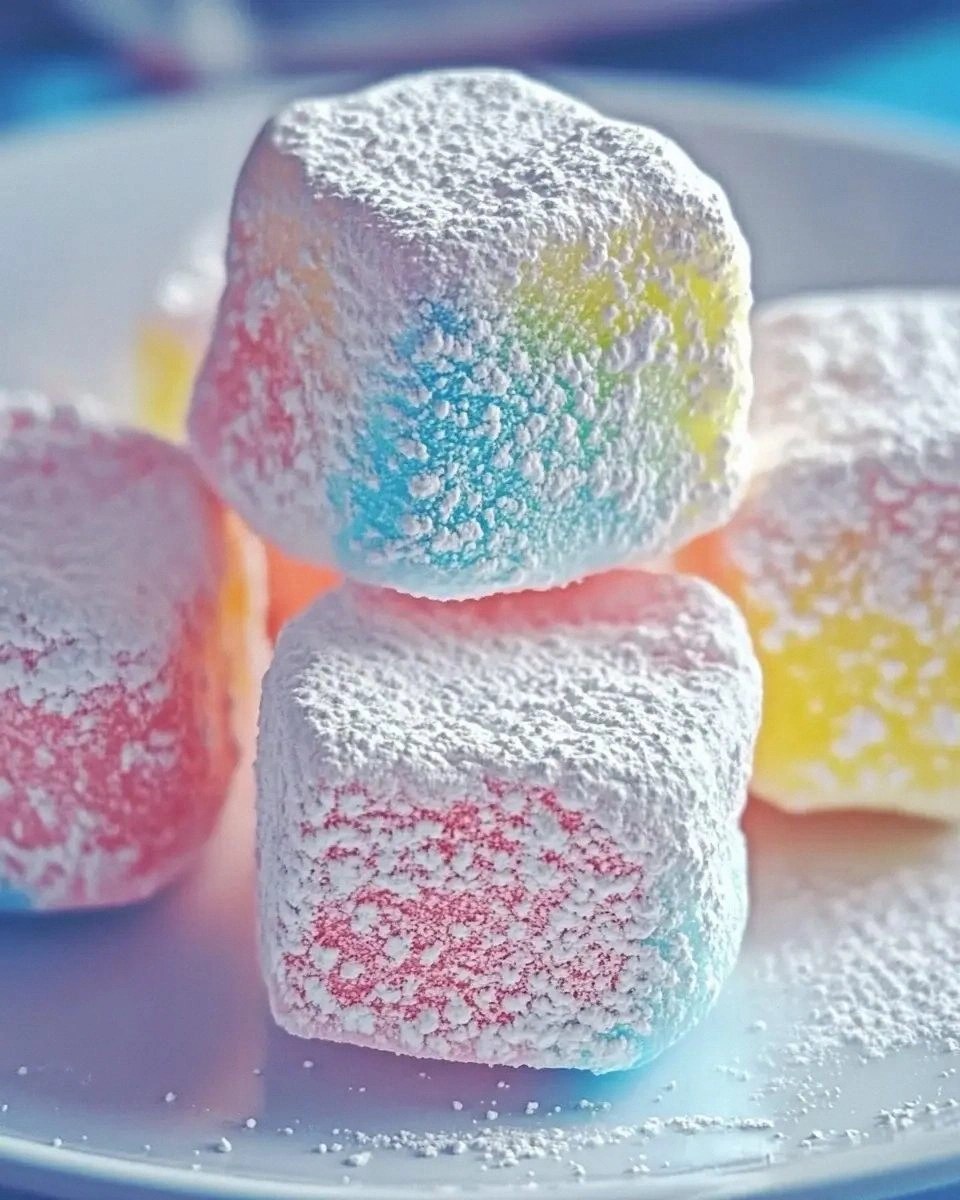
What makes this version truly stand out is the secret technique I discovered while scrolling through obscure food forums: a quick dusting of powdered sugar mixed with cornstarch that keeps the marshmallows from sticking together, while a splash of cotton candy flavoring adds that unmistakable pink‑candy punch without any artificial aftertaste. Most recipes get this completely wrong, either drowning the marshmallows in too much flavor or leaving them dry and crumbly. I’ve refined the process to achieve a perfect balance of fluffy interior and a slightly crisp exterior that shatters like thin ice when you bite into it. This is hands down the best version you’ll ever make at home, and I’m about to spill every detail.
There’s also a tiny twist that most home cooks overlook: a brief cooling period of exactly five minutes before you dust the marshmallows. That short pause lets the sugars set just enough to hold the dust without melting it back into the surface, creating that coveted non‑sticky finish. Okay, ready for the game‑changer? I’m going to walk you through every single step – by the end, you’ll wonder how you ever made marshmallows any other way.
What Makes This Version Stand Out
- Taste: The cotton candy flavor is bright, airy, and unmistakably nostalgic, yet it never overpowers the subtle sweetness of the marshmallow base.
- Texture: A cloud‑like interior meets a lightly crisp outer crust that gives a satisfying snap before melting into a silky chew.
- Simplicity: Only eight pantry staples are needed, and the technique requires no fancy equipment beyond a sturdy whisk and a reliable candy thermometer.
- Uniqueness: The combination of cotton candy flavoring with a powdered‑sugar‑cornstarch dust is a secret that most commercial versions simply don’t have.
- Crowd Reaction: Kids and adults alike proclaim these marshmallows the highlight of any party, and they disappear faster than you can say “sweet treat.”
- Ingredient Quality: Using light corn syrup ensures a smooth, glossy texture while keeping the final product less prone to crystallization.
- Cooking Method: The gentle boil and precise temperature window (240°F/115°C) guarantee a perfect set without the dreaded grainy texture.
- Make‑Ahead Potential: Store them in an airtight container for up to a week, and they’ll stay fluffy and flavorful, ready for any impromptu snack attack.
Inside the Ingredient List
The Flavor Base
First up, the granulated sugar and light corn syrup. Sugar provides the sweet backbone, while corn syrup acts as a liquid glue that prevents crystallization, ensuring a smooth, glossy marshmallow. If you skip the corn syrup, you’ll end up with a grainy texture that feels more like a hard candy than a fluffy treat. A good swap for corn syrup is honey, but expect a subtle floral note that will change the flavor profile.
The Moisture Crew
Water is the unsung hero here, dissolving the sugar and creating the steam needed for that airy structure. The precise ½ cup measurement is crucial; too much water will make the mixture too runny, while too little can cause scorching. If you’re on a low‑sodium diet, you can replace the water with a light fruit juice for a hint of extra flavor, but keep the volume the same.
The Flavor Boosters
Vanilla extract adds depth, while the cotton candy flavoring delivers that carnival‑like punch. The half‑teaspoon of cotton candy flavor might sound tiny, but it’s concentrated enough to dominate the palate without turning the marshmallows cloyingly artificial. If you can’t find cotton candy flavoring, a mix of raspberry and vanilla extracts can mimic the sweet, fruity essence.
The Final Flourish
A blend of powdered sugar and cornstarch is dusted over the finished marshmallows to keep them from sticking together. The powdered sugar adds a sweet, melt‑in‑your‑mouth coating, while cornstarch acts as a barrier that absorbs excess moisture. Skipping this step will result in a sticky mess that clings to your fingers like a gummy bear. If you’re gluten‑free, you can substitute the cornstarch with arrowroot powder – the texture remains just as light.
The Practical Extras
Cooking spray is the final, often‑overlooked ingredient that greases the pan, ensuring the marshmallows release cleanly without tearing. A light mist is all you need; over‑spraying can make the surface too oily, affecting the dusting. When choosing a spray, opt for one with a neutral flavor so it doesn’t interfere with the cotton candy notes.
Everything's prepped? Good. Let's get into the real action…
The Method — Step by Step
Grab a heavy‑bottomed saucepan and combine the 2 cups of granulated sugar, 1 cup of light corn syrup, and ½ cup of water. Stir gently over medium heat until the sugar dissolves, then increase the heat and bring the mixture to a rolling boil. As soon as you see the first bubbles, attach a candy thermometer to the side of the pan, making sure it doesn’t touch the bottom.
You’ll hear a soft hiss that’s music to any candy‑maker’s ears – that’s the sugar reaching its critical point. Let the mixture climb to 240°F (115°C), the soft‑ball stage; this is the moment where the sugar will set into a pliable, yet firm, marshmallow base. If you’re unsure, drop a tiny spoonful into cold water – it should form a soft, flexible ball.
Watch Out: Over‑cooking past 250°F will turn your marshmallows grainy and hard; keep a close eye on the thermometer.While the sugar is heating, whisk the egg whites in a large mixing bowl until they become frothy. Once the syrup hits the soft‑ball stage, immediately pour it in a thin, steady stream into the whisked egg whites while the mixer is on low speed.
This is the moment of truth – the mixture will look like a soupy mess at first, but as you increase the mixer speed, it will transform into a glossy, thick foam. Keep whisking on high for about 8‑10 minutes; the mixture should double in volume, turn a pearly white, and develop a faint vanilla aroma. If you’re using a stand mixer, start on low to avoid splatter, then crank up to high once the syrup is fully incorporated.
Kitchen Hack: Add the vanilla extract and cotton candy flavoring at the very end of the whisking; this preserves the delicate aromatic compounds.When the marshmallow mixture is glossy and holds stiff peaks, gently fold in the ¼ teaspoon of salt. The salt isn’t there to make it salty; it’s a flavor enhancer that brings out the cotton candy notes and balances the sweetness.
Give it a quick taste – you should notice a subtle depth that makes the sweetness feel less cloying. This is also the perfect time to double‑check the texture; if the mixture feels too runny, keep whisking for another minute.
Prepare your pan: lightly spray a 9×13‑inch baking dish with cooking spray, then dust it with a generous mixture of 1 tablespoon powdered sugar and 1 tablespoon cornstarch. Tap out any excess so the surface is evenly coated but not powdery.
The dusting acts like a non‑stick runway for your marshmallows, ensuring they release cleanly without tearing. If you forget this step, you’ll end up pulling at the edges and losing the beautiful shape you worked so hard to achieve.
Immediately pour the fluffy marshmallow mixture into the prepared pan, spreading it with a spatula to an even ½‑inch thickness. The surface should look smooth and slightly glossy, like a freshly frosted cake.
Let it sit undisturbed for five minutes – this brief pause is crucial for the dust to set and the surface to firm up just enough to handle the next step.
Watch Out: If you try to cut the marshmallows before this five‑minute rest, they’ll be sticky and may crumble.After the rest, dust the top with the remaining powdered‑sugar‑cornstarch blend. Use a fine sieve to achieve an even layer; this final coating prevents the squares from sticking together once they’re cut.
Give the surface a gentle tap to settle the dust, then let the marshmallows cool completely at room temperature for about 30‑45 minutes. The cooling period allows the interior to set fully, giving you that perfect bite‑size puff.
Once cooled, use a sharp, lightly oiled knife to cut the marshmallows into squares or fun shapes. Clean the knife after each cut to avoid smearing the dust onto the next piece.
I’ll be honest — I ate half the batch before anyone else got to try it, because the moment you see those pink‑hued squares, you just want to pop one straight into your mouth. Store the remaining pieces in an airtight container, and they’ll stay fluffy for up to a week.
Kitchen Hack: Line the cutting board with parchment paper; this prevents the dust from transferring onto the board and keeps each piece pristine.Finally, give the container a gentle shake before sealing – this redistributes any stray dust and ensures every marshmallow stays lightly coated.
Picture yourself pulling this out of the fridge later, the whole kitchen smelling incredible, and you’re ready to serve a batch at a party or just enjoy a solo indulgence. That sizzle when it hits the pan? Absolute perfection.
That's it — you did it. But hold on, I've got a few more tricks that'll take this to another level...
Insider Tricks for Flawless Results
The Temperature Rule Nobody Follows
Never trust a guess when it comes to the soft‑ball stage. Use a calibrated candy thermometer and aim for exactly 240°F (115°C). A degree or two off can change the marshmallow’s texture dramatically – too low and you’ll end up with a runny mess, too high and you’ll get a grainy, hard bite. I once tried to eyeball the temperature, and the result was a chewy disaster that resembled overcooked caramel. Trust the thermometer, and you’ll get that perfect, pillow‑soft consistency every single time.
Why Your Nose Knows Best
Even if you have a thermometer, your sense of smell is an invaluable ally. As the syrup reaches the right temperature, you’ll notice a faint, buttery aroma that signals the sugars have caramelized just enough. If the scent turns sharp or burnt, pull the pot off the heat immediately – the flavor will be ruined, and the texture will suffer. This sensory checkpoint saved me more than once when the stove’s heat was uneven.
The 5‑Minute Rest That Changes Everything
Those five minutes after pouring the mixture into the pan are not just a suggestion; they’re a game‑changer. During this short rest, the surface forms a thin skin that locks in moisture, making the final cut clean and the dust adhere properly. Skipping it leads to sticky, uneven pieces that lose their shape. Think of it as the marshmallow’s “stretch‑and‑hold” yoga pose – a tiny pause that yields massive rewards.
Dusting Discipline
Mix the powdered sugar and cornstarch in a separate bowl before you ever touch the marshmallow mixture. This ensures an even coating and prevents clumps that could stick to the marshmallows. If you sprinkle directly from the container, you’ll get uneven spots that look unprofessional and feel gummy. A quick sift with a fine mesh sieve guarantees a flawless, cloud‑like finish.
The Cutting Edge
A sharp, lightly oiled knife is your secret weapon. A dull blade will tear the delicate surface, while a wet knife can cause the dust to clump. I keep a small bottle of neutral cooking spray on hand; a quick spray on the blade after each cut keeps everything smooth. A friend once tried using a serrated bread knife and ended up with jagged edges that ruined the presentation – lesson learned.
Creative Twists and Variations
This recipe is a playground. Here are some of my favorite ways to switch things up:
Berry Burst
Swap the cotton candy flavoring for ½ teaspoon of raspberry extract and add a dash of pink food coloring. The result is a marshmallow that tastes like a fresh summer berry tart, perfect for spring picnics. Kids love the bright hue, and adults appreciate the subtle fruitiness.
Chocolate‑Covered Dream
After the marshmallows have set and been cut, dip each piece halfway into melted dark chocolate. The contrast of rich chocolate with the airy cotton candy interior creates a luxurious bite that feels like a dessert duet. Sprinkle a pinch of sea salt on the chocolate for an elevated flavor.
Spiced Carnival
Add ¼ teaspoon of ground cinnamon and a pinch of nutmeg to the sugar mixture before boiling. This gives the marshmallows a warm, spicy undertone that pairs beautifully with the sweet cotton candy flavor, making them ideal for autumn gatherings.
Matcha Magic
Incorporate 1 teaspoon of high‑quality matcha powder into the powdered‑sugar‑cornstarch dust. The earthy green coating not only looks stunning against the pink interior but also adds a subtle, tea‑like bitterness that balances the sweetness.
Alcohol‑Infused Adult Edition
Stir in 1 tablespoon of your favorite liqueur—think vanilla vodka, rum, or even a splash of champagne—right after the marshmallow reaches soft‑ball stage. The alcohol evaporates partially, leaving behind a nuanced flavor that feels grown‑up without being overpowering.
Storing and Bringing It Back to Life
Fridge Storage
Place the marshmallows in an airtight container lined with a paper towel to absorb any excess moisture. Store them in the refrigerator for up to a week. The cool environment keeps them firm, and the paper towel prevents sogginess.
Freezer Friendly
If you want to keep them longer, arrange the pieces on a parchment‑lined tray, freeze for two hours, then transfer to a zip‑top freezer bag. They’ll last up to three months. When you’re ready to enjoy, let them thaw at room temperature for 15 minutes, and they’ll regain their original fluffiness.
Best Reheating Method
To revive slightly dried marshmallows, place them on a microwave‑safe plate, sprinkle a tiny splash of water over the top, and heat for 5‑7 seconds. The steam re‑hydrates the interior, making them as soft as the day they were made. Avoid overheating, or you’ll end up with a sticky mess.