I was standing in my kitchen, staring at a half‑melted bag of white chocolate that had somehow decided to turn into a sticky, amber puddle on the counter. The holiday playlist was blaring, my cat was batting at a dangling ornament, and a friend had just dared me to create a dessert that could survive a snowstorm and still look cute enough for the Instagram feed. I thought, “Why not?” and the result was an avalanche of sugary snowmen that practically melt in your mouth. This moment of chaotic inspiration turned into what I now swear is the most addictive no‑bake treat you’ll ever make.
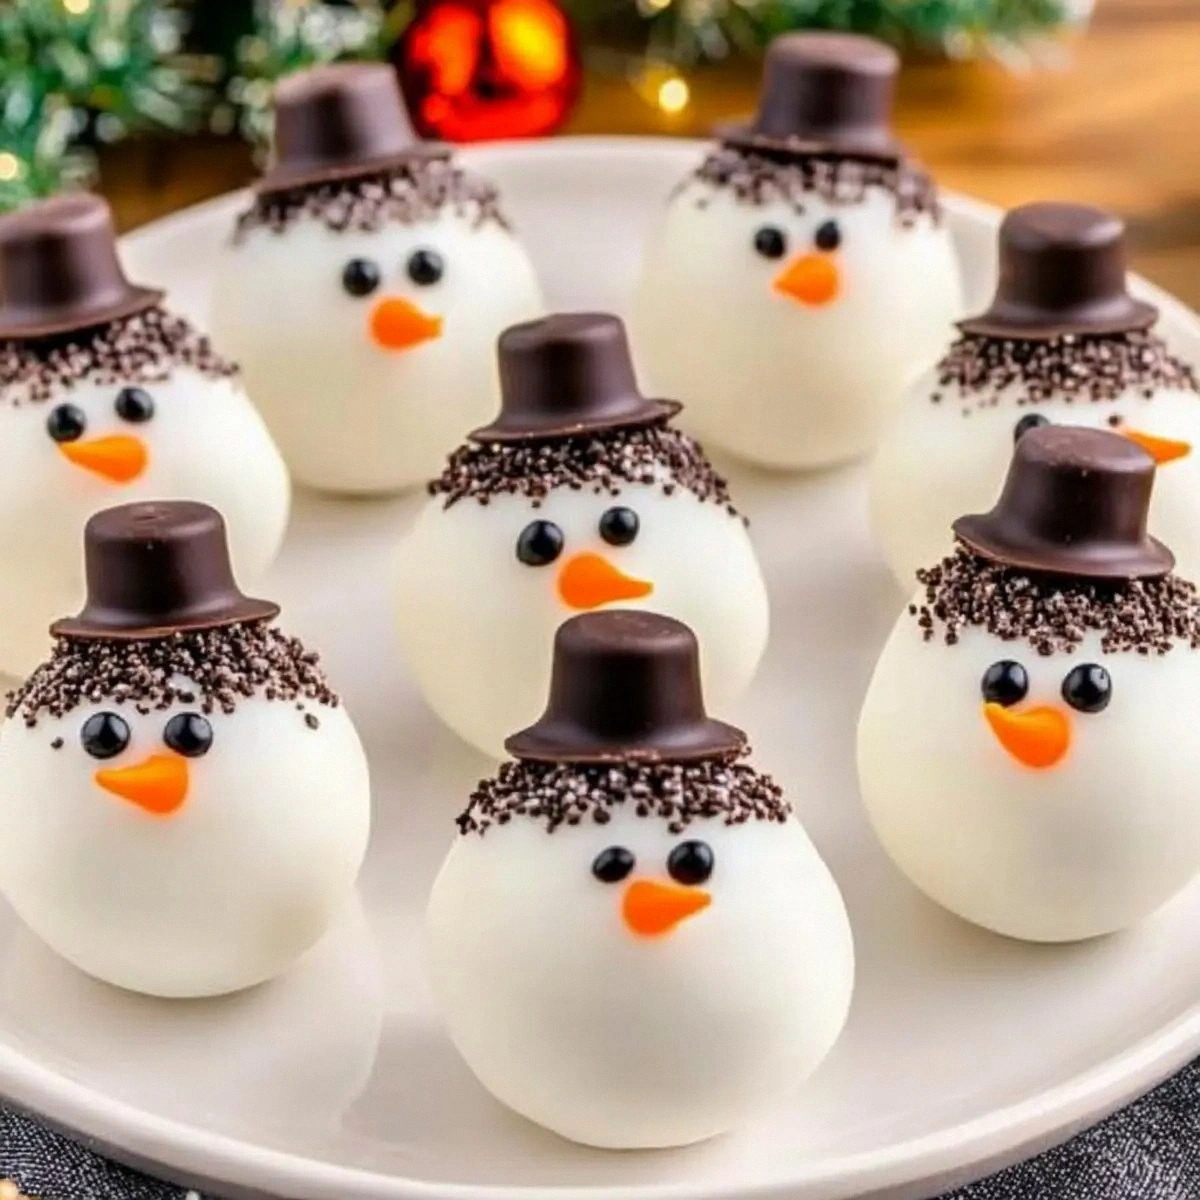
Imagine the first bite: a crunchy Oreo shell that shatters like fresh ice, a creamy, tangy center that feels like a cloud of vanilla‑kissed snow, and a glossy white chocolate coat that snaps with the satisfying crack of a wintery frost. The scent of toasted cookies and melting white chocolate wafts through the kitchen, mingling with the faint piney aroma of holiday décor, while the cool, smooth texture slides over your tongue like a sled on fresh powder. You can practically hear the faint jingle of tiny bells as you roll each ball in the festive sprinkle mix, each pop of color a reminder that the holidays are about joy, indulgence, and a little bit of mischievous fun.
What sets this version apart from every other “snowman” recipe you’ve seen on Pinterest? First, the base isn’t just crushed cookies and butter—it’s a perfectly balanced blend of Oreo crumbs, cream cheese, and a secret dash of vanilla that creates a silky, melt‑in‑your‑mouth interior. Second, we use Ghirardelli white melting wafers, which give a glossy, buttery finish that ordinary white chocolate can never match. Third, the mini Oreos and dark chocolate Rolo candies act as the eyes and nose, adding a pop of contrast that makes each snowman look like it stepped straight out of a winter wonderland. And finally, the sprinkle mix isn’t just for show; it adds a subtle crunch and a burst of holiday flavor that ties everything together.
I’ll let you in on a little secret: the technique for coating the balls is what truly elevates this dish. Instead of dipping each ball by hand, we’ll use a quick “dip‑and‑roll” method that ensures an even, glossy coat without any clumps. This trick is the game‑changer that turns a simple snack into a professional‑grade confection. Let me walk you through every single step — by the end, you’ll wonder how you ever made it any other way.
What Makes This Version Stand Out
- Flavor: The cream cheese adds a subtle tang that cuts through the sweetness, while the white chocolate provides a buttery, melt‑in‑your‑mouth richness.
- Texture: A crunchy Oreo exterior gives way to a soft, creamy interior, creating a delightful contrast that feels like biting into a snow‑kissed cloud.
- Simplicity: No oven, no complicated equipment—just a bowl, a spatula, and a couple of minutes of your time.
- Uniqueness: Using Ghirardelli white wafers for the coating gives a professional sheen that store‑bought mixes can’t replicate.
- Crowd Reaction: These snowmen disappear faster than you can say “Happy Holidays,” making them the perfect party centerpiece.
- Ingredient Quality: Each component, from premium Oreos to real cream cheese, is chosen for maximum flavor impact.
- Method: The no‑bake, dip‑and‑roll technique ensures consistent results every single time.
- Make‑Ahead Potential: You can prep the balls days in advance and store them, keeping them fresh and ready for any gathering.
Alright, let's break down exactly what goes into this masterpiece...
Inside the Ingredient List
The Flavor Base
The cornerstone of our snowmen is the Oreo cookie crumb and cream cheese blend. The Oreo cookies bring that iconic chocolate‑cream flavor, while the cream cheese adds a tangy richness that prevents the mixture from becoming overly sweet. Skipping the cream cheese would leave you with a dry, crumbly texture that can't hold its shape—trust me, I've tried, and it was a disaster. If you’re dairy‑free, a full‑fat coconut cream can substitute, but expect a slight coconut undertone that might clash with the white chocolate.
The Texture Crew
Ghirardelli White Melting Wafers are the secret weapon for that glossy, buttery coating. Unlike regular white chocolate, these wafers melt smoothly at lower temperatures, giving you a perfect sheen without the grainy texture. If you can’t find them, a high‑quality white chocolate bar chopped into small pieces works, but you’ll need to temper it carefully to avoid a dull finish. Mini Oreos serve as the tiny “snow” accents on each ball, adding a crunchy bite that contrasts the soft interior.
The Unexpected Star
Dark Chocolate Rolo Candies are the eyes and nose of our snowmen, delivering a burst of deep cocoa that balances the sweet white coating. Their firm texture holds up well during the coating process, preventing them from melting into the chocolate. If you’re a fan of caramel, you could swap them for caramel-filled chocolates, but be prepared for a stickier result that may require extra cooling time.
The Final Flourish
The Holly and Snowman Sprinkle Mix isn’t just decorative; the blend of red and white sugar crystals adds a subtle crunch and a festive visual pop that makes each bite feel like a celebration. Skipping this step would leave your snowmen looking bland, and the texture would suffer. For a nut‑free version, use a simple mix of white non‑pareve sprinkles and red sanding sugar.
Everything's prepped? Good. Let's get into the real action...
The Method — Step by Step
First, crush the Oreo cookies into fine crumbs. I like to place the cookies in a zip‑top bag and bash them with a rolling pin until they’re a uniform powder. Pour the crumbs into a large mixing bowl and add the softened cream cheese. Using a sturdy spatula, fold the cheese into the crumbs until the mixture is smooth, glossy, and holds together when pressed—think of it as the snow that’s just ready to be shaped into a snowball.
Kitchen Hack: Chill the bowl for 5 minutes after mixing; the colder mixture is easier to roll into perfect spheres.While the mixture chills, prepare your coating. Place the Ghirardelli white melting wafers in a microwave‑safe bowl and melt them in 20‑second bursts, stirring after each interval to avoid scorching. The goal is a smooth, glossy liquid that flows like melted snow. Once melted, set the bowl aside for a minute; the temperature should be warm but not hot enough to melt the Mini Oreos when they touch the surface.
Now, shape the snowmen. Using a small ice‑cream scoop (about 1‑2 tablespoons), scoop out the Oreo‑cream mixture and roll it between your palms into a smooth ball. This step is where the magic happens—press gently to ensure the ball stays intact, then place it on a parchment‑lined tray. Continue until you have about 12‑14 balls, depending on size preference.
Time for the “dip‑and‑roll.” Hold a ball with a fork or a pair of tongs, dip it quickly into the melted white chocolate, letting any excess drip back into the bowl. While the coating is still wet, roll the ball in the Holly and Snowman Sprinkle Mix, ensuring an even layer of festive sparkle. This is the part where the snowman truly comes to life—watch the glaze cling like fresh frost on a pine branch.
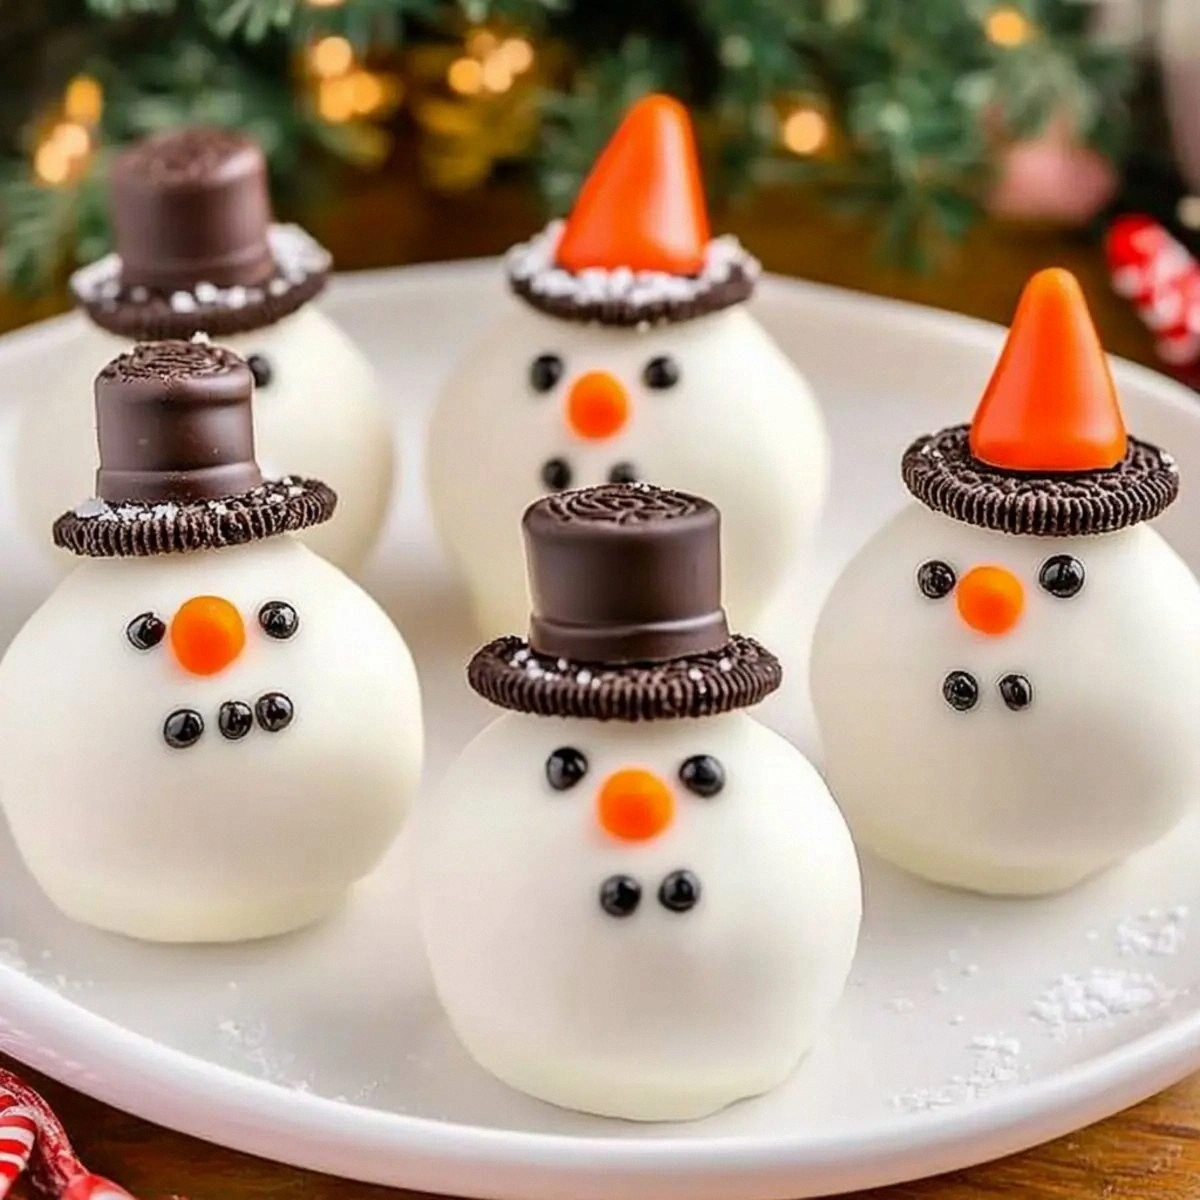
Place the coated balls back onto the parchment sheet, spacing them a few centimeters apart. Immediately press a Mini Oreo onto the “head” area of each ball to create the classic snowman “hat” effect, and gently press a Dark Chocolate Rolo candy into the “face” to serve as the nose and one eye. For the second eye, use a tiny piece of the Mini Oreo or a chocolate chip. I dare you to taste this and not go back for seconds.
Here’s a crucial step: let the snowmen set. Transfer the tray to the refrigerator for at least 20 minutes, or until the white chocolate coating is firm to the touch. This cooling period is essential; if you try to move them while the coating is still soft, they’ll lose their shape and the sprinkles will fall off.
Watch Out: Over‑melting the white chocolate can cause it to become grainy and lose its glossy finish—keep a close eye on the microwave timer.While the snowmen chill, prepare a second batch of coating if you’re aiming for extra thickness. Repeat the melt‑and‑dip process, but this time give each ball a quick second dip for a double‑layered shell that crackles like fresh ice when you bite into it. This extra layer adds a satisfying crunch and makes the treat even more photogenic.
Finally, serve! Arrange the snowmen on a festive platter, perhaps surrounded by fresh rosemary sprigs or a dusting of powdered sugar for that extra wintery vibe. Picture yourself pulling this out of the fridge, the whole kitchen smelling incredible, and guests’ eyes widening at the sight of perfectly formed snowmen ready to be devoured. And now the fun part—watch them disappear.
That's it — you did it. But hold on, I've got a few more tricks that'll take this to another level...
Insider Tricks for Flawless Results
The Temperature Rule Nobody Follows
Never melt white chocolate above 115°F (46°C). Exceeding this temperature breaks down the cocoa butter, resulting in a dull, chalky coating. I always use a kitchen thermometer and melt in short bursts, stirring constantly. A friend once tried to melt it on the stovetop without a double boiler and ended up with a grainy mess—let's just say the snowmen looked more like snow‑drifts than snowmen.
Why Your Nose Knows Best
When the coating is ready, it should give off a faint buttery aroma that’s almost nutty. If you smell a burnt or overly sweet scent, the chocolate is over‑cooked. Trust your nose; it’s the most reliable indicator that the coating will set with a glossy finish. This sensory checkpoint saves you from a batch of dull, matte snowmen that look like they’ve been left out in the rain.
The 5‑Minute Rest That Changes Everything
After shaping the Oreo‑cream balls, let them rest on the parchment for five minutes before dipping. This short pause allows the interior to firm up, reducing the chance of the balls cracking when they hit the warm chocolate. I once skipped this rest and ended up with a handful of “snowmen” that split open like fragile ice sculptures.
Cold Hands, Warm Heart
When handling the balls, keep your hands cool—run them under cold water and dry thoroughly. Warm hands can melt the coating instantly, causing uneven layers and a messy appearance. I keep a bowl of ice water nearby during the dipping stage; it’s a simple trick that makes the process smoother than a freshly‑zoned ski slope.
The Double‑Dip Secret
For an extra crunch, perform a quick double dip: after the first coating sets, melt a fresh batch of white chocolate and give each ball a rapid second immersion. This creates a thin, crisp shell that snaps satisfyingly when you bite. The double‑dip also helps the sprinkles adhere better, ensuring they stay in place even after a few hours of handling.
Creative Twists and Variations
This recipe is a playground. Here are some of my favorite ways to switch things up:
Peppermint Snowmen
Swap the Holly and Snowman Sprinkle Mix for crushed peppermint candies and white chocolate shavings. The minty crunch adds a refreshing bite that pairs beautifully with the rich white chocolate coating. Perfect for a post‑dinner treat when you want a palate cleanser with a festive twist.
Chocolate‑Dipped Delight
Instead of white chocolate, use dark chocolate wafers for the coating. The deep cocoa flavor contrasts the sweet Oreo base, creating a sophisticated dessert that feels more adult‑oriented. Top with gold dust for an elegant holiday soirée.
Caramel Snowmen
Drizzle a thin ribbon of salted caramel over the set snowmen just before serving. The salty‑sweet combination elevates the flavor profile, making each bite feel like a luxurious winter indulgence. A pinch of sea salt on the caramel adds an extra pop.
Nutty Snowball Surprise
Fold finely chopped toasted hazelnuts or almonds into the Oreo‑cream mixture before shaping. The nuts add a buttery crunch that complements the creamy interior and gives the snowmen a rustic, holiday‑market vibe.
Vegan Snowmen
Replace the cream cheese with a vegan cream cheese alternative and use dairy‑free white chocolate. Ensure the Mini Oreos are vegan (some are). The result is a plant‑based version that still delivers the same melt‑in‑your‑mouth experience, perfect for inclusive gatherings.
Miniature Snowmen Bites
Form the mixture into bite‑size pearls, about the size of a marble, and coat them in white chocolate. These mini bites are ideal for cocktail parties, allowing guests to pop a few into their mouths without committing to a full‑size snowman.
Storing and Bringing It Back to Life
Fridge Storage
Place the finished snowmen in an airtight container lined with parchment paper. They’ll stay fresh for up to five days in the refrigerator. Keep them on the middle shelf where the temperature is most stable, and avoid stacking them directly on top of each other to prevent the coating from sticking.
Freezer Friendly
If you need to make them ahead of time, freeze the snowmen on a tray for one hour, then transfer to a zip‑top freezer bag. They’ll keep for up to three months. When you’re ready to serve, let them thaw in the fridge for 30 minutes, then give them a quick 10‑second blast in the microwave (or a few seconds in a warm oven) to restore the glossy sheen.
Best Reheating Method
To revive a slightly hardened coating, place the snowmen on a microwave‑safe plate, add a tiny splash of water (about a teaspoon) to the plate’s edge, and heat for 5‑7 seconds. The steam generated will gently melt the outer layer, restoring that fresh‑out‑of‑the‑fridge sparkle without compromising the interior texture.