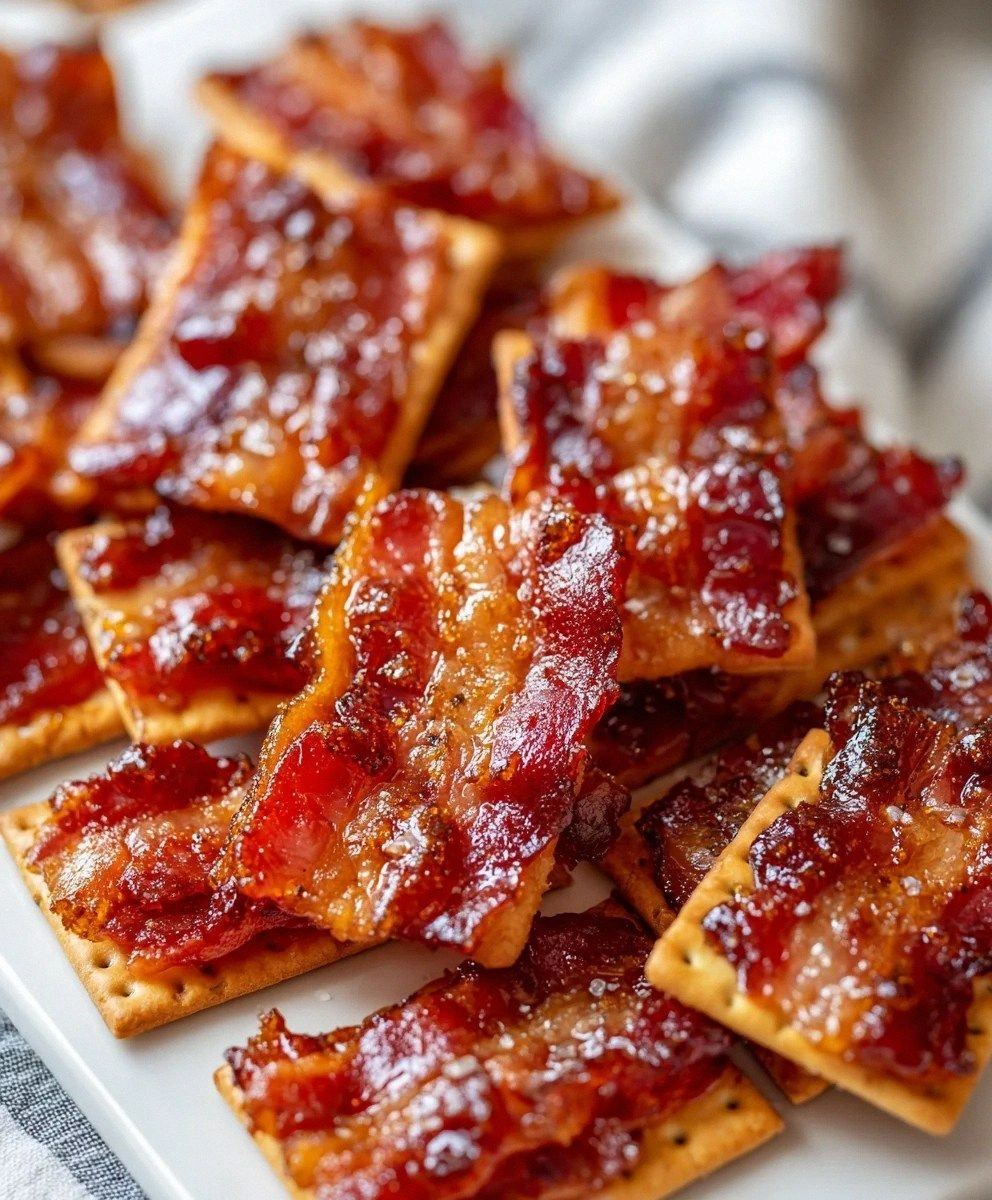
I still remember the exact moment I discovered what would become my most-requested party trick. It was 11:47 p.m. on a Tuesday, I was in my pajamas, and I had exactly three things in my pantry: a sleeve of Club crackers, half a pound of bacon, and a bottle of maple syrup I'd been saving for "something special." My friends were coming over for game night the next evening, and I'd promised snacks. Not just any snacks—I'd bragged about bringing "the best thing they'd ever tasted." Classic move, right? So there I stood, staring at these humble ingredients, when inspiration struck like lightning. Thirty minutes later, I was burning my tongue on caramelized maple bacon perched on a cracker, and my life changed forever.
Picture this: your kitchen filling with the intoxicating aroma of smoky bacon mingling with sweet maple, the sound of caramel bubbling and crackling, the sight of glossy, candied perfection cooling on parchment. That first bite? It's like someone took everything good about breakfast, dinner, and dessert, then compressed it into one absurdly addictive bite-sized package. The cracker stays crisp despite its bath in maple-brown sugar bliss, the bacon transforms into candy-like strips that shatter between your teeth, and that hit of black pepper? It's the wake-up call your taste buds didn't know they needed.
I've made these Maple Candied Bacon Crackers for every occasion since that fateful night—book clubs where they disappeared in minutes, holiday parties where people followed me around asking for the recipe, even a wedding shower where the bride threatened to cancel the cake in favor of more crackers. They're that good. Most recipes get this completely wrong by either making it too complicated or missing the crucial technique that makes the bacon candy-perfect instead of chewy or burnt.
Here's what actually works: letting the maple syrup reduce just enough to become a glossy coating without turning into tooth-breaking cement, using thick-cut bacon that stays tender inside while getting crispy edges, and that secret ingredient you won't expect—freshly cracked black pepper that makes the whole thing sing. Let me walk you through every single step—by the end, you'll wonder how you ever made it any other way.
What Makes This Version Stand Out
Flavor Bomb: The combination of pure maple syrup and light brown sugar creates a depth of flavor that's impossible to achieve with just one sweetener. The maple brings those woodsy, complex notes while the brown sugar adds molasses richness. Together, they create a caramel that tastes like it came from a gourmet candy shop, not your kitchen.
Texture Perfection: Most candied bacon turns into jaw-workout jerky or greasy limp strips. This method produces bacon that shatters like thin ice on the surface while maintaining a tender, meaty center. The crackers absorb just enough glaze to become candy-like themselves while staying crisp—it's a textural miracle that shouldn't work but absolutely does.
Foolproof Simplicity: Five ingredients. One pan. Twenty-five minutes. That's it. No candy thermometers, no finicky stages, no standing over the stove stirring constantly. If you can arrange crackers on a baking sheet and drizzle syrup, you can make these. I dare you to taste this and not go back for seconds.
Show-Stopping Presentation: These look like they came from a fancy gourmet shop, all glossy and golden with bacon that gleams like stained glass. Stack them on a platter and watch people's eyes widen. They'll think you spent hours in the kitchen when really, you were probably scrolling through your phone while the oven did all the work.
Make-Ahead Magic: Here's the game-changer—you can prep these up to three days ahead and they stay perfect. The glaze creates a protective seal that keeps the crackers crisp and the bacon fresh. Most recipes get this completely wrong by turning soggy after an hour. Picture yourself pulling this out of the oven, the whole kitchen smelling incredible, then casually mentioning you made them days ago.
Crowd Psychology: There's something about the combination of familiar (crackers and bacon) and unexpected (maple candy coating) that makes people lose their minds. I've seen the most reserved guests turn into vultures, circling the platter and plotting their next grab. If you've ever struggled with party snacks that disappear too fast, you're not alone—and I've got the fix.
Alright, let's break down exactly what goes into this masterpiece...
Inside the Ingredient List
The Foundation Crew
Buttery rectangular crackers are the unsung heroes here, not just a vehicle for bacon goodness. Think Club or Ritz—those golden, slightly salty squares that taste like childhood snacking. They create a wonderful base that soaks up the glaze perfectly, transforming from ordinary cracker to candy-like confection. The butteriness mingles with the maple to create something reminiscent of toffee, while the salt balances all that sweetness. Skip the generic store brands for this one—the better the cracker, the more spectacular the final result.
The Star Attraction
Thick-cut bacon isn't just a preference; it's the difference between bacon that disappears into the cracker and bacon that stands up as its own glorious entity. I use thick-cut bacon for that lovely smoky flavor that delivers a satisfying crunch while keeping its tenderness. Regular bacon turns into bacon jerky under the high heat and sugar, but thick-cut stays meaty and substantial. When you're at the butcher counter, ask for bacon that's at least 1/8-inch thick—your future self will thank you when you're biting through that perfect contrast of crisp edges and chewy center.
The Sweet Symphony
Pure maple syrup is non-negotiable here, and I will fight anyone who says otherwise. Not the imitation stuff that tastes like sad pancake syrup—true maple syrup adds depth and richness to your dish that's simply irresistible. Grade B (now called Grade A Dark Color) is my go-to for baking because it's got those robust, almost smoky notes that can stand up to bacon's assertiveness. Light brown sugar provides that beautiful caramelization during baking while complementing the maple syrup with its molasses notes. Together they create a glaze that's complex, not just sweet.
The Flavor Elevators
Ground black pepper is your secret weapon here—a pinch adds complexity that makes people ask "what's in this?" Don't skip this—it's like a warm hug for your taste buds that wakes them up and makes them pay attention. Cayenne pepper (optional) is for the adventurous souls who want just a smidgen of heat to elevate your crackers with a delightful hint of spice, giving your taste buds a little dance. Start with less than you think you need; you can always add more, but you can't take it away once it's baked in.
Everything's prepped? Good. Let's get into the real action...
The Method — Step by Step
- Preheat your oven to 350°F (175°C) and position the rack in the center. This temperature is crucial—too hot and the sugar burns before the bacon crisps, too low and everything stays limp and sad. While it's heating, line your rimmed baking sheet with parchment paper, making sure to leave overhang on the sides. Trust me on the parchment paper; without it, you'll be chiseling caramelized sugar off your pan with a putty knife while questioning your life choices.
- Arrange your crackers in a single layer on the prepared baking sheet like you're playing the world's most delicious game of Tetris. They should be close but not touching—about 1/8-inch apart works perfectly. If you're using a standard half-sheet pan, you'll fit about 24 crackers, which is exactly one sleeve of Club crackers. That sizzle when they hit the pan? Absolute perfection. Take a moment to appreciate these humble crackers, because in twenty minutes they're going to be completely transformed.
- Cut your bacon into 24 pieces, each about 2½ inches long. This isn't just arbitrary—it's the exact size to fit a cracker without hanging over the edges and making a mess in your oven. Lay one piece on each cracker, pressing down slightly so it curves with the cracker's shape. Thick-cut bacon might seem like too much for a cracker, but remember—it shrinks as it renders, leaving behind concentrated flavor and perfect texture. Don't trim off the fat; that's where the magic happens.
- In a small saucepan over medium heat, combine the maple syrup and brown sugar. This is the moment of truth—stir constantly as the sugar dissolves and the mixture starts to bubble. You're looking for a glossy syrup that coats the back of a spoon, about 3-4 minutes. The color should deepen to a rich amber, like liquid caramel. If it smells like burning, you've gone too far, but if it still smells like pancake syrup, keep going.
- Remove the pan from heat and quickly stir in the black pepper and cayenne if using. The syrup will be hot and angry, bubbling up like lava, so be careful. This is when the magic happens—the pepper blooms in the hot syrup, releasing oils that make your kitchen smell like a gourmet candy shop. Working quickly but carefully, drizzle about 1 teaspoon of the syrup over each bacon-topped cracker. Don't worry about perfect coverage; the oven will help it spread.
- Slide the baking sheet into your preheated oven and set a timer for 18 minutes. Don't walk away from the stove here—these go from perfect to burnt in what feels like seconds. After 12 minutes, start checking every 2 minutes. You're looking for the bacon to crisp at the edges and the syrup to bubble and caramelize. The crackers will darken slightly and the whole thing will smell like maple bacon heaven.
- Remove from the oven and let cool on the baking sheet for 5 minutes—this is crucial. The syrup needs to set up, and the bacon will crisp as it cools. After 5 minutes, transfer to a wire rack to cool completely. They'll keep for up to 3 days in an airtight container, but honestly, when have they ever lasted that long?
That's it—you did it. But hold on, I've got a few more tricks that'll take this to another level...
Insider Tricks for Flawless Results
The Temperature Rule Nobody Follows
Here's the thing about oven temperature: every oven lies. That dial might say 350°F, but your oven could be running hot or cold by 25 degrees or more. I've seen people make these at 375°F because "hotter is better" and end up with charcoal briquettes that taste like regret. Invest in an oven thermometer—they cost less than a fancy coffee and will save you from more kitchen disasters than I can count. The perfect temperature is actually 345°F in most ovens, but since you can't set that, check yours after 10 minutes and adjust accordingly.
Why Your Nose Knows Best
I'll be honest—I ate half the batch before anyone else got to try it, and I knew they were ready by smell alone. When the maple syrup hits that perfect caramelization point, your kitchen fills with this intoxicating aroma that's equal parts breakfast and candy shop. If you smell something sharp or burnt, you've gone too far. If you still smell mostly raw bacon, give it another 2-3 minutes. Your nose is more reliable than any timer once you've made these a few times.
The 5-Minute Rest That Changes Everything
This next part? Pure magic. When you pull these from the oven, they'll look glossy and wet—don't panic. Let them sit undisturbed for exactly 5 minutes. During this time, the syrup continues to bubble and set, creating that perfect candy coating. Move them too early and the syrup runs off, taking all that glossy beauty with it. Wait too long and they'll glue themselves to the parchment. Five minutes is the sweet spot where they release cleanly but retain their shine.
The Storage Secret That Defies Physics
Most candied bacon turns into a sticky, soggy mess after a day. Not these beauties. The key is that initial high heat that seals the glaze, creating a protective barrier. Store them in a metal tin rather than plastic—plastic traps moisture that kills the crunch. Layer them between sheets of parchment paper and they'll stay crisp for up to 72 hours, which is approximately 71 hours longer than they'll actually last in your house.
Creative Twists and Variations
This recipe is a playground. Here are some of my favorite ways to switch things up:
The Bourbon Street Version
Replace 1 tablespoon of the maple syrup with bourbon and add a pinch of smoked paprika. The bourbon cooks off but leaves behind these incredible vanilla and oak notes that make people ask if you used fancy vanilla. The smoked paprika adds another layer of smoky complexity that plays beautifully with the bacon. This version tastes like New Orleans in the best possible way.
The Heat Seeker's Dream
Add 1/4 teaspoon of chipotle powder along with the cayenne. The chipotle brings smoky heat that's different from cayenne's sharp bite—it's warm and complex rather than just hot. I've served these to people who "don't like spicy food" and watched them demolish the entire batch. The heat builds slowly, so by the time they realize it's spicy, they're already addicted.
The Sweet and Salty Deluxe
Sprinkle a few flakes of Maldon sea salt over the top right after they come out of the oven. The contrast between the sweet maple candy and the crunchy salt crystals creates this incredible flavor explosion. Plus, the salt helps cut through the richness so you can eat twice as many without feeling overwhelmed. It's basic math, really.
The Everything Bagel Remix
Mix 1 teaspoon of everything bagel seasoning into the syrup before drizzling. The sesame seeds toast in the oven, the poppy seeds add little bursts of flavor, and the dried garlic and onion become candy-like. It's like your favorite bagel got together with candied bacon and had beautiful babies.
The Holiday Spectacular
Add 1/4 teaspoon of ground cinnamon and a pinch of ground cloves to the syrup. Suddenly these taste like Christmas morning and Thanksgiving dinner had a love child. I make these for holiday parties and people lose their minds—they taste familiar but you can't quite place why they're so special.
The Tropical Escape
Replace the brown sugar with coconut sugar and add 1/4 teaspoon of rum extract to the syrup. The coconut sugar brings these incredible caramel notes that pair surprisingly well with bacon, and the rum extract makes people think you've been secretly aging these in oak barrels. They're like a tropical vacation in cracker form.
Storing and Bringing It Back to Life
Fridge Storage
Here's where most recipes get it completely wrong—they tell you to refrigerate these, which is basically a death sentence for texture. The cold makes the bacon fat congeal and the crackers go soft. Instead, store them at room temperature in an airtight container for up to 3 days. If your kitchen runs warm, find the coolest cabinet you have, but avoid the fridge at all costs. They'll stay crisp and the flavors actually meld and improve after the first day.
Freezer Friendly
Okay, ready for the game-changer? These freeze beautifully. Lay them in a single layer on a baking sheet, freeze until solid, then transfer to a freezer bag with parchment between layers. When you're ready to serve, let them thaw at room temperature for 30 minutes. They'll taste exactly like fresh—I've done this for holiday prep and nobody could tell the difference. Just don't microwave them unless you enjoy bacon-flavored rubber.
Best Reheating Method
If they've lost their crunch (though they shouldn't if you stored them right), revive them in a 300°F oven for 5-7 minutes. Add a tiny splash of water to the baking sheet before reheating—it steams back to perfection without drying out. The water creates just enough steam to refresh the glaze without making anything soggy. Watch them closely though; they're already cooked and can go from perfect to burnt in the blink of an eye.