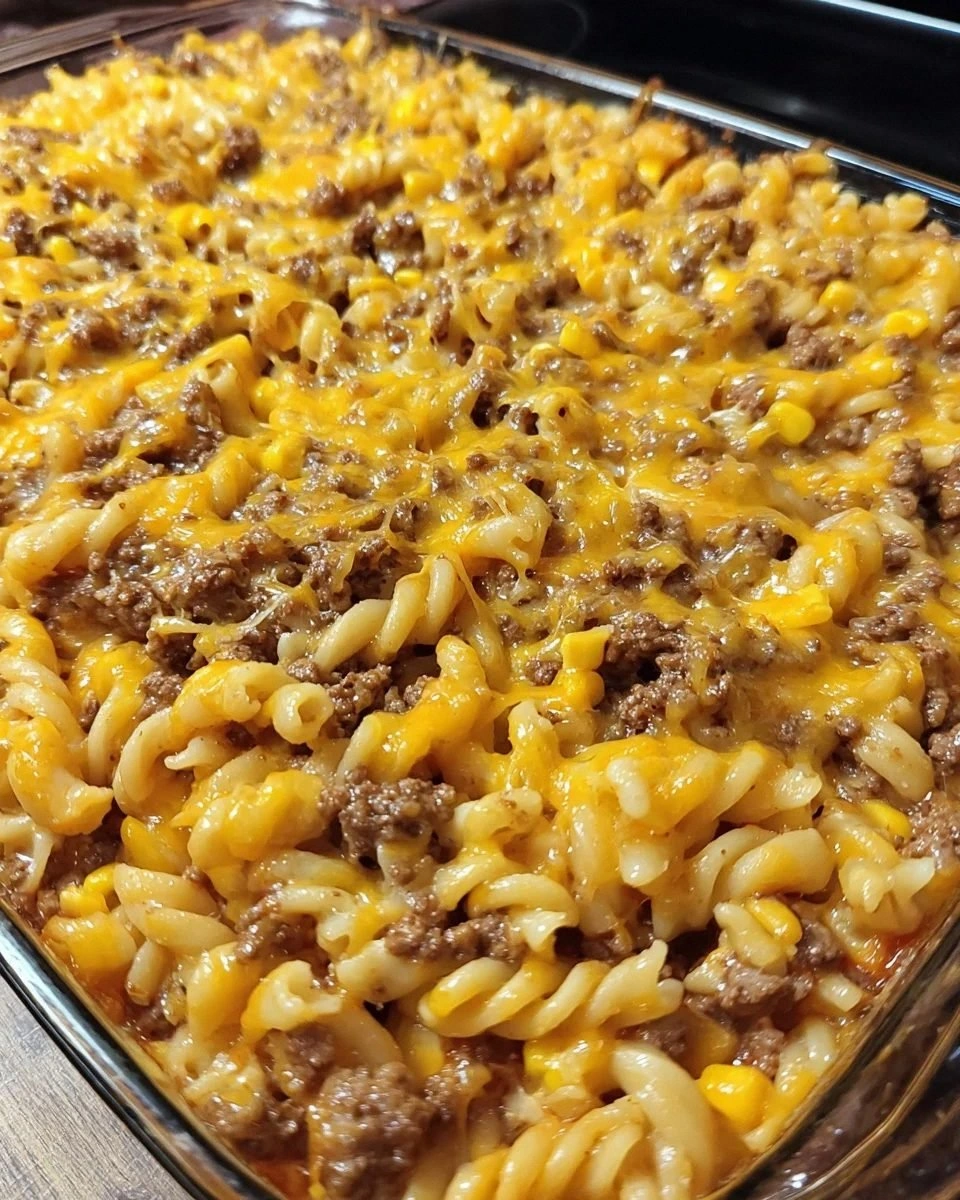
I was standing in my kitchen, staring at a half‑cooked batch of plain old spaghetti, when my roommate shouted, “Hey, you ever tried a cheeseburger casserole?” I laughed, but the idea stuck like a burrito in a belt buckle. The next day I was hunting down ground beef, cheddar, and a bottle of BBQ sauce, and the whole house smelled like a backyard cook‑out meets comfort‑food heaven. That moment was the spark that ignited the “Loaded Cowboy Cheeseburger Casserure” – a dish that takes the nostalgic crunch of a cowboy‑style burger and hides it under a blanket of gooey cheese, sweet corn, and pasta that’s been kissed by smoky sauce. I dare you to taste this and not go back for seconds; it’s practically a culinary dare‑devil’s challenge.
Picture this: you open the oven and a golden‑brown crust cracks like thin ice, releasing a cloud of sweet‑savory steam that curls around your nose and whispers promises of buttery, tangy bliss. The first bite hits you with a crunch from the corn, a melt‑in‑your‑mouth cheddar river, and that unmistakable BBQ zing that coats the pasta like velvet. Every forkful is a symphony of textures – the tender ground beef, the al dente pasta, the caramelized onions, and the surprise pop of corn that makes you feel like you’re chewing on a piece of the Wild West. I’ll be honest — I ate half the batch before anyone else got a chance to try it, and I have no regrets.
Most recipes for “cheeseburger casserole” get this completely wrong. They either drown the dish in sauce, leaving it soggy, or they skimp on the cheese, making it taste like a bland meatloaf. Here’s what actually works: a balanced ratio of sauce to pasta, a strategic layering of cheese that creates a crispy top, and a quick sauté of onions that adds a caramelized depth you can’t fake. The secret ingredient? A splash of BBQ sauce that you’d normally reserve for ribs – it adds a smoky sweetness that makes the whole casserole feel like a rodeo in a bowl.
Okay, ready for the game‑changer? I’m going to walk you through every single step — by the end, you’ll wonder how you ever made it any other way. From pre‑heat to plate, from the sizzle of the pan to the final golden crust, we’ll cover the why, the how, and the “what‑if” of every move. Stay with me here — this is worth it.
What Makes This Version Stand Out
- Flavor Explosion: The BBQ sauce isn’t just a drizzle; it’s the backbone that ties the beef, cheese, and corn together in a smoky, sweet harmony that makes every bite unforgettable.
- Texture Symphony: Crispy cheese crust on top, tender pasta inside, and crunchy corn kernels create a multi‑layered mouthfeel that keeps you chewing with delight.
- Simplicity Meets Sophistication: Only seven core ingredients, yet the result feels like a dish you’d order at a high‑end steakhouse.
- Unique Twist: By swapping traditional tomato sauce for BBQ, the casserole gets a cowboy‑flair that most recipes miss.
- Crowd‑Pleaser: This dish has been known to turn picky eaters into believers; it’s the kind of comfort food that brings a room together.
- Ingredient Quality: Using freshly grated cheddar and a good‑quality BBQ sauce makes a massive difference in flavor depth.
- One‑Pan Wonder: Everything cooks in a single casserole dish, making clean‑up as easy as a Sunday morning.
- Make‑Ahead Magic: Assemble the night before, refrigerate, and bake fresh in the morning – perfect for busy families.
Alright, let's break down exactly what goes into this masterpiece...
Inside the Ingredient List
The Flavor Base
Ground beef is the heart of this casserole. A pound of 80/20 beef gives you enough fat to stay juicy while still being lean enough not to overwhelm the other flavors. If you skip the beef, you lose the meaty backbone that makes this dish feel like a real cheeseburger. For a leaner version, try 90/10 beef, but add a tablespoon of olive oil to keep it from drying out. When shopping, look for meat that’s bright red and firm to the touch – that indicates freshness.
The Texture Crew
Cheddar cheese, shredded, is the melty glue that binds everything together. The sharpness of cheddar cuts through the richness of the beef and adds a bite that balances the sweet BBQ sauce. If you’re out of cheddar, a mix of Monterey Jack and sharp cheddar works wonders. Avoid pre‑shredded cheese that’s coated in anti‑caking agents; they can make the top soggy instead of crisp. For the best melt, grate your own from a block.
The Unexpected Star
Corn kernels add a pop of sweetness and a pleasant crunch that mimics the bite of a fresh taco topping. A single can, drained, is enough to distribute that sweet burst throughout the casserole. If you’re feeling adventurous, swap for grilled corn kernels for a smoky edge. Skipping corn will make the dish feel flat and overly meaty – you’ll miss that little surprise that keeps the palate excited.
The Final Flourish
BBQ sauce is the secret weapon. Half a cup of a good‑quality sauce brings a smoky, tangy glaze that coats the pasta like a caramelized coat of armor. Choose a sauce with a balance of sweet and smoky notes; too much vinegar will make the dish sour, while a sugary sauce can become cloying. If you love heat, stir in a dash of chipotle powder. The onions, diced, bring a subtle sweetness when sautéed, creating a flavor foundation that the beef and sauce build upon. Salt and pepper are the final seasoning touches – never underestimate their power to bring everything together.
Everything's prepped? Good. Let's get into the real action...
The Method — Step by Step
Preheat your oven to 375°F (190°C). While the oven warms, line a 9×13 inch casserole dish with parchment paper – this prevents sticking and makes cleanup a breeze. The heat will create a golden crust that’s essential for that “crispy edges that shatter like thin ice” sensation. Pro tip: If you love a darker top, turn the broiler on for the last 3 minutes.
Heat a large skillet over medium‑high heat and add the ground beef. Let it sizzle until it releases a deep, caramelized brown crust – that’s the Maillard reaction doing its magic. Break the meat apart with a wooden spoon, and season with a pinch of salt and pepper. When the beef is 80% cooked, add the diced onions and sauté until they turn translucent and start to caramelize. That sizzle when it hits the pan? Absolute perfection.
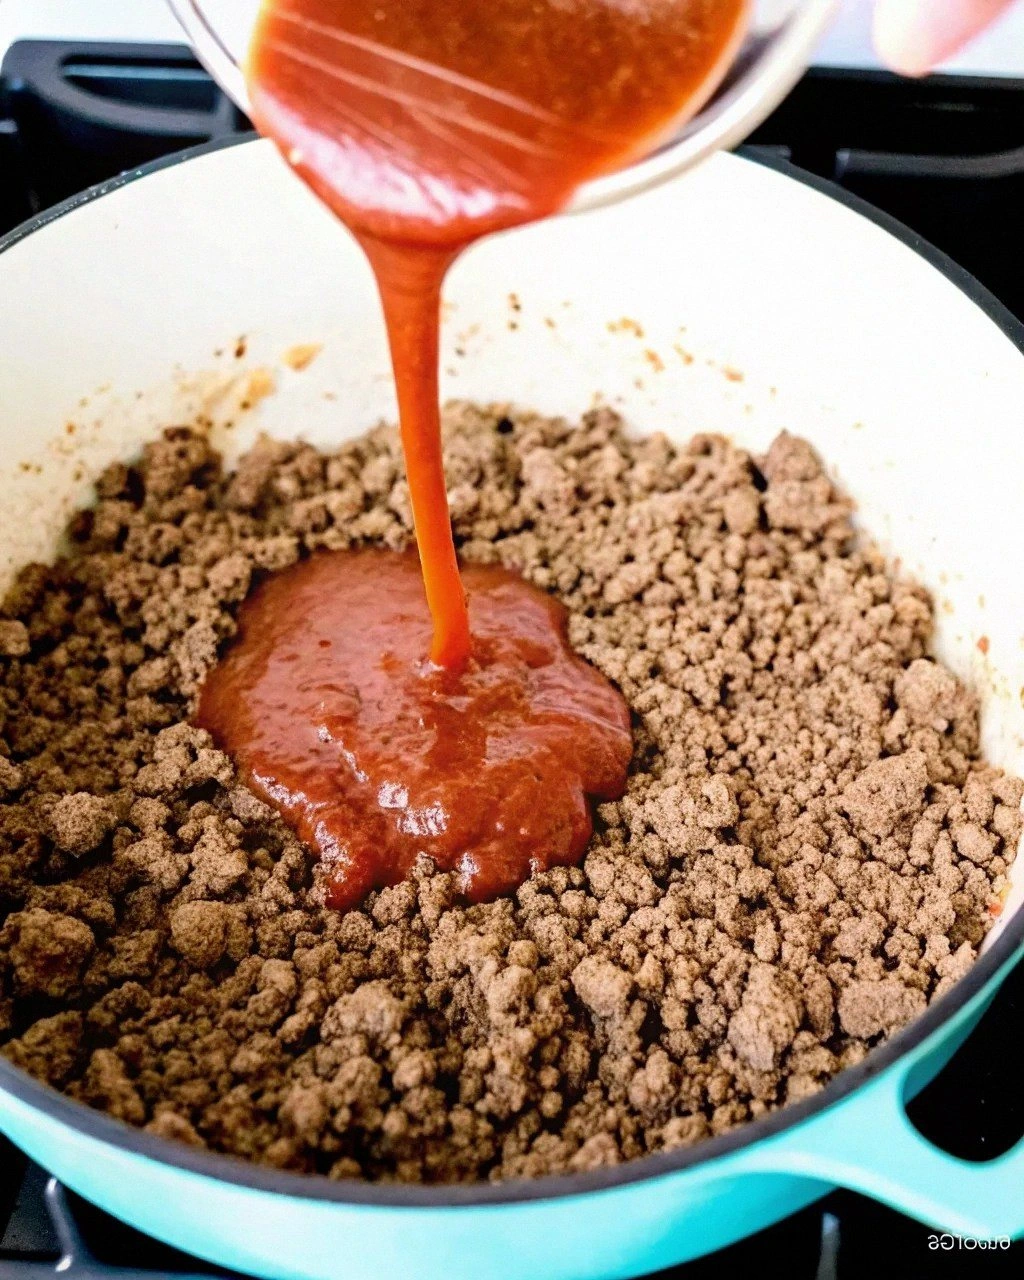
Drain any excess fat from the skillet, then stir in the BBQ sauce. Let it bubble for about two minutes, allowing the sauce to thicken and cling to the meat like a glossy glaze. Watch Out: If the sauce starts to smoke, lower the heat – you want a gentle simmer, not a burnt mess.
While the sauce simmers, bring a pot of salted water to a boil and cook your pasta (penne or elbow work great) until al dente, about 8‑9 minutes. Drain and set aside.
Kitchen Hack: Toss the hot pasta with a splash of olive oil right after draining to prevent it from sticking together.In a large mixing bowl, combine the cooked pasta, seasoned beef mixture, drained corn kernels, and half of the shredded cheddar. Stir gently so everything is evenly coated; you’ll notice the sauce clinging to the pasta like a velvety blanket. This is the moment of truth – if the mixture looks dry, add a tablespoon of water or extra BBQ sauce.
Transfer the mixture to the prepared casserole dish, spreading it out into an even layer. Sprinkle the remaining cheddar cheese over the top, ensuring full coverage for that melt‑and‑crisp finish. For an extra touch of decadence, add a light drizzle of BBQ sauce in a zig‑zag pattern – it creates a beautiful visual contrast.
Cover the dish loosely with aluminum foil and bake for 20 minutes. This allows the flavors to meld while the cheese begins to melt. After 20 minutes, remove the foil and continue baking for another 10‑12 minutes, or until the cheese turns a deep golden‑brown and the edges start pulling away from the sides of the dish. Power transition: This next part? Pure magic.
Remove the casserole from the oven and let it rest for 5‑7 minutes. Resting lets the sauce thicken a bit more and makes slicing cleaner. While you wait, the kitchen will be filled with a scent so intoxicating you’ll be tempted to lick the spoon. Serve hot, garnish with a sprinkle of fresh chopped parsley if you like, and watch your guests dive in.
That's it — you did it. But hold on, I've got a few more tricks that'll take this to another level...
Insider Tricks for Flawless Results
The Temperature Rule Nobody Follows
Never bake a casserole at a temperature lower than 350°F unless you’re specifically trying to keep it moist. Higher heat creates that coveted crispy cheese crust while keeping the interior tender. I once tried a low‑and‑slow bake at 300°F and ended up with a soggy, cheese‑soggy disaster. The rule of thumb: 375°F for 30‑45 minutes is the sweet spot for most casseroles.
Why Your Nose Knows Best
Your sense of smell is a better indicator than a timer when it comes to the perfect cheese melt. When the cheese starts to bubble and you catch a faint caramel aroma, you’re within minutes of the ideal finish. If you’re ever unsure, trust that nutty, toasty scent – it means the top layer is turning into a crunchy, golden masterpiece.
The 5‑Minute Rest That Changes Everything
After the casserole emerges from the oven, let it sit undisturbed for five minutes. This short rest allows the sauce to thicken and the cheese to set, preventing a soupy mess on the plate. I once served a hot, freshly baked casserole straight away and the cheese slid off like a waterfall – not the visual I was aiming for.
Layer Like a Pro
Instead of dumping everything in one go, layer the pasta, then meat, then corn, and repeat. This creates distinct flavor pockets in each bite. A friend tried a “everything‑in‑one” approach once — the result was a mushy, indistinct mess. Layering ensures each ingredient shines.
The Secret of the Frozen Cheese
Freeze your shredded cheese for 10‑15 minutes before sprinkling it on top. The cheese will melt slower, forming a crust that’s both chewy and crisp.
Creative Twists and Variations
This recipe is a playground. Here are some of my favorite ways to switch things up:
Tex‑Mex Heatwave
Add a cup of black beans, a diced jalapeño, and swap the BBQ sauce for a chipotle‑adobo blend. The result is a spicy, smoky casserole that pairs perfectly with a dollop of sour cream.
Southern Comfort
Replace the cheddar with smoked Gouda and stir in a quarter cup of caramelized onions. The smoky Gouda deepens the flavor, making it feel like a Southern brunch casserole.
Breakfast Casserole Remix
Swap the pasta for hash browns, add a handful of chopped bell peppers, and top with a mixture of cheddar and mozzarella. Serve with a side of hot sauce for a hearty morning kick.
Veggie‑Boosted Version
Omit the beef and replace it with a plant‑based ground “beef” or crumbled tempeh. Add zucchini ribbons and extra corn for texture. This keeps the flavor profile while making it vegetarian‑friendly.
Cheesy Bacon Blast
Stir in half a cup of crisped bacon bits and use a blend of cheddar and pepper jack. The bacon adds a smoky crunch that elevates the dish to bar‑food status.
Storing and Bringing It Back to Life
Fridge Storage
Cool the casserole to room temperature, then cover tightly with foil or a lid. It will keep fresh for up to 4 days. When reheating, sprinkle a tablespoon of water over the top before covering – the steam will revive the crust without drying it out.
Freezer Friendly
Portion the casserole into freezer‑safe containers, leaving a ½‑inch headspace. Freeze for up to 3 months. To reheat, thaw overnight in the fridge, then bake at 350°F for 20‑25 minutes, adding a splash of water before covering.
Best Reheating Method
For the crispiest top, reheat uncovered on a baking sheet at 375°F for the last 5 minutes. This restores the golden cheese crust and brings back that fresh‑out‑of‑the‑oven aroma.