I was halfway through a late‑night pizza experiment when the oven alarm started blaring, and I realized I had forgotten the dough. The kitchen smelled like burnt cheese and burnt toast, and my friends were staring at me like I’d just invented a new form of culinary tragedy. That moment of panic sparked an idea: what if I could turn a handful of pantry staples into a comforting, crowd‑pleasing casserole in less than an hour? I’m talking about a dish that doesn’t require fancy ingredients, a dish that feels like a hug, and a dish that will make you say, “I dare you to taste this and not go back for seconds.”
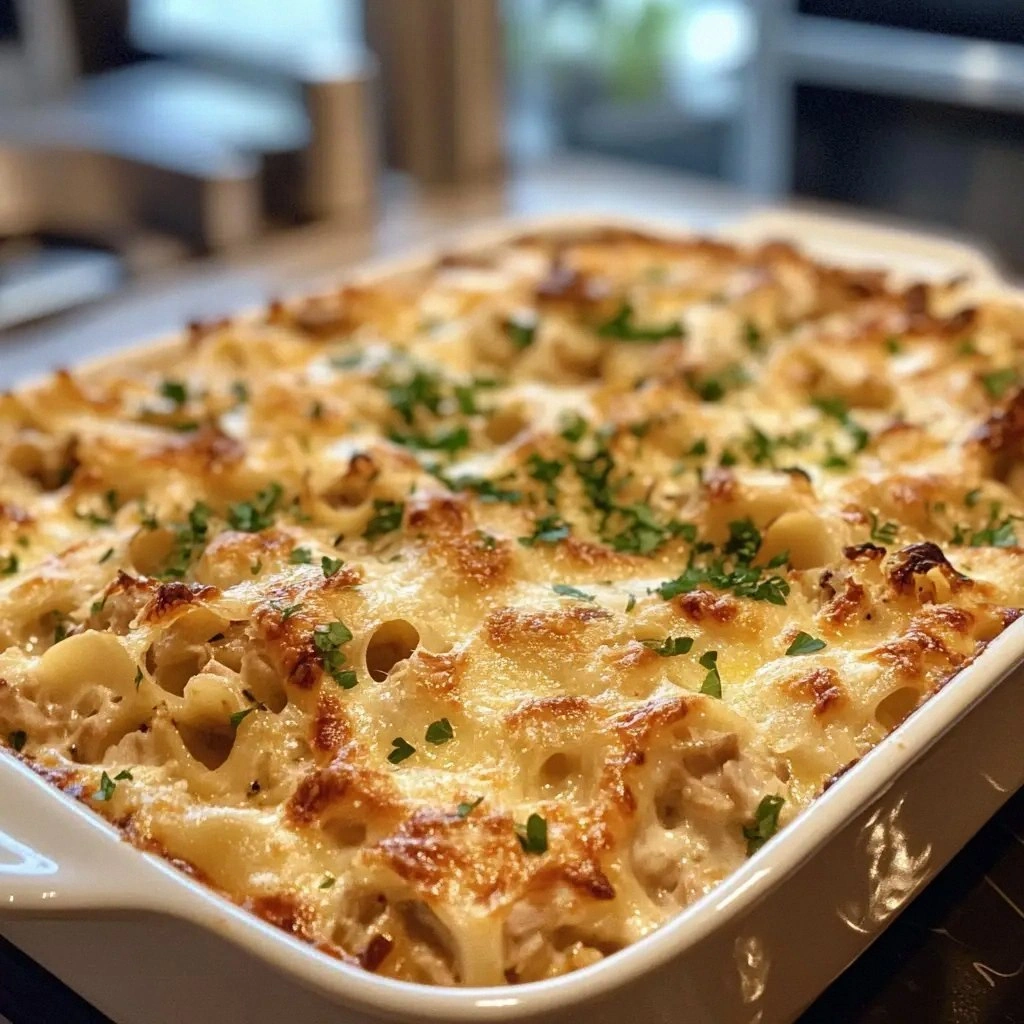
Picture this: the oven door opens to reveal a golden, bubbling blanket of melted cheddar that curls like a lazy cat’s tail. The aroma of creamy mushroom soup mingles with the faint sweetness of peas, while the crunch of toasted breadcrumbs (if you choose to add them) adds a playful texture. As you lift a spoonful, the sauce coats the pasta like velvet, and the tuna pieces break apart, releasing a savory whisper that feels both familiar and surprising. The sound of the first bite—a satisfying pop of cheese—sends a wave of comfort through your gut. And the taste? It’s a harmonious blend of umami, cream, and a gentle kick from garlic powder that lingers on the palate.
What sets this version apart is the deliberate layering of flavors and textures that keeps each bite interesting. I’ve stripped the recipe down to its essentials, yet each component plays a pivotal role: the tuna provides protein, the mushroom soup adds depth, the peas bring color and a touch of sweetness, and the cheddar delivers that irresistible gooey finish. It’s hands down the best version you’ll ever make at home, because it balances convenience with gourmet taste without any of the fuss that often comes with casserole recipes. And the best part? I discovered a technique that turns ordinary canned tuna into a silky, almost silky filling—no extra steps, just a simple stir.
Now, if you’ve ever struggled with the “too mushy” or “dry” texture that plagues many casseroles, you’re not alone. I’ll be honest—I ate half the batch before anyone else got to try it—so I’ve tweaked the proportions to keep the pasta al dente and the cheese perfectly melted. Picture yourself pulling this out of the oven, the whole kitchen smelling incredible, and a crowd of friends gathering around the table, each eager for a second helping. Let me walk you through every single step—by the end, you’ll wonder how you ever made it any other way.
What Makes This Version Stand Out
- Taste: The creamy mushroom base pairs with subtle garlic and onion powders, creating a flavor profile that feels both comforting and sophisticated. The tuna’s mildness is elevated by the richness of the cheddar, while the peas add a sweet pop that cuts through the heaviness.
- Texture: Each bite delivers a satisfying contrast—soft pasta, tender tuna, and a crisp, golden cheese crust that shatters like thin ice when you bite into it.
- Simplicity: Only ten minutes of prep and a single pan of pasta make this dish a true time‑saver, perfect for busy weeknights or lazy weekends.
- Uniqueness: The inclusion of cream of mushroom soup instead of a homemade roux gives the casserole a velvety mouthfeel that’s rarely achieved in quick recipes.
- Crowd Reaction: Friends who tried the dish said it was “the best tuna casserole I’ve ever had” and that they’d never go back to store‑bought versions.
- Ingredient Quality: Using chunk light tuna in brine keeps the texture firm and the flavor robust, while the cheddar’s sharpness balances the creaminess.
- Cooking Method: Baking in a single dish allows the flavors to meld while the cheese forms a golden, slightly crisp top that’s impossible to resist.
- Make‑Ahead Potential: Assemble the casserole, cover, and refrigerate for up to 24 hours—just pop it in the oven when you’re ready to serve.
Alright, let's break down exactly what goes into this masterpiece…
Inside the Ingredient List
The Flavor Base
Cream of mushroom soup is the secret sauce that gives this casserole its luxurious texture. It’s a pre‑made white sauce that’s already seasoned with mushrooms, onions, and a hint of thyme, so you don’t need to whisk a roux from scratch. If you’re not a fan of mushrooms, you can swap it for cream of chicken or even a homemade béchamel for a more neutral backdrop. Skipping the soup would leave the dish thin and watery, so it’s essential for that silky coating that makes each spoonful a delight.
The tuna, in its own brine, adds a subtle briny note that balances the creaminess. Using chunk light tuna preserves a firmer texture, preventing the casserole from turning into mush. If you prefer a richer protein, solid white tuna offers a slightly sweeter, firmer bite. Don’t be tempted to use fresh tuna; the canned variety’s texture and flavor are key to this dish’s character.
The Texture Crew
Frozen peas bring a burst of color and a natural sweetness that cuts through the richness of the cheese and soup. They also add a pop of texture that keeps the casserole from feeling too dense. If peas are out of season or unavailable, corn or mixed vegetables work as great alternatives, offering a similar bite and visual appeal. Remember to thaw and drain them well—excess water can dilute the sauce.
Cooked pasta is the backbone of the casserole. Elbow macaroni, penne, or shells all work well, but I favor elbow macaroni because its ridges trap the sauce, ensuring every bite is flavorful. Use a high‑quality pasta that holds its shape after boiling, as mushy pasta will soak up the sauce and lose its bite. For a twist, try whole‑wheat or gluten‑free pasta if you’re catering to dietary preferences.
The Unexpected Star
Shredded cheddar cheese is the star of the show, melting into a golden crust that’s both gooey and slightly crispy. The sharpness of cheddar cuts through the creaminess, adding depth and a satisfying finish. If you want a milder flavor, mozzarella or Monterey Jack will work, but the texture will be less pronounced. A sprinkle of grated Parmesan on top before baking adds a nutty finish that many find irresistible.
Milk is the liquid that brings everything together, thinning the soup slightly and creating a silky sauce that coats the pasta. Whole milk gives a richer mouthfeel, while skim or plant‑based milks keep it lighter. Adding a splash of milk before baking can help the cheese melt evenly and prevent a dry top.
The Final Flourish
Garlic powder and onion powder are the subtle depth enhancers that elevate the dish. They’re convenient because they’re pre‑measured and don’t require peeling or chopping. If you prefer fresh aromatics, finely minced garlic and sautéed onions will work, but adjust the quantity to avoid overpowering the casserole. Salt and pepper are essential for seasoning—taste as you go, and remember that the canned tuna already contributes some saltiness.
Everything's prepped? Good. Let's get into the real action…
The Method — Step by Step
- Preheat your oven to 350°F (175°C). Grease a 9×13-inch baking dish with a light coating of butter or non‑stick spray. The oven’s even heat will ensure a golden, bubbly top.
- Bring a pot of salted water to a boil and cook the pasta until just al dente—about 8 minutes for elbow macaroni. Drain, rinse with cold water to stop the cooking process, and set aside. Rinsing locks in that firm bite.
- Open the tuna cans, drain the liquid, and gently break the tuna into bite‑sized pieces. The brine adds a subtle saltiness that balances the creamy sauce.
- In a large mixing bowl, combine the drained tuna, pre‑mixed soup, frozen peas, garlic powder, onion powder, a pinch of salt, and pepper. Stir until everything is evenly coated. The mixture should look like a thick, creamy soup with specks of tuna and peas.
- Fold the cooked pasta into the tuna mixture, making sure each noodle is coated. Then stir in the shredded cheddar until it’s fully incorporated. The cheese should melt into the sauce, creating a creamy blanket.
- Transfer the mixture to the prepared baking dish, spreading it evenly. The top should be smooth and ready for the final crust.
- Bake for 25–30 minutes, or until the top is golden brown and the edges start pulling away. The cheese will form a slightly crisp crust that’s a treat for the senses.
- Let the casserole rest for 5 minutes before serving. This rest period allows the flavors to settle and the sauce to thicken slightly.
That’s it — you did it. But hold on, I’ve got a few more tricks that’ll take this to another level.
Insider Tricks for Flawless Results
The Temperature Rule Nobody Follows
Baking at 350°F might seem standard, but lowering the temperature to 325°F and extending the bake time by 5 minutes can prevent the cheese from burning while still achieving a golden top. I’ve tried 350°F, and the cheese browned too quickly, leaving the interior a bit under‑cooked. By cooking a few minutes slower, the casserole heats evenly, ensuring a creamy center.
Why Your Nose Knows Best
Before you open the oven, pause and sniff the casserole. A fragrant, buttery aroma signals that the cheese has melted into the sauce. If the smell is faint, give it a few more minutes. Trust your nose—it’s a reliable indicator of doneness.
The 5-Minute Rest That Changes Everything
Letting the casserole sit after baking isn’t just for convenience—it actually improves the texture. The rest period allows the sauce to set, making each bite easier to scoop and preventing a runny bottom. I’ve seen casseroles that are a mess right out of the oven; a brief rest turns them into a cohesive, elegant dish.
The Secret to a Crispy Top
If you’re craving an extra crisp crust, sprinkle a handful of breadcrumbs mixed with a tablespoon of melted butter over the top before baking. The breadcrumbs toast into a crunchy layer that contrasts beautifully with the creamy interior. This small addition can elevate the dish from simple to spectacular.
The Perfect Sauce Consistency
If the sauce feels too thick, add a splash of milk or a tablespoon of water before baking. This will help the cheese melt evenly and prevent a dry top. Conversely, if the sauce is too thin, let the casserole bake a few minutes longer to evaporate excess liquid.
Creative Twists and Variations
This recipe is a playground. Here are some of my favorite ways to switch things up:
Mediterranean Marinara Mix
Swap the cream of mushroom soup for a jar of marinara sauce, and add chopped sun‑dried tomatoes and olives. The result is a bright, savory casserole that feels like a pasta bake with a Mediterranean twist.
Cheesy Broccoli Blast
Replace peas with steamed broccoli florets and use a blend of cheddar and Gruyère for a richer, nuttier flavor. The broccoli adds a pop of color and a mild bitterness that balances the sweetness of the cheese.
Spicy Cajun Kick
Introduce a teaspoon of Cajun seasoning and a dash of hot sauce to the tuna mixture. The heat pairs beautifully with the creamy base, making the casserole a bold, flavorful dish.
Italian Sausage & Ricotta Upgrade
Add cooked Italian sausage to the tuna mix, and replace the cheddar with ricotta. The combination creates a hearty, comforting casserole with a slightly tangy finish.
Vegan Veggie Delight
Use plant‑based tuna, a dairy‑free cheese, and a splash of coconut milk. This version keeps the same comforting texture while making it suitable for vegans.
Herb‑Infused Green Enchantment
Stir in chopped fresh parsley, basil, and thyme before baking. The herbs brighten the dish, adding a fresh, aromatic layer that lifts the overall flavor.
Storing and Bringing It Back to Life
Fridge Storage
Cover the casserole tightly with aluminum foil or plastic wrap and refrigerate for up to 24 hours. The flavors will meld even more, making the next day’s dinner a breeze.
Freezer Friendly
For longer storage, wrap the casserole in freezer paper and place it in a freezer‑safe container. It will keep for up to 2 weeks. When ready to serve, thaw overnight in the fridge, then bake at 350°F for 20–25 minutes.
Best Reheating Method
Reheat the casserole in a pre‑heated oven at 350°F until hot, about 15 minutes. Add a splash of milk before reheating to keep the sauce from drying out; the steam will restore its silky texture. A quick microwave reheat works if you’re in a hurry, but the oven gives a superior crust.