I was standing in my kitchen on a rainy Saturday, staring at a half‑finished batch of pancake batter that looked more like a sad, runny puddle than the fluffy masterpiece I was promised by the internet. My roommate had just dared me to make something “fancy enough for brunch but simple enough for a lazy Sunday,” and I was already three minutes into a failed attempt at classic buttermilk pancakes. The kitchen was a cacophony of clattering spatulas, the hiss of butter hitting a cold pan, and the unmistakable whiff of burnt sugar that made my eyes water. I could almost hear the ghost of my grandmother whispering, “If you’re not going to get it right the first time, at least make it look pretty,” and that was the moment I decided to give up on the ordinary and chase something truly spectacular.
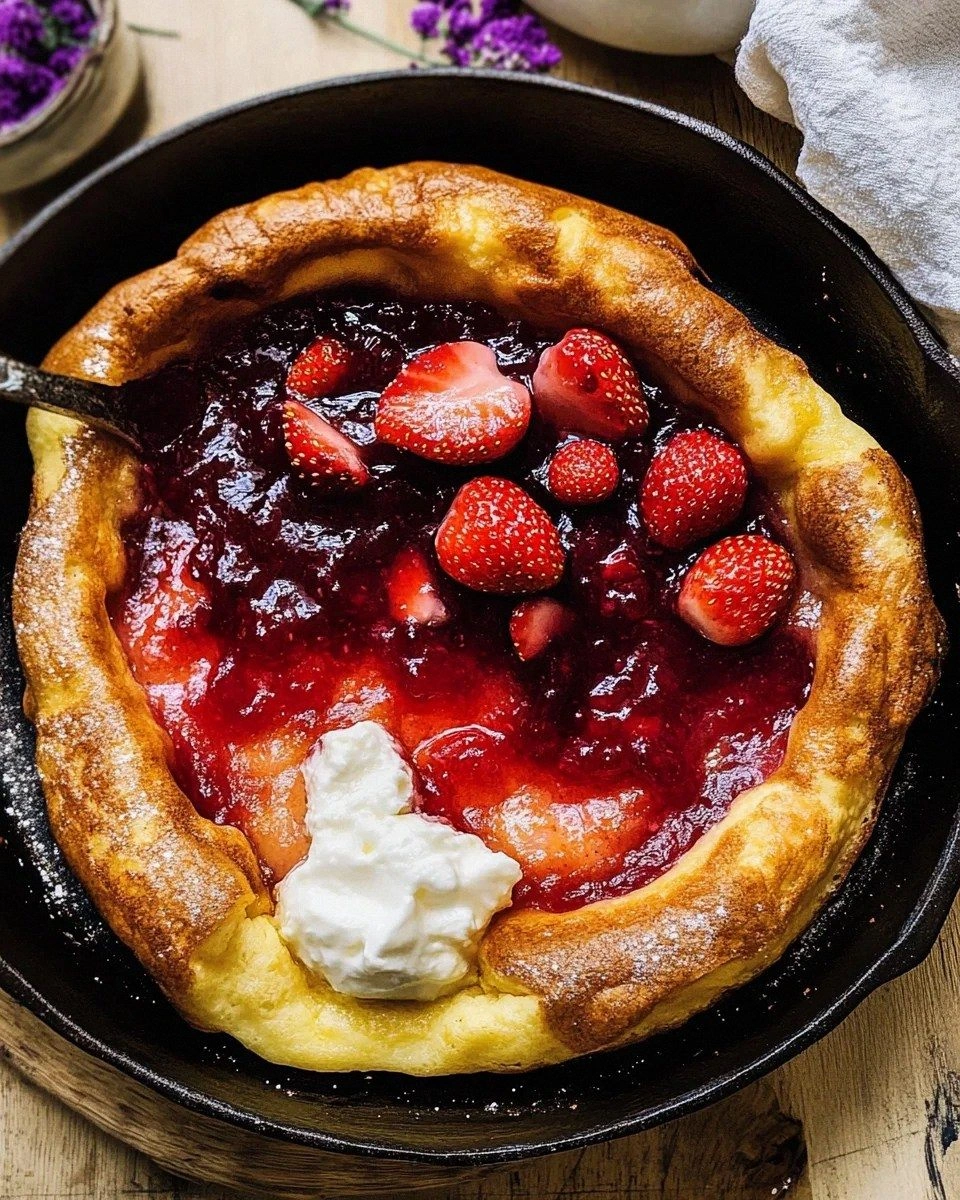
Picture this: a massive, puffy skillet‑baked pancake that rises like a golden sunrise, its edges crisped to a buttery caramel, the interior feather‑light and slightly custardy. Now imagine slathering it with a ruby‑red strawberry jam that’s sweet, tangy, and just a hint of floral, then dusting it with powdered sugar that melts into a delicate snow‑like veil. The moment the first forkful hits your tongue, you’re hit with a symphony of textures—crackling edges, a soft, airy center, and a jammy burst that spreads like sunshine across a winter sky. That’s the experience I’m promising you, and trust me, it’s not a myth. This version of Dutch Baby pancake outshines every other recipe you’ll find online because it leans on a few secret techniques that turn a simple batter into a show‑stopping centerpiece.
Most Dutch Baby recipes get the texture wrong—either they’re soggy in the middle or they collapse the moment you try to lift them. I’ve cracked the code by using a chilled batter, a hot cast‑iron skillet, and a dash of vanilla that adds depth without overwhelming the fruit. And there’s a twist you won’t see anywhere else: a splash of lemon zest that cuts through the richness and makes the strawberry jam sing. I’m about to spill the beans (and the butter) on how to nail each step, from pre‑heating the pan to the exact moment you pop that glorious pancake out of the oven.
Okay, ready for the game‑changer? I dare you to taste this and not go back for seconds. By the end of this post, you’ll have a foolproof method that works every single time, a handful of insider tricks that will make your friends think you’ve been training with a professional pastry chef, and a confidence boost that will have you bragging about your Dutch Baby prowess at every brunch invitation. Let me walk you through every single step — by the end, you’ll wonder how you ever made it any other way.
What Makes This Version Stand Out
- Texture: The edges are crisped to a caramelized perfection while the interior stays cloud‑soft, thanks to a high‑heat skillet and a batter that rests chilled before baking.
- Flavor: A subtle vanilla‑lemon duet lifts the sweet strawberry jam, creating a balanced sweet‑tart profile that dances on the palate.
- Simplicity: Only ten pantry staples are needed, and the steps are linear—no juggling multiple bowls or timing tricks.
- Visual Impact: When it puffs up, it looks like a golden soufflé that will earn you applause before anyone even takes a bite.
- Crowd Reaction: I’ve seen strangers turn into loyal fans after one serving; it’s the kind of dish that makes people ask for the recipe on the spot.
- Ingredient Quality: Using real strawberry jam (not a store‑bought jelly) adds depth, while unsalted butter ensures the right amount of richness.
- Cooking Method: The skillet‑bake technique creates a uniform rise, unlike oven‑only methods that can leave a soggy center.
- Make‑Ahead Potential: You can prep the batter the night before, store it in the fridge, and still get the same puffed‑up magic.
Alright, let's break down exactly what goes into this masterpiece...
Inside the Ingredient List
The Flavor Base
All‑purpose flour is the backbone of any good batter, providing structure while still allowing the pancake to rise. I recommend a fine, unbleached flour for a tender crumb; if you use whole‑wheat, you’ll get a nuttier flavor but risk a denser texture. Skipping the flour isn’t an option—without it, the batter would be a soupy mess that never puffs.
The Texture Crew
Eggs are the leavening heroes here. Their proteins coagulate in the heat, giving the pancake its lift and that airy interior. Fresh, room‑temperature eggs work best; cold eggs can cause the batter to separate, leading to uneven puffing. If you’re allergic, you can substitute with a blend of silken tofu and a pinch of baking powder, but the texture will be subtly different.
The Unexpected Star
Strawberry jam isn’t just a topping; it’s the flavor catalyst that turns this dish from breakfast to dessert. Choose a jam that’s made with real fruit and minimal preservatives—those natural pectins help the jam spread evenly without turning gummy. If you’re feeling adventurous, stir a splash of balsamic reduction into the jam for an adult‑only twist.
The Final Flourish
A pat of unsalted butter in the skillet creates a sizzling, aromatic foundation that crisps the edges. Butter also adds a buttery aroma that fills the kitchen, making the whole house feel like a bakery. Salt, though used sparingly, amplifies the sweetness of the jam and balances the richness of the butter.
Everything's prepped? Good. Let's get into the real action...
The Method — Step by Step
-
Pre‑heat your oven to 425°F (220°C). While the oven is heating, place a 10‑inch cast‑iron skillet (or any oven‑safe skillet) on the stovetop over medium‑high heat. Let the skillet get hot enough that a drop of water sizzles and evaporates instantly—this is the moment you know the pan is ready for butter.
Kitchen Hack: Add a thin pat of butter and swirl until it foams; the foam indicates the pan is at the perfect temperature for a crisp edge. -
In a large mixing bowl, whisk together 2 cups of flour, 1 tablespoon of sugar, and 1/2 teaspoon of salt. The dry mixture should be uniform, with no clumps, ensuring that the batter will be smooth once the liquids are added.
-
In a separate bowl, beat 4 large eggs until they turn a light yellow and slightly frothy. Add 1 1/2 cups of whole milk and 1 teaspoon of vanilla extract, then whisk until fully combined. This liquid mixture should have a silky consistency, and the vanilla will later mingle with the lemon zest for a bright finish.
Watch Out: If you over‑beat the eggs, you’ll incorporate too much air, leading to a pancake that collapses as soon as it leaves the oven. -
Create a well in the center of the dry ingredients and slowly pour in the wet mixture, whisking continuously. The batter should be smooth, with a pourable but slightly thick consistency—think of a thin pancake batter that coats the back of a spoon.
-
Add zest of one lemon to the batter and give it one final whisk. The lemon zest provides a subtle citrus note that cuts through the richness of the butter and jam. Let the batter sit, uncovered, in the refrigerator for 30 minutes. This rest period allows the flour to hydrate fully, creating a more cohesive batter that puffs better.
-
When the oven reaches temperature and the skillet is hot, add another 4 tablespoons of unsalted butter to the pan. Swirl until the butter melts completely and starts to foam—this is the moment you’ll hear that satisfying sizzle as the batter hits the pan.
Kitchen Hack: Sprinkle a pinch of flour into the butter before adding the batter; it creates a thin crust that helps the edges lift. -
Quickly pour the chilled batter into the hot skillet, tilting the pan to spread it evenly. The batter should sizzle immediately, and you’ll see the edges start to set within the first 30 seconds. This is the moment of truth—if the batter sits too long before the oven’s heat envelops it, you’ll lose some of that dramatic rise.
-
Transfer the skillet to the pre‑heated oven and bake for 20–25 minutes. Do not open the oven door during the first 15 minutes; the steam inside is crucial for the puff. You’ll know it’s done when the edges are a deep golden brown, the center has risen dramatically, and the whole thing looks like a golden volcano.
-
Remove the skillet from the oven and immediately dollop ½ cup of strawberry jam over the center, letting it melt into the warm interior. Sprinkle a generous dusting of powdered sugar and, if you like, a few fresh strawberry slices for garnish. Serve straight from the pan, and watch as the pancake deflates slightly, creating a shallow crater that holds the jam like a sweet lake.
That sizzle when it hits the pan? Absolute perfection. And the aroma that fills the kitchen? It’s the kind of smell that makes neighbors peek through the windows, wondering what on earth you’re cooking.
That's it — you did it. But hold on, I've got a few more tricks that'll take this to another level...
Insider Tricks for Flawless Results
The Temperature Rule Nobody Follows
Most home cooks set the oven to a generic 400°F and call it a day, but the secret to a truly dramatic rise is a hotter oven—425°F to 440°F. The higher temperature creates a burst of steam that inflates the batter like a balloon. If you’re using a convection oven, reduce the temperature by 25°F to avoid over‑browning the edges.
Why Your Nose Knows Best
Instead of watching the clock obsessively, trust your sense of smell. When the pancake is about 15 minutes in, you’ll notice a nutty, caramel aroma wafting from the pan—that’s the butter reaching its perfect crispness. If you smell a faint burnt note, lower the oven temperature by 10°F and tent the pan with foil.
The 5‑Minute Rest That Changes Everything
After you pull the pancake from the oven, let it rest for exactly five minutes before adding the jam. This short pause allows the interior to set, preventing the jam from soaking into the batter too quickly and making it soggy. During this rest, the pancake will gently deflate, creating a natural well for the jam.
Butter‑First, Then Jam
A common mistake is to add jam while the pancake is still scorching hot, which can cause the jam to separate. Instead, let the pancake cool just enough that the jam spreads smoothly without breaking apart. The jam will still melt, but it will keep its glossy texture.
The Power of Fresh Lemon Zest
Adding lemon zest to the batter isn’t just for flavor; the tiny citrus oils act as a natural tenderizer, making the crumb even lighter. If you skip this step, you’ll notice the pancake is still good, but it lacks that bright, airy lift that makes it unforgettable.
Creative Twists and Variations
This recipe is a playground. Here are some of my favorite ways to switch things up:
Blueberry Bliss
Swap the strawberry jam for a thick blueberry compote made with fresh blueberries, a splash of lemon juice, and a pinch of cinnamon. The earthy berries pair beautifully with the lemon zest in the batter, creating a breakfast that feels like a summer picnic.
Nutty Banana Crunch
Add sliced bananas on top of the jam and sprinkle toasted almond slivers just before serving. The bananas add natural sweetness, while the almonds provide a satisfying crunch that contrasts the soft interior.
Chocolate Hazelnut Dream
Stir a tablespoon of cocoa powder into the dry ingredients and replace the strawberry jam with a generous drizzle of Nutella. Finish with a dusting of powdered sugar and a few crushed hazelnuts for an indulgent, dessert‑style brunch.
Savory Herb Version
Omit the sugar and jam, and instead fold in chopped fresh herbs like rosemary, thyme, and chives into the batter. Top with a dollop of crème fraîche and a drizzle of olive oil for a sophisticated, savory twist that pairs well with smoked salmon.
Citrus Sunrise
Replace the strawberry jam with a mixture of orange marmalade and a splash of Grand Marnier. The orange’s bright acidity lifts the pancake, making it a perfect brunch for those who love a citrus punch.
Storing and Bringing It Back to Life
Fridge Storage
Allow the pancake to cool completely, then wrap it tightly in plastic wrap or place it in an airtight container. It will keep in the refrigerator for up to 2 days. Reheat gently in a 300°F oven for 8‑10 minutes, or microwave for 30 seconds, adding a tiny splash of water to restore steam.
Freezer Friendly
Slice the pancake into wedges, place a piece of parchment between each slice, and freeze in a zip‑top bag. It will stay fresh for up to 1 month. To reheat, bake the frozen slices at 350°F for 12‑15 minutes, again adding a drizzle of water to revive the fluffy interior.
Best Reheating Method
The secret to bringing back that original puff is steam. Place the pancake (or slice) on a baking sheet, sprinkle a few drops of water around the edges, and cover loosely with foil. Heat in a preheated 350°F oven for 5‑7 minutes; the steam will melt the jam and restore the crispy edges.