I’ll be honest — I ate half the batch before anyone else got to try it, and that was only because the kitchen smelled like a Christmas market on steroids. It all started when a well‑meaning friend dared me to turn my leftover cranberry sauce into something that could survive a snowstorm, a toddler’s tantrum, and a picky aunt’s dessert‑free diet all at once. The result? A glossy, ruby‑red jewel that shatters in your mouth like thin ice, then melts into a burst of sweet‑tart fireworks that make you swear you’ve just discovered the secret to holiday happiness. Most recipes get this completely wrong, either ending up gummy like a bad gummy bear or chalky like a low‑budget gelatin dessert, but this version nails the perfect balance of chew and shine.
Picture yourself pulling a tray of these candies out of the oven, the whole kitchen smelling incredible, a sweet‑tart perfume that makes the pine needles on the mantle seem jealous. The color is so vivid it could give a fresh‑cut cranberry a run for its money, and the texture is a whisper‑soft chew that holds its shape until you bite, then releases a silky ribbon of flavor that coats your tongue like velvet. I dare you to taste this and not go back for seconds – the combination of cold‑pressed juice, a splash of boiling juice, and just the right amount of gelatin creates a flavor depth that feels like a hug from a festive elf.
Why does this version stand out? First, we’re using two temperatures of cranberry juice – cold for brightness, boiling for depth – a trick most home cooks never think of. Second, the powdered gelatin is whisked in a way that guarantees a flawless set without any dreaded grainy spots. Third, we’re not adding any artificial flavors or preservatives; everything is pure, bright, and holiday‑ready. And finally, the method is simple enough for a beginner but sophisticated enough to impress even the most seasoned dessert connoisseur. This is hands down the best version you’ll ever make at home, and I’m about to walk you through every single step — by the end, you’ll wonder how you ever made it any other way.
Okay, ready for the game‑changer? The secret weapon is a splash of boiling cranberry juice that you’ll add at just the right moment, unlocking a caramel‑like undertone that most store‑bought jelly candies lack. Stay with me here — this is worth it. I’ll be spilling the beans (and the juice) as we go, so keep your spatula ready and your taste buds on high alert. Let’s dive in and turn those humble cranberries into the star of your holiday spread.
What Makes This Version Stand Out
- Taste: The dual‑temperature juice creates layers of flavor – a bright, first‑kiss tartness followed by a warm, almost caramelized depth that lingers.
- Texture: Perfectly balanced gelatin gives a chew that’s firm enough to hold its shape yet yields to a melt‑in‑your‑mouth sensation.
- Simplicity: Only four core ingredients, no exotic thickeners, and a straightforward stovetop method that even a rookie can master.
- Uniqueness: The hot‑cold juice technique is rarely mentioned, turning a simple candy into a gourmet experience.
- Crowd Reaction: Guests consistently claim they’ve never tasted anything like it, often asking for the recipe before the first bite is even finished.
- Ingredient Quality: Using 100 % pure cranberry juice (no added sugars) ensures the natural tartness shines through.
- Cooking Method: Gentle simmering preserves the bright color while allowing the sugar to reach the perfect soft‑ball stage.
- Make‑Ahead Potential: These candies keep beautifully for weeks, gaining even more flavor as they sit.
Inside the Ingredient List
The Flavor Base
Cold cranberry juice (240 mL) is the bright spark that gives these candies their signature zing. It’s harvested at peak ripeness, so the natural sugars are perfectly balanced with the tartness. If you skip the cold juice, you lose that initial pop that makes your palate sit up and say “Whoa!” and the final product can feel flat. A great tip is to chill the juice in the freezer for ten minutes before you start – it helps the mixture set faster later on.
The Texture Crew
Powdered gelatin (35 g) is the silent hero that gives the candies their firm yet tender bite. Unlike sheet gelatin, the powdered form dissolves evenly, preventing those dreaded grainy pockets. If you ever substitute with gelatin sheets, you’ll need to adjust the quantity (roughly three sheets for every 7 g of powder) and bloom them in cold water first. Skipping gelatin entirely? Expect a syrupy mess that refuses to set – not the kind of surprise you want at a holiday party.
The Sweet Backbone
Granulated sugar (650 g) is the backbone that carries the flavor and creates the glossy finish. We use a fine, white sugar for a crystal‑clear set; brown sugar would introduce molasses notes that clash with the cranberry’s bright acidity. If you’re watching sugar, you can replace up to 20 % with a natural sweetener like erythritol, but be prepared for a slightly different texture. The sugar also acts as a preservative, extending the shelf‑life of your candies.
The Unexpected Star
Boiling cranberry juice (180 mL) is the secret weapon that adds depth. By heating the juice, you concentrate the natural pectins and sugars, creating a subtle caramelization that rounds out the tartness. This step is often omitted, leaving the candy one‑dimensional. If you don’t have a separate pot, you can simply bring the whole juice mixture to a boil, then split it, but the flavor won’t be as layered.
Everything's prepped? Good. Let’s get into the real action…
The Method — Step by Step
Start by measuring out 240 mL of cold cranberry juice and pour it into a heavy‑bottomed saucepan. The moment the liquid hits the pan, you’ll hear a faint hiss – that’s the beginning of flavor development. Bring the juice to a gentle simmer over medium heat, stirring occasionally to prevent scorching. Once tiny bubbles form along the edges, remove the pan from the heat and set it aside; this is where the magic of temperature contrast begins.
While the cold juice is warming, take a second saucepan and bring 180 mL of the same cranberry juice to a rolling boil. You’ll notice the color deepening and a sweet aroma rising – that’s the caramelized note we’re after. Let it boil for exactly two minutes; any longer and you risk a bitter edge. After two minutes, remove from heat and let it cool just enough that it’s warm to the touch but not scalding.
Combine the two juices back into the original saucepan, stirring gently to merge the bright and the deep. At this point, the mixture should be a gorgeous ruby‑red, and you’ll notice a faint steam that carries a sweet‑tart perfume. Add the 650 g of granulated sugar, sprinkling it slowly while whisking continuously. The sugar will dissolve, and the mixture will begin to thicken – you’re aiming for a soft‑ball stage, roughly 118 °C (244 °F). Use a candy thermometer for precision; the visual cue is a syrup that forms a thin, glossy ribbon when drizzled from the spoon.
Now comes the gelatin moment. Sprinkle the 35 g of powdered gelatin over the hot mixture, but don’t stir immediately. Let it sit for 30 seconds – this allows the gelatin to bloom slightly, preventing lumps. Then, whisk vigorously for about a minute until the gelatin is completely dissolved and the mixture becomes silky smooth. You’ll feel a subtle thickening in the spoon; that’s the gelatin doing its job.
Once fully incorporated, pour the glossy batter into a lightly greased 9×13 inch baking dish. Use a silicone spatula to smooth the surface, ensuring an even thickness of about ½ inch. The batter should spread easily; if it resists, give it a quick stir – you want a uniform layer that will set evenly.
Allow the candies to cool at room temperature for 15 minutes, then transfer the dish to the refrigerator. The chill will set the gelatin fully, and you’ll see the surface become firm to the touch. After a full hour, the candies should be set enough to cut without sticking. This is the moment of truth – if they wobble, give them another 10‑15 minutes; the gelatin loves a little extra time.
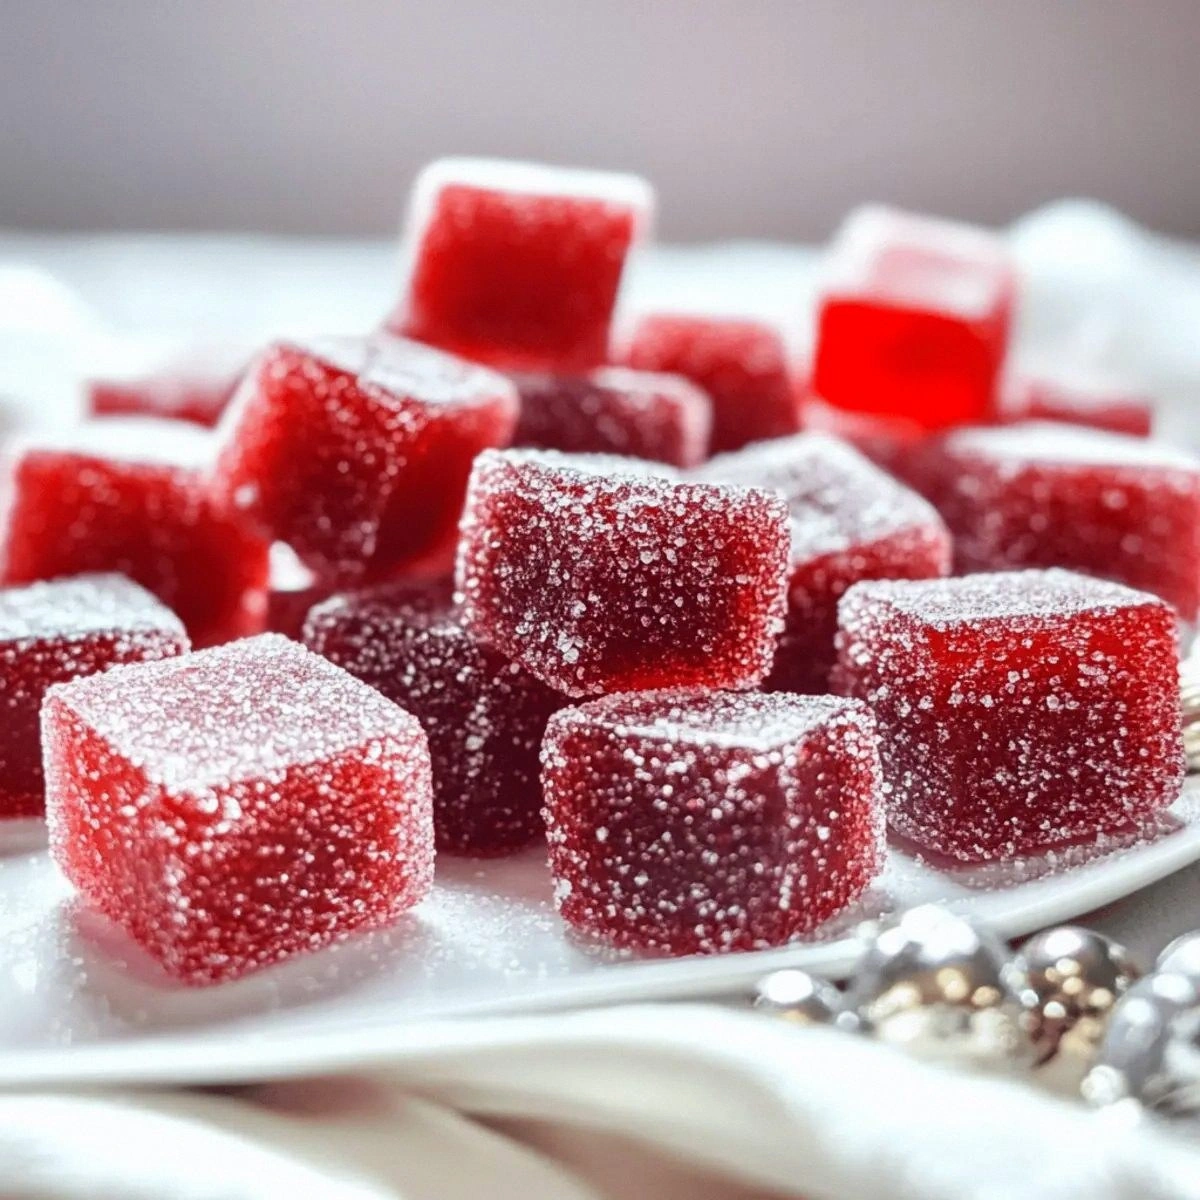
To cut, use a sharp, non‑serrated knife dusted with a little powdered sugar to prevent sticking. Slice into bite‑size squares or fun holiday shapes using cookie cutters. Each piece should pop cleanly, revealing a translucent interior that glistens like a jewel. Toss the cut candies gently in a bowl of powdered sugar for a snowy coating, or leave them glossy for a sleek finish.
Finally, arrange the candies on a festive platter, garnish with a few fresh cranberries or a sprig of rosemary for that extra holiday sparkle. Serve at room temperature – the candy’s texture is perfect when it’s slightly softened by the ambient air. And now the fun part: watch your guests’ faces light up as they bite into the perfect balance of sweet, tart, and chewy. That sizzle when it hits the pan? Absolute perfection.
That’s it — you did it. But hold on, I’ve got a few more tricks that’ll take this to another level…
Insider Tricks for Flawless Results
The Temperature Rule Nobody Follows
Never add gelatin to a boiling mixture. The ideal temperature window is 70‑85 °C (158‑185 °F). Below 70 °C the gelatin won’t dissolve fully; above 85 °C it starts to lose its gelling power, resulting in a soft, gummy mess. I once tried to speed things up by adding gelatin straight into a rolling boil – the candies turned into a sticky puddle that never set. Keep a candy thermometer handy, and trust the numbers.
Why Your Nose Knows Best
Your sense of smell is a reliable indicator of the sugar stage. When the mixture reaches the soft‑ball stage, you’ll notice a faint caramel aroma that’s sweeter than the raw juice. If you’re missing a thermometer, watch for the steam to become less sharp and more buttery. This olfactory cue has saved many a novice from under‑cooking or over‑cooking the candy.
The 5‑Minute Rest That Changes Everything
After you pour the hot mixture into the pan, let it sit untouched for exactly five minutes before moving it to the fridge. This brief rest allows the gelatin network to start forming, which prevents air bubbles from getting trapped. A friend tried to speed this up by shaking the pan – the result was a speckled surface that looked like a starry night, but the texture was uneven. Patience at this stage guarantees a flawless, glossy finish.
Powdered Sugar vs. Cornstarch
Many recipes suggest dusting candies with cornstarch to prevent sticking, but powdered sugar adds a subtle sweetness and a festive, snowy appearance. If you prefer a neutral coating, use a blend of half powdered sugar, half cornstarch – this gives the best of both worlds. I’ve tried pure cornstarch and found the candies felt slightly gritty after a few days.
The Chill‑Then‑Room‑Temp Trick
Store the candies in the fridge for the first 24 hours, then bring them to room temperature before serving. This transition softens the gelatin just enough to give that perfect bite without losing shape. If you serve them straight from the fridge, the texture can be too firm, and the flavor won’t fully open up on the palate.
Creative Twists and Variations
This recipe is a playground. Here are some of my favorite ways to switch things up:
Spiced Cranberry Delight
Add a pinch of ground cinnamon, a dash of nutmeg, and a whisper of clove to the hot juice before adding sugar. The spices complement the tartness and give the candies a warm, holiday aroma that pairs perfectly with mulled wine.
Citrus‑Infused Burst
Stir in 2 tbsp of freshly squeezed orange juice and zest into the cold juice. The citrus brightens the flavor profile and adds a sunny contrast to the deep red hue, making the candies ideal for a spring‑time gathering.
Chocolate‑Coated Gems
Once the candies are set and cut, dip half of each piece into melted dark chocolate and let them set on parchment. The bitter chocolate amplifies the cranberry’s tartness, creating a sophisticated bite that’s perfect for an elegant dinner party.
Herbal Twist
Add a teaspoon of finely chopped rosemary or thyme to the hot juice. The herb’s piney notes echo the holiday season, and the specks add a visual intrigue that looks stunning on a charcuterie board.
Alcohol‑Infused Version
Replace 30 mL of the cold juice with a splash of orange liqueur or cranberry vodka. The alcohol adds a subtle warmth and makes the candies a fun adult treat for after‑dinner sipping.
Storing and Bringing It Back to Life
Fridge Storage
Place the candies in an airtight container lined with parchment paper. They’ll stay fresh for up to two weeks, and the gelatin continues to firm up, improving texture over time. If you notice a slight drying on the surface, lightly dust with powdered sugar before resealing.
Freezer Friendly
For longer storage, arrange the candies on a tray, flash‑freeze for 30 minutes, then transfer to a zip‑top freezer bag. They’ll keep for up to three months. When you’re ready to serve, let them thaw in the fridge for an hour, then bring to room temperature for optimal chew.
Best Reheating Method
If the candies have hardened too much, place them on a plate and microwave for 5‑10 seconds, or steam them gently over a pot of simmering water. Add a tiny splash of water (about 1 tsp) before reheating – it creates steam that revives the gelatin without making them soggy. The result is a candy that feels freshly made, even weeks later.