I was standing in my kitchen, staring at the last crumb of a burnt chocolate cake that had been my attempt at a “fancy dessert.” The smoke alarm had been blaring for half a minute, the smell of charred sugar still clinging to the air, and my friend, who had just come over for a quick coffee, was staring at me like I’d just asked her to taste a raw dough. I knew I had to salvage the evening, and that meant I needed something that would make her forget the kitchen disaster and leave her craving more. So I dove into the pantry, grabbed a jar of smooth peanut butter, a splash of non‑dairy milk, and a handful of other pantry staples that would turn into the most luscious, airy mousse you’ll ever taste.
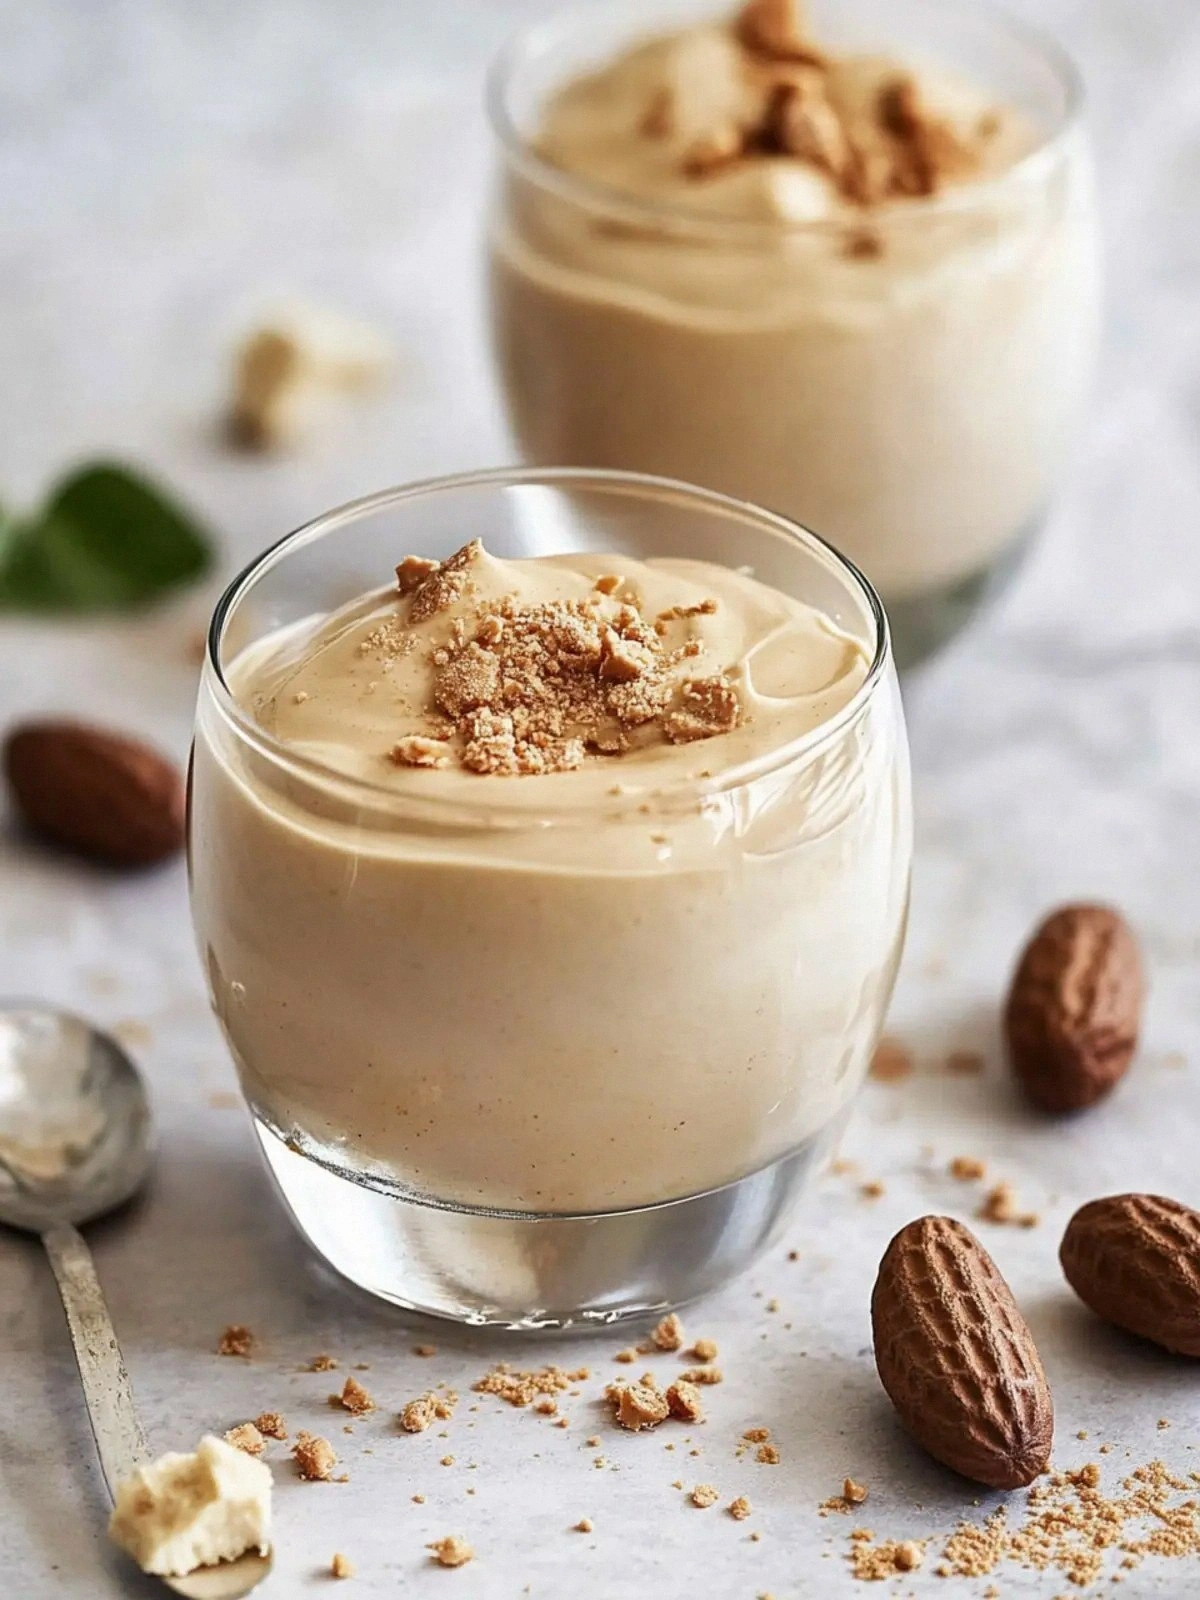
Picture this: a silky, cloud‑like mousse that glides across your tongue, the nutty richness of peanut butter balanced by a whisper of cocoa, a hint of vanilla that lingers, and a dash of cinnamon that feels like a secret spice in a midnight snack. The aroma is a comforting blend of roasted peanuts and warm maple syrup, and when you bite into it, the texture is a perfect marriage of creamy and crunchy—crushed peanuts add that satisfying bite. The visual is a glossy, pale ivory swirl that gleams under the kitchen lights, topped with a delicate drizzle of peanut butter and a pinch of sea salt that glints like tiny crystals. I dare you to taste this and not go back for seconds; I’m not even kidding. If you’ve ever struggled to make a mousse that isn’t dense or heavy, you’re not alone—and I’ve got the fix.
What makes this version stand out is that it’s not just a peanut butter mousse; it’s a revelation. I’ve blended the peanut butter with a splash of non‑dairy milk to thin it out just enough for that airy feel, then whisked in club soda for lift and volume. The addition of a few drops of vanilla and a pinch of cinnamon gives it depth without overpowering the nutty base. The maple syrup sweetens it naturally, keeping it wholesome and less processed than typical desserts. And the crushed roasted peanuts are folded in at the end for that satisfying crunch that contrasts the smoothness. I’ve been experimenting with this recipe for months, and each time it becomes a new favorite, proving that simple pantry staples can create something truly decadent.
Picture yourself pulling this out of the fridge, the whole kitchen smelling incredible, and watching the mousse settle into perfect cups. The anticipation of that first spoonful is a moment of pure bliss—fluffy, sweet, nutty, and just a hint of chocolate. I’ve added a trick that most recipes get completely wrong: using club soda instead of whipped cream for lift, which keeps the mousse light and reduces the fat content. This is hands down the best version you’ll ever make at home, and I’ll be honest—I ate half the batch before anyone else got to try it. Let me walk you through every single step—by the end, you’ll wonder how you ever made it any other way.
What Makes This Version Stand Out
- Texture: The mousse is airy yet dense enough to hold its shape, thanks to the club soda’s lift and the gentle whisking technique.
- Flavor: A balanced harmony of sweet, nutty, and chocolatey notes, with a subtle cinnamon undertone that keeps it from feeling flat.
- Ease: No special equipment—just a blender, a saucepan, and a hand mixer or whisk. The recipe is straightforward enough for beginners yet delivers gourmet results.
- Make‑Ahead: It sets beautifully in the fridge, making it ideal for parties or as a last‑minute dessert that you can prepare hours in advance.
- Ingredient Quality: Uses only pantry staples, but the choice of a high‑quality smooth peanut butter makes all the difference in flavor.
- Versatility: The mousse can be served on its own, in cups, or as a filling for cakes and cupcakes.
- Nutrition: Relatively low in calories for a dessert, with protein from peanut butter and no added dairy.
- Presentation: A glossy finish topped with a swirl of peanut butter and a pinch of sea salt gives it a gourmet look.
Inside the Ingredient List
The Flavor Base
The foundation of this mousse is the combination of non‑dairy milk, smooth peanut butter, and a splash of vanilla extract. The milk keeps the mixture fluid, allowing the peanut butter to coat the palate without becoming clumpy. Vanilla adds a subtle sweetness that elevates the nutty flavor, and the maple syrup brings natural sweetness that balances the saltiness. Skipping the vanilla will leave the mousse a bit flat; the maple syrup is optional if you prefer a more pronounced peanut flavor, but it adds a depth that’s hard to replace.
The Texture Crew
Club soda is the secret weapon that gives this mousse its airy texture. The carbonation creates tiny bubbles that light up the mixture, making it feel like a cloud. If you’re worried about the mousse collapsing, whisk the mixture vigorously after adding the soda; this traps the air and keeps it fluffy. The crushed roasted peanuts are folded in at the end, providing a contrasting crunch that prevents the mousse from feeling too smooth.
The Unexpected Star
Cocoa powder is the unexpected star that gives the mousse a chocolate undertone without making it a chocolate mousse. It’s a subtle addition that works in harmony with the peanut butter, creating a complex flavor profile that’s both sweet and slightly bitter. If you’re allergic to cocoa or want a lighter version, you can replace it with a touch of almond extract or keep it simple with just peanut butter and cinnamon. The cinnamon adds warmth and a slight spice that lifts the overall flavor.
The Final Flourish
The final flourish is the topping—softened peanut butter or a pinch of sea salt. A swirl of peanut butter gives a glossy finish and a burst of flavor, while sea salt adds a savory contrast that heightens the sweetness. If you’re looking for a more dramatic presentation, sprinkle the crushed peanuts on top for a crunchy finish. The garnish is optional but highly recommended for that professional touch.
Everything's prepped? Good. Let's get into the real action.
The Method — Step by Step
- Step 1: Blend the Base — In a high‑speed blender, combine the non‑dairy milk, smooth peanut butter, salt, cinnamon, vanilla extract, maple syrup, and cocoa powder. Blend until the mixture is silky and completely smooth, with no lumps. The goal is a uniform base that will carry the flavors evenly. I always let the blender run for about 30 seconds to ensure the peanut butter is fully emulsified. This step sets the foundation for the mousse’s texture.
- Step 2: Warm the Mixture — Transfer the blended mixture to a medium saucepan and heat over medium heat, stirring constantly. Warm it until it just begins to simmer; this will help the peanut butter melt and integrate fully. Watch the surface for small bubbles forming—this is a sign that the mixture is heating properly. Avoid letting it boil, as that can scorch the sugar and alter the flavor. The aroma at this point is already rich and nutty.
- Step 3: Add the Club Soda — Slowly pour in the club soda while whisking vigorously. The mixture will start to froth and rise, creating an airy foam. Keep whisking until the foam is stable and the mixture has doubled in volume. This is the moment where the mousse gains its lightness; if you rush this step, the mousse might not set properly. Don’t be afraid to use a whisk—this is the heart of the mousse’s texture.
- Step 4: Cool to Room Temperature — Remove the saucepan from the heat and let the mixture cool to room temperature. As it cools, it will thicken slightly, preparing it for the next step. I like to cover it with a clean cloth to keep dust out while it cools. If you’re in a hurry, you can place the saucepan in an ice bath, but be careful not to let it get too cold. Once cooled, the mixture should feel thick but still pourable.
- Step 5: Whisk for Airiness — Transfer the cooled mixture to a stand mixer or a hand mixer and whip on medium speed for 3–5 minutes. The mixture should triplicate in volume and become light and airy. This step is crucial; if you skip it, the mousse will be dense. The watch-out moment is when the mixture starts to look like whipped cream—stop whipping at that point to avoid over‑whipping. The aroma will be sweet and nutty, and the texture will feel like a cloud.
- Step 6: Fold in Crushed Peanuts — Gently fold in the crushed roasted peanuts with a spatula. This adds a pleasant crunch and a burst of roasted flavor. The peanuts should be folded in just enough to distribute them evenly without deflating the mousse. If you prefer a smoother texture, you can reduce the amount of peanuts or use a finer grind. The visual cue is a speckled mousse with tiny brown flecks throughout.
- Step 7: Assemble the Cups — Spoon the mousse into serving cups or glasses, filling them about three-quarters full. Top each cup with a swirl of softened peanut butter or a pinch of sea salt, depending on your preference. This garnish adds a glossy finish and a savory contrast. If you’re feeling fancy, sprinkle a few extra crushed peanuts on top for crunch. The mousse should look like a velvety cloud with a glossy peak.
- Step 8: Chill Until Set — Place the assembled cups in the refrigerator for at least 30 minutes, or until the mousse has set firmly. The mousse will firm up but remain creamy; it should hold its shape when lifted. If you’re serving immediately, the mousse will be slightly softer, but still enjoyable. The aroma in the fridge will be even more enticing, and the texture will feel like a soft, sweet cloud.
- Step 9: Final Touches — Just before serving, garnish with a few chocolate shavings or a drizzle of maple syrup if desired. This final touch adds a splash of color and an extra layer of flavor. I love adding a few fresh berries on the side for a pop of color and freshness. The mousse should look glossy, airy, and irresistibly sweet.
- Step 10: Serve and Enjoy — Serve immediately, or keep chilled until ready to serve. The mousse will keep its airy texture for up to 2 days in the fridge. If you’re hosting a gathering, this dessert will be a showstopper. The first bite will melt in your mouth, leaving a lingering nutty, chocolatey aftertaste that will keep guests coming back for more.
That’s it — you did it. But hold on, I’ve got a few more tricks that will take this to another level.
Insider Tricks for Flawless Results
The Temperature Rule Nobody Follows
Keeping the mixture at the right temperature is key to achieving that perfect airy texture. If the base is too hot when you add the club soda, the foam will collapse; if it’s too cold, it won’t incorporate the soda properly. Aim for a lukewarm temperature—just warm enough that you can feel the heat on your fingertips but not hot enough to burn your skin. Use a kitchen thermometer if you’re unsure; 80–90°F is ideal. This small step ensures the mousse stays light and fluffy.
Why Your Nose Knows Best
Your sense of smell is your best ally in the kitchen. When the mixture starts to sizzle and the aroma of roasted peanuts intensifies, you know it’s ready for the next step. If the scent feels flat or sour, it’s a sign you need to adjust the heat or add a bit more maple syrup. Trust your nose; it’ll guide you to the perfect balance of sweetness and nuttiness.
The 5-Minute Rest That Changes Everything
After whipping the mousse, let it rest for 5 minutes before folding in the peanuts. This brief pause allows the bubbles to stabilize, preventing the mousse from deflating when you add the peanuts. I’ve tried skipping this step, and the mousse collapsed, losing its airy structure. The rest period is quick but essential for maintaining that cloud‑like texture.
The Secret to a Glossy Finish
A swirl of softened peanut butter on top not only adds flavor but also gives the mousse a glossy, professional look. To achieve the perfect swirl, let the peanut butter sit at room temperature until it softens, then drizzle it in a thin line across the top. The contrast between the glossy peanut butter and the matte mousse creates a visual appeal that’s hard to resist. This simple trick turns a humble dessert into a showstopper.
The Power of Fresh Peanuts
Using freshly roasted peanuts instead of pre‑roasted ones adds a deeper, more authentic flavor. Fresh peanuts have a natural oiliness that enhances the overall richness. If you can’t find fresh peanuts, choose a brand with no added salt or sugar. The crunch will be more pronounced, and the overall taste will be richer.
Creative Twists and Variations
This recipe is a playground. Here are some of my favorite ways to switch things up:
Coconut Cream Twist
Replace the non‑dairy milk with coconut cream for a tropical flavor. The coconut adds a subtle sweetness that pairs beautifully with the peanut butter. The mousse will be richer and slightly denser, but still airy. Serve with toasted coconut flakes for an extra crunch.
Chocolate Ganache Layer
Add a layer of chocolate ganache between the mousse and the topping. Melt dark chocolate with a splash of non‑dairy milk and let it cool until it’s thick but pourable. Swirl it into the mousse for a chocolate‑peanut butter swirl that looks stunning. This variation is perfect for chocolate lovers.
Salted Caramel Drizzle
Drizzle a salted caramel sauce over the mousse before serving. The caramel adds a sweet, buttery note that complements the nutty base. Use a homemade caramel sauce or a high‑quality store brand. The contrast between sweet and salty is a crowd‑pleaser.
Berry Compote Accent
Serve the mousse with a fresh berry compote on the side. Cook mixed berries with a splash of maple syrup and lemon juice until they break down into a thick sauce. The tartness of the berries balances the sweetness of the mousse. This is a refreshing twist for summer gatherings.
Almond Butter Variation
Swap the peanut butter for almond butter for a milder nutty flavor. Almond butter has a slightly sweeter profile, making it a great option for those who prefer a less intense taste. The texture remains the same, and the mousse still stays airy.
Espresso Infusion
Add a teaspoon of instant espresso powder to the base for a coffee kick. The espresso complements the chocolate notes and adds depth. This variation is perfect for coffee lovers and pairs well with a slice of chocolate cake.
Storing and Bringing It Back to Life
Fridge Storage
Store the mousse in an airtight container in the refrigerator for up to 2 days. The mousse will keep its airy texture and stay creamy. If the mousse becomes slightly firmer, let it sit at room temperature for 10 minutes before serving.
Freezer Friendly
The mousse freezes well for up to 3 weeks. Transfer it to a freezer‑safe container or individual portions in silicone cups. When you’re ready to serve, thaw overnight in the fridge. The texture may be slightly denser after freezing, but it will still be delicious.
Best Reheating Method
If the mousse has become too firm, add a tiny splash of water or non‑dairy milk before reheating. Gently warm it in a microwave on low power for 10–15 seconds, then stir. This steams it back to perfection, restoring its silky texture. Avoid over‑heating, as it can separate the mixture.