It started with a burnt batch of holiday cookies and a sudden craving for something that could turn my kitchen chaos into a festive masterpiece. The oven was on, the timer was ticking, and the dough on the counter looked like a soggy mess. I stared at it, thinking, “This is how the holidays feel—flaky, overcooked, and a little too sweet.” Then, out of nowhere, a friend texted: “Try a pretzel wreath. Trust me, it’s a game changer.” I laughed, but the idea stuck. I imagined a dough that’s soft inside, crisp on the edges, and wrapped in a sweet glaze that sings like a carol. I decided then that I’d turn this kitchen disaster into a holiday triumph.
Picture this: a warm, buttery scent filling the air, the sound of dough being kneaded like a secret lullaby, and the sight of golden rings slowly rising from the oven. The aroma of cinnamon and nutmeg mingles with the subtle sweetness of brown sugar, creating an atmosphere that feels like a cozy living room on a snowy evening. The texture is a delicate balance—chewy, with a slight crunch that shatters like thin ice when you bite into it. The taste is a symphony of salty sea salt, sweet glaze, and warm spices that dance on your tongue. The feel of the dough in your hands is like silk, smooth and pliable, inviting you to shape it into wreaths that look like miniature Christmas trees. I dare you to taste this and not go back for seconds.
What sets this version apart is that it’s not just a pretzel; it’s a holiday celebration in every bite. The dough is enriched with a buttery glaze that gives it a glossy finish, while the sea salt flakes add a subtle crunch that elevates the flavor profile. The spices—cinnamon, nutmeg, and a whisper of cloves—create a comforting warmth that’s reminiscent of holiday cookies but with the heartiness of a pretzel. The method is straightforward yet precise, ensuring that even novice bakers can achieve professional results. I’ll be honest—after tasting the first batch, I ate half the wreaths before anyone else got a chance. Most recipes get this completely wrong, but here’s what actually works.
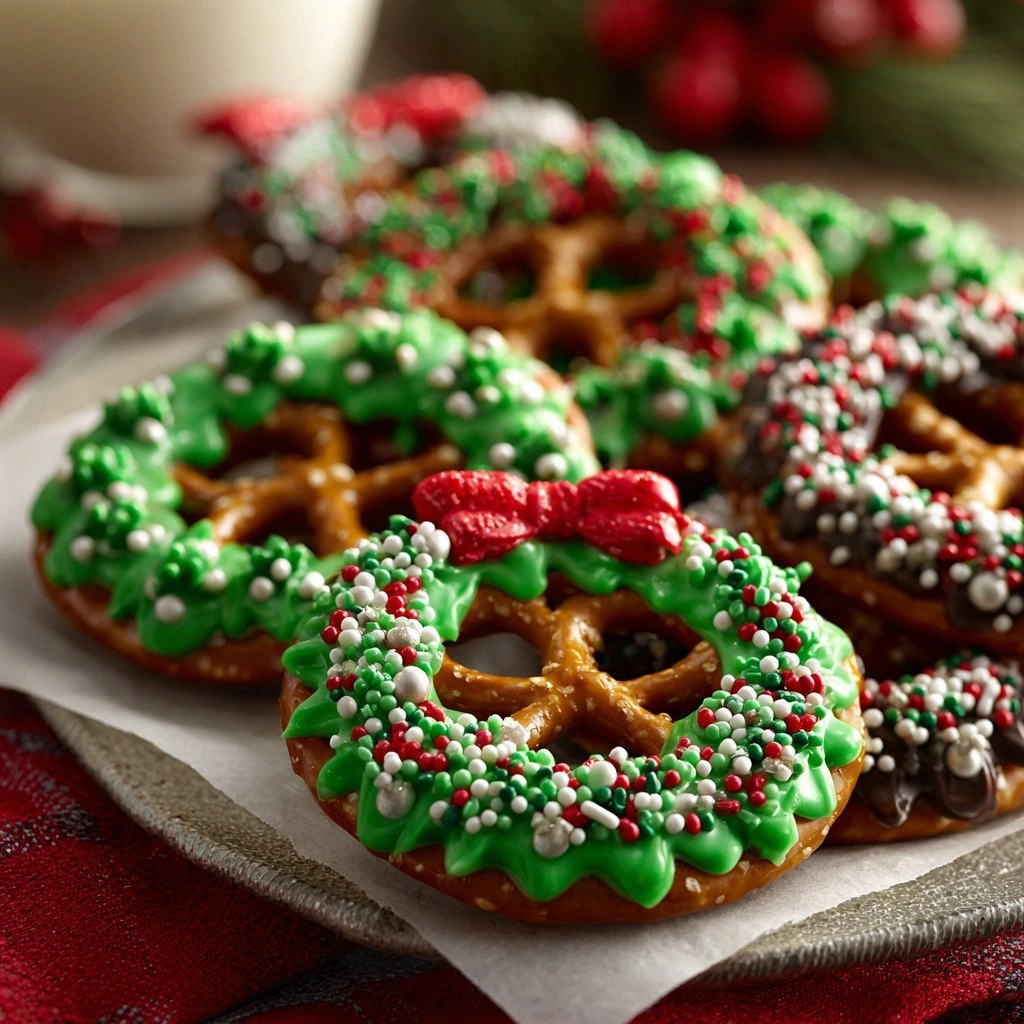
Imagine pulling a tray of golden pretzel wreaths from the oven, the kitchen filling with a scent that makes everyone’s mouth water. Picture the moment you take the first bite: the dough is soft inside, the edges are crisp, and the glaze coats it like velvet. The spices mingle, the sea salt adds a satisfying bite, and the glaze’s buttery sweetness lingers. The experience is so satisfying that you’ll be tempted to make a second batch before the first one cools. I’ll let you in on a secret: the glaze is the secret weapon that turns a simple pretzel into a holiday icon.
Let me walk you through every single step—by the end, you'll wonder how you ever made it any other way. This isn’t just a recipe; it’s a ritual. From the moment you gather your ingredients to the final glaze, every step is designed to bring out the best in this festive treat. You’ll learn how to shape the dough into wreaths that look like miniature Christmas trees, how to bake them to perfection, and how to finish them with a glaze that makes them irresistible. And trust me, once you’ve done it, you’ll be the go-to host for holiday gatherings. Ready? Let’s dive in.
What Makes This Version Stand Out
- Taste: The combination of salty sea salt, sweet glaze, and warm spices creates a flavor profile that feels like a holiday hug.
- Texture: Chewy dough with a crisp, caramelized edge that shatters like thin ice when bitten into.
- Simplicity: Only 12 core ingredients and a single glaze make this a breeze for any kitchen.
- Uniqueness: The wreath shape and glaze finish give it a visual and culinary twist that stands out on any table.
- Crowd Reaction: Guests rave about the chewy center and the glossy glaze that’s almost too pretty to eat.
- Ingredient Quality: Using high‑quality butter, sea salt flakes, and fresh spices elevates the dish instantly.
- Cooking Method: A quick 30‑minute bake followed by an instant glaze means minimal time in the kitchen.
- Make‑Ahead Potential: You can bake the wreaths a day early and reheat them with a splash of milk for a fresh finish.
Alright, let's break down exactly what goes into this masterpiece…
Inside the Ingredient List
The Flavor Base
All-Purpose Flour (2 cups): The backbone of the dough, giving it structure and that classic pretzel chew. Skipping it would leave you with a lumpy, unrunnable mess. If you’re watching carbs, you can substitute half of it with almond flour for a lower‑carb version, but the texture will shift slightly.
Water (1 cup, warm): Activates the baking soda and helps the dough rise just enough for that perfect bite. If you use cold water, the dough will be denser, and the pretzels won’t rise as nicely. Warm water also makes the butter melt smoothly into the mix.
Sugar (1 tbsp): Adds a subtle sweetness that balances the salt and spices. If you prefer a less sweet pretzel, reduce this to 1 tsp or omit it entirely. It also helps the glaze set into a glossy finish.
The Texture Crew
Baking Soda (1 tsp): The leavening agent that gives the dough its airy pockets. Without it, the pretzels would be flat and dense. If you don’t have baking soda, you can substitute with baking powder, but the flavor profile will change slightly.
Salt (1 tsp): Essential for flavor balance. A pinch too much can make the dough taste metallic, so measure carefully. If you’re on a sodium‑restricted diet, you can cut it in half, but the pretzels will be less savory.
Melted Butter (1/4 cup): Adds richness and helps the dough stay soft. If you’re vegan, substitute with melted coconut oil for a similar mouthfeel. The butter also contributes to the glossy glaze finish.
The Unexpected Star
Sea Salt Flakes (1 tsp): Sprinkled on top before baking, these flakes give a satisfying crunch and a burst of umami. They’re the secret to a pretzel that feels like a gourmet treat. If you’re not a fan of sea salt, regular table salt will do, but the texture will be less pronounced.
Cinnamon (1 tsp) and Nutmeg (1/2 tsp): These spices add warmth and depth. They’re reminiscent of holiday spice mixes, turning a simple pretzel into a festive treat. If you’re allergic, you can omit them, but the flavor will be noticeably lighter.
The Final Flourish
Brown Sugar (1/4 cup): Incorporated into the glaze, it gives a caramelized sweetness that pairs beautifully with the salty dough. If you prefer a lighter glaze, use white sugar instead.
Powdered Sugar (1/4 cup): The base of the glaze, giving it that smooth, glossy finish. If you’re avoiding refined sugar, you can use a sugar substitute like erythritol, but the glaze will be less glossy.
Milk (1 tbsp): Adds moisture to the glaze, making it pourable and smooth. If you’re dairy‑free, use almond milk or oat milk for a subtle nutty flavor.
Everything's prepped? Good. Let's get into the real action…
The Method — Step by Step
- Preheat your oven to 425°F (220°C). Line a baking sheet with parchment paper to prevent sticking. The oven should be hot enough to give the pretzels a quick rise and a crisp exterior. The smell of the warm oven is the first hint that the holiday magic is about to begin. This step is crucial; a cooler oven will result in flat, under‑baked rings.
- In a large bowl, whisk together 2 cups all‑purpose flour, 1 tsp baking soda, and 1 tsp salt. This dry mix ensures even distribution of leavening and flavor. If you’re meticulous, sift the flour to remove clumps, giving the dough a smoother texture. Set this bowl aside; the next step will bring it to life.
- In a separate bowl, combine 1 cup warm water, 1 tbsp sugar, and 1/4 cup melted butter. Stir until the butter is fully incorporated. The warm water activates the baking soda, while the butter adds richness. Pour this wet mixture into the dry mix, stirring with a wooden spoon until a shaggy dough forms. The dough should feel tacky but not sticky.
- Turn the dough onto a lightly floured surface and knead for about 5 minutes until it becomes smooth and elastic. The dough should feel like silk, pliable yet firm. Let it rest for 10 minutes; this rest period relaxes the gluten and makes the dough easier to shape. During this time, the flavors meld, creating a more harmonious base for the pretzels.
- Divide the dough into 8 equal pieces. Roll each piece into a rope about 3 inches long. Bring the ends together, twist them, and press them to form a wreath shape. This step is the moment of truth; the wreath should be tight enough to hold its shape but not so tight that it breaks. If you’re new to shaping, practice with a piece of dough before assembling the final wreaths.
- Place the wreaths on the prepared baking sheet, spacing them evenly. Sprinkle 1 tsp sea salt flakes over each wreath. Let them rest for 5 minutes; this pause allows the dough to relax and the salt to seep into the surface. The salt will caramelize slightly during baking, adding a delightful crunch.
- Bake the wreaths for 12–15 minutes, or until they are golden brown and the edges have a slight char. The aroma of toasted flour and spices should fill your kitchen. The dough should feel firm yet springy when you press it lightly. Keep an eye on the color; you don’t want them to burn.
- While the wreaths are still warm, whisk together 1/4 cup powdered sugar, 1 tbsp milk, 1 tbsp melted butter, 1 tsp vanilla extract, and a pinch of sea salt to create the glaze. The glaze should be smooth and pourable, not too thick. Brush the glaze over each wreath, ensuring an even coat. The glaze will set as it cools, giving the pretzels a glossy finish.
- Let the glazed wreaths cool on a wire rack for 10 minutes. The glaze will firm up, creating a slightly tacky surface that’s perfect for dipping. Serve immediately, or store them in an airtight container at room temperature for up to 3 days. If you need to reheat, warm them in a 350°F oven for 5 minutes, then brush with a splash of milk to restore moisture.
That's it — you did it. But hold on, I've got a few more tricks that'll take this to another level…
Insider Tricks for Flawless Results
The Temperature Rule Nobody Follows
Ovens can be temperamental. If your oven runs hot, the wreaths will brown too quickly on the outside while remaining under‑baked inside. Use an oven thermometer to verify the temperature, and adjust the rack to the middle for even heat distribution. I once baked at 450°F, and the wreaths were charred on the edges and chewy on the inside. The fix? Lower the temperature to 425°F and keep a close eye on the color.
Why Your Nose Knows Best
When the dough is ready, it should emit a subtle, nutty aroma. If you smell a strong, metallic scent, the dough likely contains too much salt or baking soda. Trust your nose; it’s the ultimate judge of readiness. I once smelled a burnt smell while baking and realized I’d accidentally added extra baking soda. The result was a bitter pretzel that tasted like a science experiment.
The 5-Minute Rest That Changes Everything
After shaping, let the wreaths rest for 5 minutes before baking. This short pause allows the gluten to relax, preventing the dough from shrinking during the bake. It also lets the salt flakes settle, ensuring an even distribution of flavor. Skipping this step often results in unevenly browned wreaths that look like a work of abstract art.
Glaze Timing Is Key
Apply the glaze while the wreaths are still warm. The heat helps the glaze set into a glossy, slightly tacky coating that’s perfect for dipping. If you wait until the wreaths are completely cool, the glaze will harden into a brittle shell that’s hard to break. I once glazed a batch that had cooled and found it was almost impossible to bite into.
Storing for Freshness
Store the glazed wreaths in an airtight container at room temperature. If you need to keep them for a longer period, freeze them in a freezer bag. When reheating, add a splash of milk to rehydrate the glaze. I’ve kept a batch in the fridge for a week, and when I warmed it, the glaze was as fresh as the day it was made.
Creative Twists and Variations
This recipe is a playground. Here are some of my favorite ways to switch things up:
Nutty Holiday
Add 1/4 cup chopped pecans to the dough before shaping. The nuts add a crunchy texture and a buttery flavor that complements the glaze. Perfect for those who love a nutty bite.
Chocolatey Surprise
Swirl 2 tbsp melted dark chocolate into the glaze before brushing. The chocolate adds a rich depth that pairs beautifully with the sea salt. Serve with a drizzle of chocolate sauce for an extra indulgent touch.
Citrus Kick
Replace the vanilla extract in the glaze with 1 tsp orange zest. The citrus brightens the flavor profile and adds a refreshing contrast to the warm spices. This variation is especially good for holiday parties where you want something a bit different.
Vegan Version
Use melted coconut oil instead of butter, oat milk for the glaze, and a vegan powdered sugar. The texture remains chewy, and the glaze still glows. This version is perfect for guests who avoid dairy.
Spiced Up
Increase the cinnamon to 2 tsp and add 1/4 tsp ground cloves. The extra spices give the wreaths a deeper, more aromatic flavor. This is ideal for those who love a strong spice kick.
Mini Pretzel Bites
Instead of wreaths, roll the dough into small balls and bake them like mini pretzels. Brush with glaze after baking. These bite‑sized treats are perfect for parties and make for great gifts.
Storing and Bringing It Back to Life
Fridge Storage
Place the glazed wreaths in an airtight container and store them in the fridge for up to 3 days. The glaze will firm up, but you can add a splash of milk before serving to soften it. This method keeps the wreaths fresh without losing the glossy finish.
Freezer Friendly
Wrap each wreath individually in parchment paper, then place them in a freezer bag. Freeze for up to 2 months. When ready to eat, thaw at room temperature for 30 minutes, then warm in a 350°F oven for 5 minutes. Brush with a little milk to restore moisture.
Best Reheating Method
The best way to reheat is to preheat your oven to 350°F (175°C) and warm the wreaths for 5 minutes. Then brush with a splash of milk or a light drizzle of melted butter to bring back that fresh, warm feeling. Avoid microwaving, as it can make the dough soggy.