Remember that night when I tried to bake a simple vegan tart and ended up with a kitchen that looked like a flour battlefield? The flour dust clung to my hair like a fine mist, the coconut oil melted into a sticky glaze, and my oven was screaming for mercy. I was staring at a soggy, lumpy dough that had no promise of crispness or flavor. That disaster became the catalyst for a culinary epiphany that I can’t keep to myself.
I was craving something that felt like a dessert but could also double as a light lunch. The air was thick with the scent of toasted coconut and the sweet tang of raspberries, the sound of the oven timer ticking down, and the gentle hum of the fridge. When the first bite finally hit my tongue, it was a revelation—sweetness that didn’t overwhelm, a buttery mouthfeel that was entirely plant‑based, and a texture that was both airy and satisfying. The moment the tart cooled, the edges began to crisp like thin ice, and the filling glistened like a jewel set in amber.
What makes this version stand out is not just the ingredients but the way they work together. I dared you to taste this and not go back for seconds, and I’ve seen people double the recipe in a single sitting. The combination of coconut cream, agar powder, and fresh raspberries creates a velvety filling that sets perfectly, while the desiccated coconut adds a subtle crunch that balances the softness. This is hands down the best version you'll ever make at home because it transforms ordinary pantry staples into a show‑stopping dish.
The secret? A micro‑challenge that I’ll reveal in a moment: using agar powder to thicken the filling without the need for gelatin, which keeps the tart fully vegan and gives it a silky finish that feels indulgent. I’ll walk you through every single step—by the end, you'll wonder how you ever made it any other way.
What Makes This Version Stand Out
- Taste: The harmony of coconut sweetness and tart raspberries delivers a balanced flavor profile that lingers on the palate. The subtle bitterness of desiccated coconut adds depth, preventing the dish from feeling one‑dimensional.
- Texture: The agar‑infused filling sets into a smooth, sliceable consistency that melts in your mouth, while the crust remains flaky and buttery without the use of animal butter.
- Simplicity: All ingredients are pantry staples or can be found in any grocery store, making this recipe a go‑to for both beginners and seasoned cooks.
- Uniqueness: Using coconut cream as the base gives a rich body, and the agar powder eliminates the need for gelatin, a game‑changer for vegan enthusiasts.
- Crowd Reaction: Friends who are skeptical of plant‑based desserts rave about how this tart feels like a luxury treat.
- Ingredient Quality: Fresh raspberries and high‑quality coconut oil elevate the dish, ensuring that each bite is vibrant and flavorful.
- Cooking Method: The two‑stage baking process—first the crust, then the filling—ensures optimal texture and flavor integration.
- Make‑Ahead Potential: The tart can be assembled a day ahead; the filling will set beautifully, and the crust retains its crispness when baked just before serving.
Alright, let's break down exactly what goes into this masterpiece...
Inside the Ingredient List
The Flavor Base
All‑Purpose Plain Flour is the backbone of our crust, providing structure and a neutral canvas that lets the other flavors shine. A pinch of salt balances the natural sweetness of the coconut, while the granulated sugar adds a subtle caramel note. If you’re looking for a gluten‑free version, you can swap in a 1:1 gluten‑free flour blend, but be prepared to adjust the liquid slightly to maintain the right dough consistency.
The Texture Crew
Coconut Oil is the secret to that buttery, flaky bite without any dairy. It coats the flour particles, creating layers that puff up during baking. The desiccated coconut adds a chewy contrast that keeps the crust from becoming too dense. A quick tip: toast the coconut lightly before adding it to the dough to unlock its nutty aroma.
The Unexpected Star
Agar Powder is the unsung hero that turns our coconut cream into a firm, sliceable filling. Unlike gelatin, agar sets at room temperature, meaning you can prepare the tart in advance and let it chill overnight. It also gives the filling a glossy sheen that looks as good as it tastes. If you’re new to agar, dissolve it in a small amount of cold water before adding it to the warm coconut mixture to prevent clumping.
The Final Flourish
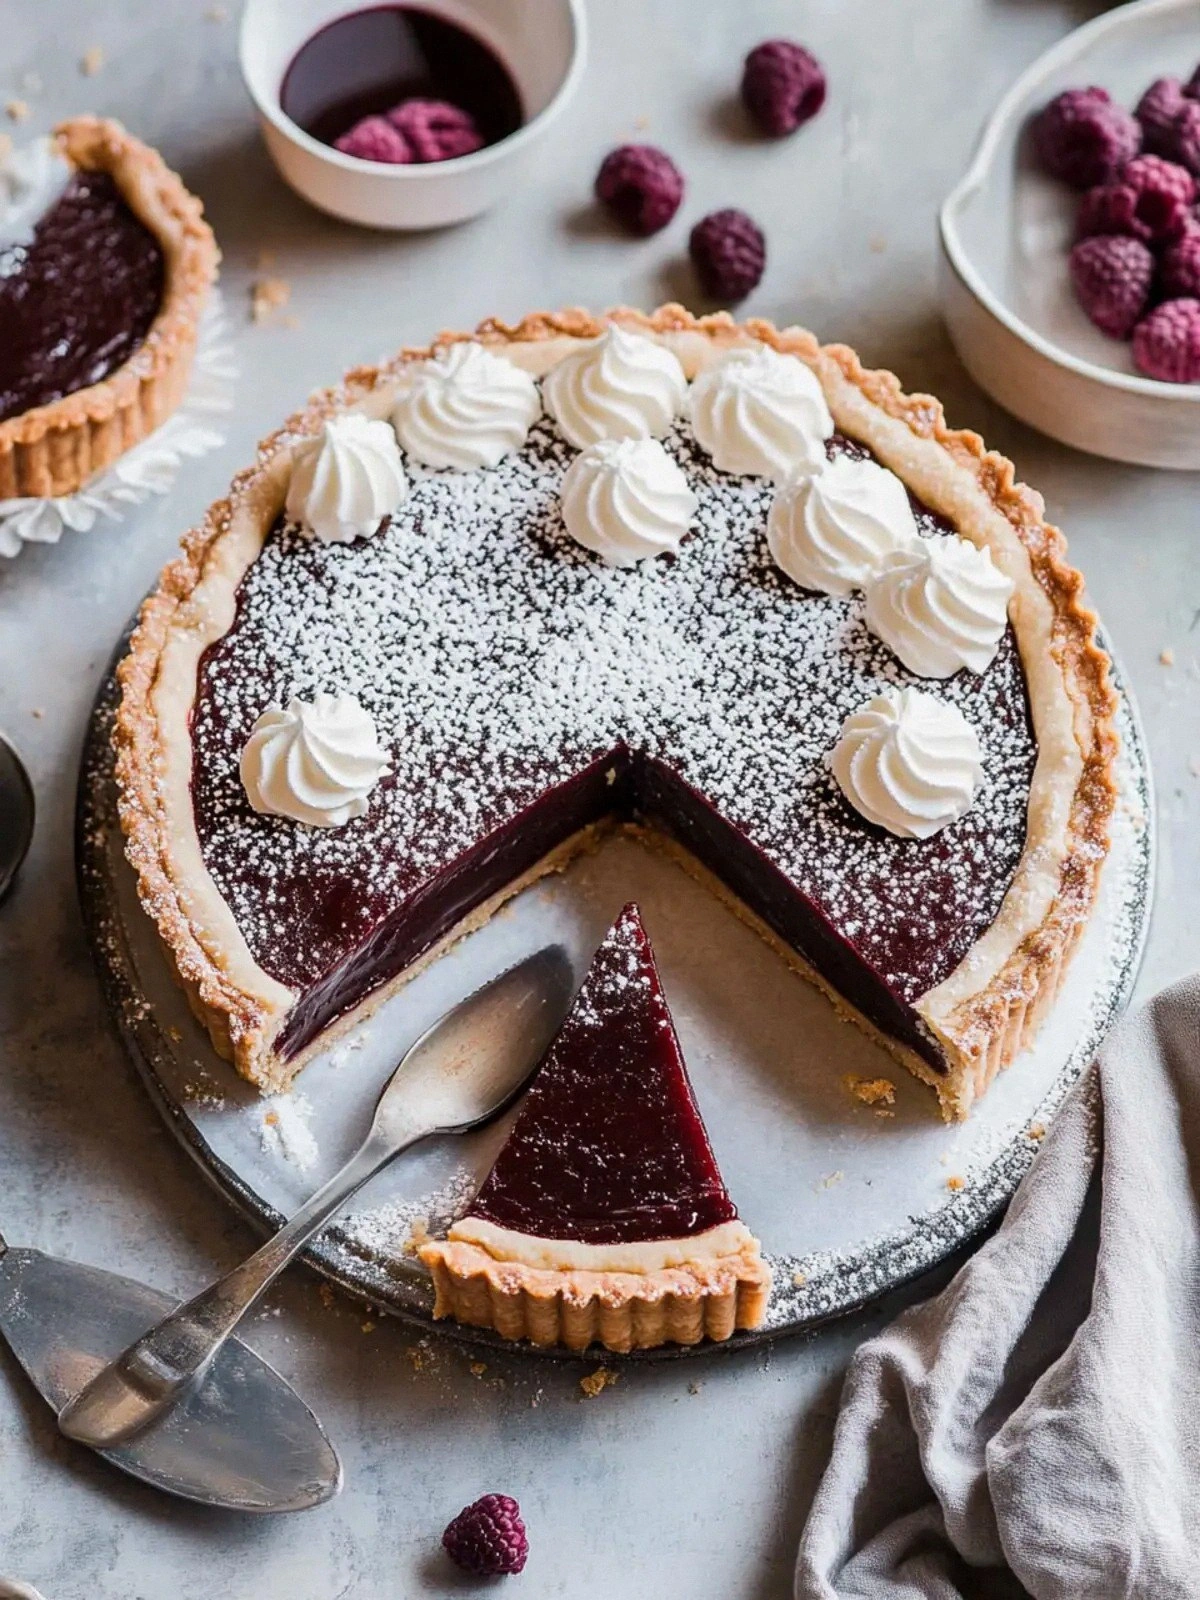
Fresh Raspberries are the crown jewel that brings brightness and a pop of color to every slice. Their natural tartness cuts through the richness of the coconut, creating a dynamic flavor profile. If raspberries are out of season, blueberries or blackberries work well, but the tart will taste slightly different. Light-Colored Sweetener, such as agave nectar or maple syrup, rounds out the sweetness without overpowering the fruit.
Everything's prepped? Good. Let's get into the real action...
The Method — Step by Step
- Step 1: Prepare the Crust. In a large bowl, whisk together the flour, sugar, and salt until evenly blended. Add the coconut oil and rub it into the dry mixture with your fingertips until the mixture resembles coarse crumbs. This is the moment of truth—if the crumbs are too coarse, your crust will be tough; if too fine, it will crumble. Gently press the mixture into the bottom of a 9-inch tart pan, using the back of a spoon to achieve an even thickness. Chill the crust in the refrigerator for 10 minutes to firm up before baking.
- Step 2: Bake the Crust. Preheat the oven to 350°F (175°C). Slide the chilled crust onto a baking sheet and bake for 15 minutes, or until the edges are golden brown. The aroma of toasted coconut should fill your kitchen, signaling that the crust is ready. Remove the crust from the oven and let it cool completely on a wire rack—this prevents sogginess when the filling is added.
- Step 3: Make the Filling. In a medium saucepan, combine the canned coconut cream, light-colored sweetener, and a pinch of salt. Warm over medium heat, stirring constantly, until the mixture is silky and fragrant. This should take about 5 minutes; keep an eye on it so it doesn’t scorch. The filling should smell like warm coconut, a hint of vanilla, and a whisper of tropical fruit.
- Step 4: Dissolve the Agar. In a small bowl, sprinkle the agar powder over 2 tablespoons of cold water. Let it bloom for 2 minutes, then whisk vigorously to break up any clumps. This step is critical—skipping it will result in a lumpy filling. Once bloomed, pour the agar mixture into the warm coconut cream while whisking continuously. Bring the mixture to a gentle simmer; it should thicken slightly after 2 minutes. Remove from heat immediately to prevent overcooking, which can reduce the setting ability of agar.
- Step 5: Add the Fruit. Fold in the fresh raspberries gently to preserve their shape. The berries will release juice, which will help the filling set and add a natural glaze. If you prefer a smoother texture, you can blend the raspberries before adding them, but the whole fruit gives a delightful burst of flavor in each bite.
- Step 6: Pour into the Crust. Carefully pour the filling into the cooled crust, spreading it evenly with a spatula. The filling should sit on top of the crust like a glossy, fragrant sauce. If it’s too thick, add a splash of coconut milk to thin it slightly; if too thin, let it rest for a few minutes to thicken.
- Step 7: Chill to Set. Place the tart in the refrigerator for at least 4 hours, or overnight if you’re prepping ahead. The agar will firm up, creating a sliceable consistency that holds its shape. While the tart sets, you can prepare a simple garnish—perhaps a drizzle of coconut cream or a sprinkle of toasted coconut flakes.
- Step 8: Serve. Remove the tart from the fridge, let it sit at room temperature for 10 minutes to soften slightly, then slice with a sharp knife. The edges should hold together like a well‑made cookie, and the interior will melt on the tongue. Plate the slices on a chilled platter, garnish with extra raspberries or a dusting of powdered sugar, and serve immediately.
That's it — you did it. But hold on, I've got a few more tricks that'll take this to another level...
Insider Tricks for Flawless Results
The Temperature Rule Nobody Follows
Many bakers think that higher oven temperatures always produce better crusts, but that’s a myth. Baking at a moderate 350°F allows the crust to develop a golden crust without burning the coconut flavor. I’ve tried 375°F once, and the result was a dry, over‑cooked crust that didn’t hold the filling well. Stick to the moderate heat for a buttery, tender base.
Why Your Nose Knows Best
When the coconut cream starts to bubble, the aroma is your best indicator that it’s ready. A faint scent of toasted coconut and a hint of vanilla mean the mixture is at the right temperature. If you’re still unsure, perform the “spoon test”: drop a small amount onto a cold plate; if it spreads quickly, you’re good to go.
The 5-Minute Rest That Changes Everything
After pouring the filling into the crust, let it rest for 5 minutes before chilling. This pause allows the flavors to meld and the filling to start setting slightly, reducing the chance of the crust becoming soggy. I’ve seen people skip this step and end up with a soggy, mushy base—avoid that.
Use a Silicone Mat for a Crisp Finish
A silicone baking mat keeps the crust from sticking and ensures an even bake. The non-stick surface means you can easily lift the crust out of the pan without damaging it. It also cleans up faster than parchment paper, saving you time after a long cooking session.
Keep the Filling Cool Until Set
If you’re preparing the tart a day ahead, let the filling cool to room temperature before refrigerating. This prevents condensation from forming on the surface, which can make the crust soggy. A quick trick: cover the top with plastic wrap and let it sit for 10 minutes before sealing it.
Creative Twists and Variations
This recipe is a playground. Here are some of my favorite ways to switch things up:
Citrus Burst
Replace half of the raspberries with finely chopped fresh orange segments. The citrus zest will add a bright, tangy note that balances the coconut richness. This variation is perfect for spring and summer gatherings.
Chocolate Lover’s Dream
Swirl in a tablespoon of dark chocolate sauce into the filling before pouring it into the crust. The chocolate will create a glossy, decadent layer that pairs beautifully with the coconut base. Serve with a dusting of cocoa powder for an extra touch.
Nutty Crunch
Sprinkle toasted almond slivers on top of the finished tart. The nutty crunch adds a contrasting texture and a subtle buttery flavor that complements the coconut. This version is ideal for holiday parties.
Mango Tango
Swap out the raspberries for diced ripe mango. The mango’s natural sweetness and silky texture create a tropical vibe that transports you to a beach vacation. Pair it with a light coconut whipped cream for an extra indulgent experience.
Herbal Twist
Add a pinch of fresh thyme or basil to the filling for an aromatic, herbaceous undertone. The herb pairs surprisingly well with coconut, providing a savory counterpoint to the fruit’s sweetness. This variation works wonderfully for dinner parties where you want a dessert that feels unexpected.
Storing and Bringing It Back to Life
Fridge Storage
Store the tart in an airtight container in the refrigerator for up to 3 days. The agar ensures the filling remains firm, while the crust retains its crispness. If you notice the crust softening, place a paper towel in the container to absorb excess moisture.
Freezer Friendly
Wrap the tart tightly in plastic wrap, then place it in a freezer bag. It will keep for up to 2 weeks. When ready to serve, thaw in the refrigerator overnight. The texture should remain intact, but let it sit at room temperature for 10 minutes before slicing.
Best Reheating Method
To reheat a slice, microwave on high for 10–15 seconds until warm. Alternatively, place the slice on a baking sheet and warm in a preheated oven at 300°F for 5 minutes. Add a tiny splash of water before reheating to steam back to perfection, ensuring the filling stays moist and the crust doesn’t become soggy.