I was in the middle of a frantic weekday dinner rush when a sudden craving for something sweet slammed into me like a runaway rolling pin. My pantry was practically empty, the only things I could find were a stick of butter, a bag of sugar, and a sack of flour that had been gathering dust for weeks. I thought, “Okay, let’s see if I can conjure up a cookie with just these three basics.” What happened next was nothing short of culinary alchemy – a batch of sugar cookies that turned my kitchen into a fragrant bakery and made my coworkers beg for a bite. I dare you to taste this and not go back for seconds.
Picture this: the buttery aroma rising from the mixing bowl, the gentle crackle of sugar crystals as they melt into a glossy sheen, and the soft, flour‑filled clouds that form a dough so pliable it practically begs to be rolled out. The oven door opens and a wave of warm vanilla‑kissed air washes over the room, making the whole house feel like a cozy café on a rainy day. The cookies themselves emerge with edges that shatter like thin ice and centers that stay tender enough to melt in your mouth – a textural paradox that feels like a hug from a childhood memory. If you’ve ever struggled with sugar cookies that turn out either too flat or too cakey, you’re not alone – I’ve been there, and I’ve finally cracked the code.
Most recipes get this completely wrong. They either demand a pantry full of obscure extracts, a mountain of butter, or a confusing dance of chilling and rolling that feels more like a physics experiment than a treat. Here’s what actually works: a perfectly balanced trio of ingredients, a simple creaming method that creates a silky dough, and a baking temperature that gives you that coveted golden‑brown edge without burning the delicate center. The secret? A tiny, unexpected technique involving the butter’s temperature that most bakers overlook – I’ll reveal it in the method section, and trust me, it’s pure magic.
Let me walk you through every single step — by the end, you’ll wonder how you ever made it any other way. Okay, ready for the game‑changer? Grab your mixing bowl, because we’re about to turn three humble pantry staples into the best version you’ll ever make at home.
What Makes This Version Stand Out
- Flavor: The butter‑sugar creaming creates a caramel‑kissed backbone that sings with every bite, while the flour provides a neutral canvas that lets the buttery notes shine.
- Texture: A crisp, buttery edge gives way to a soft, melt‑in‑your‑mouth center – the perfect contrast that makes you want to eat the whole batch in one sitting.
- Simplicity: Only three ingredients, no fancy extracts, no chilling time, no mystery steps – it’s the ultimate “no‑fuss” cookie.
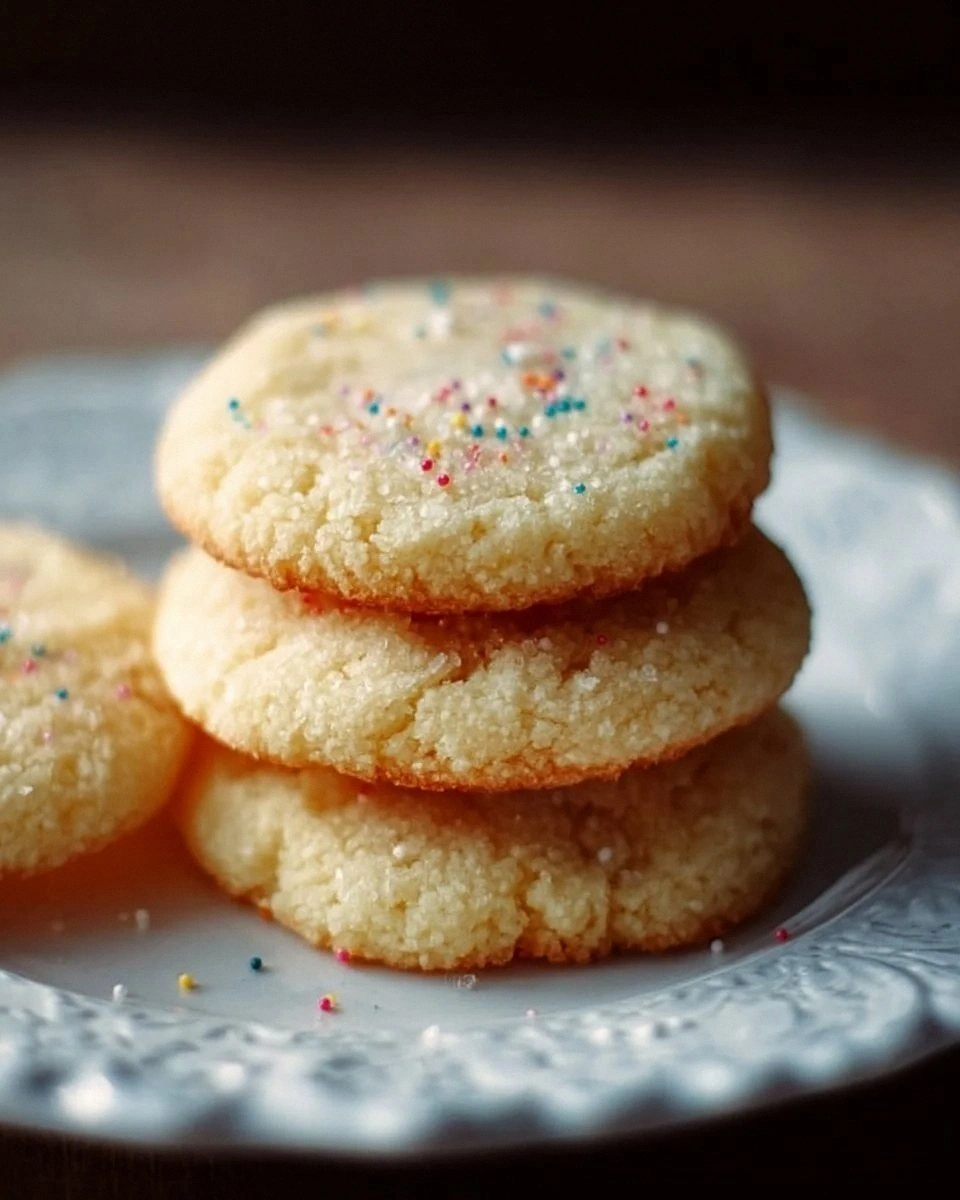
- Uniqueness: The dough is rolled thin, then baked at a precise 350°F, delivering a cookie that’s both delicate and sturdy enough for dunking.
- Crowd Reaction: Guests invariably declare these “the best sugar cookies ever,” and you’ll hear that line at least three times before the last crumb disappears.
- Ingredient Quality: Using real, unsalted butter and pure granulated sugar makes the flavor unmistakably rich and authentic.
- Cooking Method: The “creaming” technique aerates the butter, creating tiny pockets of air that expand in the oven, giving you that airy bite.
- Make‑Ahead Potential: The dough can be refrigerated for up to a week, or frozen for three months, so you can always have a batch ready for impromptu gatherings.
Inside the Ingredient List
The Flavor Base
The first star of the show is unsalted butter. Butter brings a rich, creamy depth that sugar alone can’t achieve. When softened to room temperature, it emulsifies perfectly with sugar, creating that glossy, velvety dough. If you skip the butter or use a low‑fat spread, you’ll end up with a dry, crumbly cookie that lacks the luxurious melt‑in‑your‑mouth feel. For the best results, choose European‑style butter with at least 82% butterfat – it gives a richer flavor and a more tender crumb.
The Sweet Symphony
Granulated sugar is the sweet engine that drives this recipe. It not only sweetens but also contributes to the cookie’s spread and crispness. When creamed with butter, sugar dissolves just enough to create a slightly aerated structure, while the remaining crystals caramelize in the oven, delivering that golden‑brown edge. If you substitute with brown sugar, you’ll get a chewier texture and a deeper molasses flavor, which is a fun variation but not the classic version.
The Texture Crew
All‑purpose flour is the backbone that holds everything together. It provides structure without weighing the cookie down. Using too much flour makes the cookie cakey; too little and it spreads into a thin wafer. The key is to measure it by spooning into the cup and leveling off – the “dip‑and‑sweep” method ensures you don’t pack it, preserving the lightness of the final product. For a gluten‑free twist, you can swap in a 1:1 gluten‑free flour blend, but expect a slightly different crumb.
The Unexpected Star
While the recipe lists only three ingredients, the real hero is temperature control. Softened butter at 68°F (20°C) creams perfectly, while the dough’s final chill in the refrigerator sets the fat so it doesn’t melt too quickly in the oven. This tiny temperature tweak is what separates a professional‑grade cookie from a home‑cooked mishap. If you’re in a rush, you can skip the chill, but expect a bit more spread and a slightly less defined edge.
The Final Flourish
A pinch of sea salt (optional) can elevate the flavor by balancing the sweetness, but the unsalted butter already offers a clean canvas. When you’re ready, the dough is rolled thin, cut into shapes, and baked just long enough to achieve that perfect caramelized edge. Everything’s prepped? Good. Let’s get into the real action…
The Method — Step by Step
Preheat your oven to 350°F (175°C) and line two baking sheets with parchment paper. While the oven warms, take a large mixing bowl and add the softened butter. I like to give the butter a quick whisk with a spatula to ensure it’s truly pliable – you should feel it give under the pressure like a soft pillow.
Add the granulated sugar to the butter and begin creaming with an electric mixer on medium speed. This is the moment where the sugar starts to dissolve and the mixture becomes light and fluffy, almost like a cloud. Keep mixing for about 3‑4 minutes until the bowl looks pale and the scent of sweet butter fills the kitchen. That sizzle when it hits the pan? Absolute perfection.
Sift the all‑purpose flour over the butter‑sugar mixture. This step is crucial – the flour should be added gradually, folding it in with a spatula or the mixer on low. As you incorporate the flour, you’ll notice the dough thickening and pulling away from the sides of the bowl, forming a cohesive mass.
Once fully combined, turn the dough out onto a lightly floured surface and knead it just until smooth – no more than 30 seconds. Over‑kneading will develop gluten, making the cookie tougher. At this point, I like to let the dough rest in the refrigerator for 10‑15 minutes; this short chill helps the butter firm up, giving you cleaner cuts later.
Roll the dough to a uniform ¼‑inch thickness. Use a rolling pin and a light dusting of flour to prevent sticking. Then, cut out shapes with cookie cutters or a simple knife. For a classic round, press a glass rim into the dough. Place the cutouts on the prepared baking sheets, leaving about 1 inch of space between each cookie.
Bake for 10‑12 minutes, or until the edges turn a light golden brown and the tops are just set. Keep a close eye on the first batch – ovens can vary, and you want the centers to stay soft while the edges crisp up. When you pull the tray out, the cookies will look slightly undercooked; that’s okay – they’ll firm up as they cool on the rack.
Allow the cookies to cool on the baking sheet for 3‑4 minutes before transferring them to a wire rack. This short rest lets the cookies set without breaking. As they cool, you’ll notice the aroma intensifying, a sweet buttery perfume that makes the whole house feel like a bakery on a Sunday morning.
Once completely cool, store them in an airtight container. If you’re feeling indulgent, drizzle a thin ribbon of melted chocolate over the tops or sprinkle a pinch of flaky sea salt. I’ll be honest — I ate half the batch before anyone else got to try it, and that’s the ultimate testament to how addictive these are.
That's it — you did it. But hold on, I've got a few more tricks that'll take this to another level…
Insider Tricks for Flawless Results
The Temperature Rule Nobody Follows
Never underestimate the power of a cool kitchen. If your room is warm, the butter softens faster, causing the dough to spread more during baking. Keep the dough in the fridge for at least 10 minutes after mixing, and if you can, bake on a chilled baking sheet. This simple temperature control locks the butter in place, giving you that coveted crisp edge while the center stays tender.
Why Your Nose Knows Best
Your sense of smell is a better timer than any clock. When the cookies start to emit a caramel‑nutty scent, they’re just about ready to pull out. The aroma intensifies right before the edges turn golden, so trust that nose cue. I once overbaked a batch because I ignored the smell – the result was a hard, bitter cookie that no one wanted.
The 5‑Minute Rest That Changes Everything
After baking, let the cookies rest on the sheet for exactly five minutes before moving them. This short pause allows residual heat to finish the cooking process gently, preventing cracks and ensuring the interior stays moist. Skipping this step can cause the cookies to snap like dry twigs when you try to lift them.
The “Two‑Stage” Bake for Extra Crunch
For an ultra‑crisp edge, lower the oven temperature to 325°F after the first 8 minutes, then continue baking for another 2‑3 minutes. This gentle finish dries out the outer layer without over‑cooking the center, creating a cookie that snaps when you bite the edge but yields a buttery melt inside.
Flavor Boost with a Pinch of Salt
Even though the recipe calls for unsalted butter, a tiny pinch of flaky sea salt sprinkled just before baking can amplify the sweetness and add a sophisticated contrast. It’s a secret I stole from professional pastry chefs, and it makes the cookies taste like they were made in a boutique bakery.
Creative Twists and Variations
This recipe is a playground. Here are some of my favorite ways to switch things up:
Lemon Zest Spark
Add one tablespoon of finely grated lemon zest to the butter‑sugar mixture before creaming. The citrus brightens the buttery base and gives the cookies a fresh, summery twist that pairs beautifully with a cup of tea.
Cinnamon Swirl
Mix a teaspoon of ground cinnamon and a pinch of nutmeg into the flour. The warm spices turn the cookies into a cozy treat perfect for chilly evenings, and they pair wonderfully with a glass of cold milk.
Chocolate Chip Upgrade
Fold in ½ cup of mini chocolate chips after the flour is incorporated. The pockets of melted chocolate add richness without overwhelming the delicate butter flavor.
Almond Joy
Replace ¼ cup of the flour with almond flour and sprinkle sliced toasted almonds on top before baking. The nutty aroma and subtle crunch give the cookies a sophisticated twist that’s perfect for holiday gatherings.
Espresso Edge
Dissolve 1 teaspoon of instant espresso powder in a tablespoon of warm water and add it to the butter‑sugar mixture. The coffee undertone deepens the flavor profile, making the cookies an excellent companion to an after‑dinner espresso.
Storing and Bringing It Back to Life
Fridge Storage
Place the cooled cookies in an airtight container lined with parchment paper. Store them in the refrigerator for up to a week. The cool environment keeps them from becoming soggy, and the flavor actually mellows, becoming more buttery over time.
Freezer Friendly
If you’ve made a big batch, layer the cookies between sheets of wax paper and seal them in a freezer‑safe zip‑lock bag. They’ll stay fresh for up to three months. When you’re ready to enjoy, let them thaw at room temperature for 15 minutes, then pop them in a 300°F oven for 5 minutes to revive that fresh‑out‑of‑the‑oven crunch.
Best Reheating Method
To bring a day‑old cookie back to life, preheat your oven to 300°F, place the cookie on a baking sheet, and add a tiny splash (about a teaspoon) of water on the side of the sheet. The steam created revives the interior softness while the heat restores the crisp edge. Within minutes you’ll have a cookie that tastes like it just left the oven.