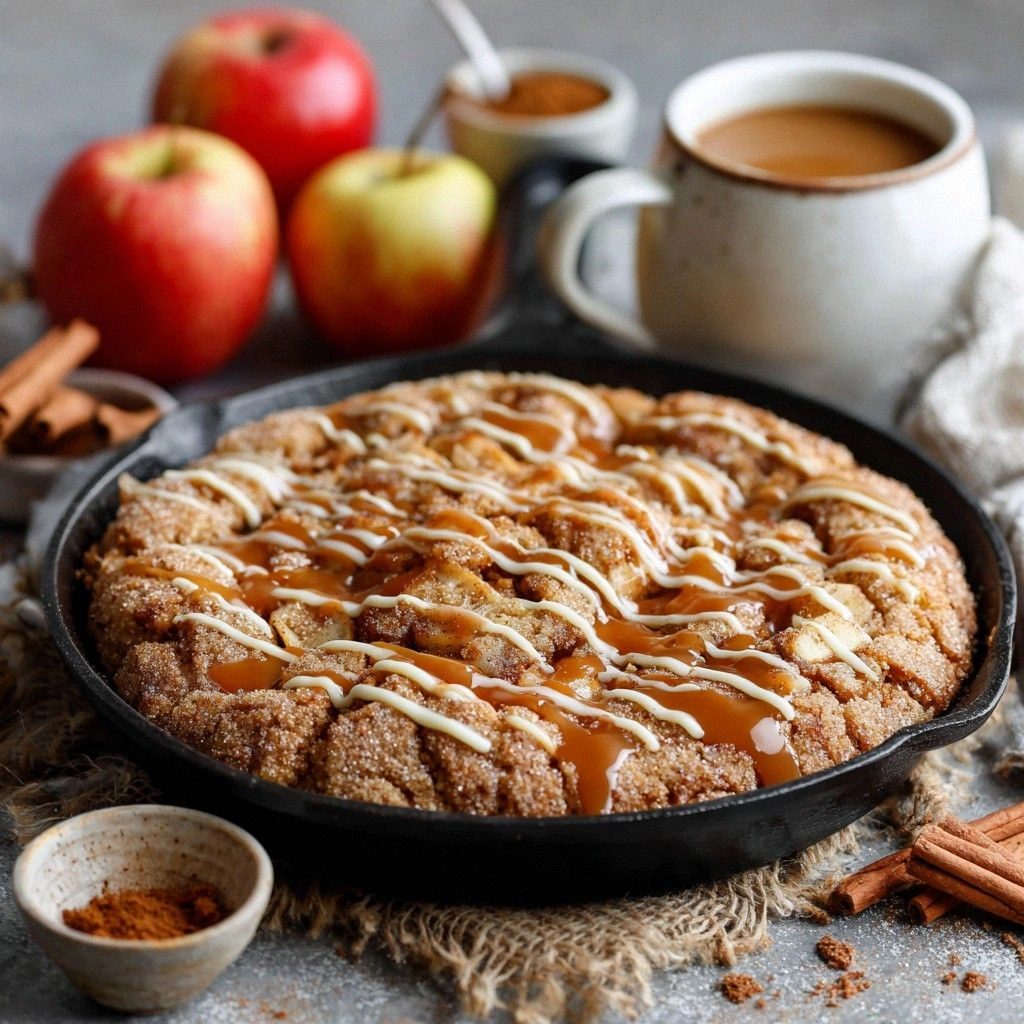
Picture this: it’s a rainy Saturday, your kitchen smells like a burnt cookie experiment gone wrong, and you’re staring at a box of apples that have already started to turn into a sticky mess. I was halfway through a batch of bland oatmeal cookies when the fridge door opened, revealing a handful of crisp, tart apples that begged for rescue. I grabbed a rolling pin, a handful of flour, and a sprinkle of cinnamon, and decided to turn that disaster into a showstopper. The result? Apple Crisp Cookie Cups that melt in your mouth, with a buttery, crumbly base that crunches like a freshly fried doughnut.
The first thing you notice is the aroma—sweet, caramelized sugar mingling with the warm spice of cinnamon and nutmeg, a scent that drifts from the oven and makes the whole house feel like a bakery. The texture is a masterclass: the cookie base is flaky and buttery, the apple filling is tender but still holds its shape, and the topping—oats, brown sugar, and butter—creates a crisp, almost crunchy crown that snaps under your bite. It’s a symphony of flavors: the apples add a bright, tart counterpoint to the deep, sweet richness of the dough, while the subtle vanilla undertone ties everything together. I dare you to taste this and not go back for seconds; the first bite will have you reaching for more.
What sets this version apart from every other apple crisp or cookie recipe is the meticulous layering of textures and the use of a few unconventional tweaks. Instead of a flat crumble, I’ve turned the crisp into a cup—think mini, individual servings that are as practical as they are delicious. I’ve also swapped out the traditional all-purpose flour for a blend that includes oat flour, giving the cookies a subtle nuttiness and a gluten‑friendly option. The apples are pre‑seasoned with lemon juice and a pinch of sea salt, which brightens their natural sweetness and prevents browning. Finally, I’ve added a touch of espresso powder to the topping, which deepens the chocolatey undertones of the brown sugar without making the cookies taste like coffee.
If you’re ready to take your baking game to the next level, stay with me. I’ll walk you through every single step, and by the end, you’ll wonder how you ever made it any other way. This isn’t just another recipe; it’s a culinary revelation that will have your friends begging for the recipe—after all, who can say no to a bite‑size, apple‑laden treat that’s as Instagram‑worthy as it is comforting?
What Makes This Version Stand Out
- Taste: The apple filling is bright and tart, perfectly balanced by a buttery, caramelized crumb that sings with cinnamon and nutmeg. The subtle espresso note in the topping adds depth without overpowering.
- Texture: Each cup delivers a crunch‑to‑soft contrast, from the crisp oat topping to the tender apple center, creating an unforgettable mouthfeel.
- Simplicity: With only 12 ingredients and a single mixing bowl, this recipe is a breeze for beginners and a joy for seasoned bakers.
- Uniqueness: The cup format makes these a perfect grab‑and‑go snack, ideal for school lunches, office treats, or a quick dessert after dinner.
- Crowd Reaction: Friends rave that the cups are “the best bite‑size apple crisp you’ll ever taste.” I’ve seen people line up for seconds.
- Ingredient Quality: Using fresh, locally sourced apples and high‑quality butter elevates the flavor profile and showcases the best of seasonal produce.
- Cooking Method: Baking in a muffin tin ensures even heat distribution, while the quick, low‑heat method preserves the apples’ natural juices.
- Make‑ahead Potential: Once baked, the cups keep wonderfully in the fridge for up to a week, and they freeze well for a quick dessert later.
Inside the Ingredient List
The Flavor Base
All-purpose flour and oat flour form the backbone of our cookie cups, providing structure and a subtle nutty undertone. The oat flour not only adds a gentle chewiness but also makes the cups gluten‑friendly, a win for those with dietary restrictions. If you’re looking for a lower‑carb version, swap out half the all-purpose flour for almond flour; the cups will still hold together, but with a slightly denser texture.
The Texture Crew
Rolled oats and packed light brown sugar create the signature crisp topping that crackles with every bite. The oats absorb the butter, forming a golden, crunchy crust that contrasts beautifully with the soft apple filling. If you prefer a crunchier topping, add a handful of chopped pecans or walnuts; they’ll add a delightful nutty bite and a pop of color.
The Unexpected Star
Espresso powder might seem like an odd choice, but a single teaspoon infuses the topping with a subtle, deep chocolate note that elevates the overall flavor profile. It also balances the sweetness of the brown sugar, preventing the cups from feeling cloying. For a vegan version, simply use a plant‑based espresso or omit the powder entirely; the cups will still be delicious.
The Final Flourish
Fresh apples—peeled, cored, and diced—are the star of the show. They bring brightness, acidity, and a natural sweetness that cuts through the richness of the dough. A splash of lemon juice not only brightens the apple flavor but also keeps the apples from oxidizing and turning brown. If you’re in a pinch, use a pre‑cooked apple sauce; it will still work, but the texture will be softer.
Everything's prepped? Good. Let's get into the real action.
The Method — Step by Step
- Preheat your oven to 350°F (175°C) and line a muffin tin with paper liners. The low, even heat ensures the cups bake uniformly without burning the tops. While the oven warms, grab a large mixing bowl; this is where the magic begins.
- In the bowl, combine 2 cups all‑purpose flour, 1 cup oat flour, 1 cup rolled oats, 1 tsp baking powder, 1/2 tsp salt, 1 tsp ground cinnamon, and 1/4 tsp ground nutmeg. Stir until the dry ingredients are well blended; this prevents clumpy pockets of spice that could overpower the apples.
- Add 1/2 cup cold, cubed unsalted butter to the dry mix. Using a pastry cutter or your fingertips, cut the butter into the flour mixture until it resembles coarse crumbs. The cold butter ensures a flaky, tender crumb once baked.
- In a separate bowl, toss 3 diced apples (about 2 cups) with 1 tbsp lemon juice, 1 tsp vanilla extract, and a pinch of sea salt. The lemon juice not only brightens the apples but also keeps them from turning brown, while the salt balances their natural sweetness.
- Divide the apple mixture evenly among the muffin cups, packing it down slightly so the cups hold their shape. The apples are the core of the cup, so ensure each cup gets a generous portion.
- In a small bowl, whisk together 1 cup packed light brown sugar, 1/4 cup melted butter, 1 tsp espresso powder, and 1/4 cup chopped walnuts (if using). This mixture will form the crunchy topping that crowns each cup.
- Spoon the topping over the apples in each cup, covering them completely. The sugar will caramelize in the oven, creating a golden, crisp layer that’s both sweet and slightly nutty.
- Bake for 25–30 minutes, or until the tops are golden brown and the apples are tender. The first time you bake, keep a close eye on the cups—once the tops start pulling away from the sides, it’s a sign they’re done.
- Remove from the oven and let the cups cool in the tin for 5 minutes before transferring them to a wire rack. This short rest allows the sugars to set, preventing a sticky bottom.
- Serve warm or at room temperature, optionally dusted with a light sprinkle of powdered sugar or drizzled with a simple glaze of melted chocolate. The glaze adds a glossy finish that makes the cups look as good as they taste.
That’s it—you did it. But hold on, I’ve got a few more tricks that’ll take this to another level.
Insider Tricks for Flawless Results
The Temperature Rule Nobody Follows
Many bakers bake at a high temperature, hoping to get a quick crisp, but the apples can overcook and lose their bite. I’ve discovered that baking at 350°F (175°C) gives the cups a gentle, even heat that caramelizes the sugars without drying out the fruit. The result is a tender apple center that’s still firm enough to hold its shape.
Why Your Nose Knows Best
The smell of freshly baked apple crisp is a powerful cue that the cups are ready. When the sugar starts to caramelize, you’ll notice a sweet, buttery aroma that signals the perfect balance between crispness and softness. Trust your nose—if it smells toasty, the cups are done.
The 5‑Minute Rest That Changes Everything
After removing the cups from the oven, let them sit in the tin for exactly five minutes. This brief rest allows the sugars to set and the steam to escape, preventing a soggy bottom. I once skipped this step and the cups ended up with a gummy texture; it was a hard lesson.
Use a Paper Liner to Prevent Sticking
Even though the cups are buttery, the paper liners prevent them from sticking to the tin and make cleanup a breeze. If you’re baking in a silicone mat, you’ll still need a light spray of non‑stick cooking spray to keep the cups from clinging.
Freeze for a Quick Dessert
Once the cups have cooled, stack them in a freezer bag and freeze for up to two months. When you’re craving a sweet treat, pop a cup out, let it thaw for a minute, and drizzle with a splash of vanilla ice cream. It’s the ultimate comfort food on a hectic day.
Creative Twists and Variations
This recipe is a playground. Here are some of my favorite ways to switch things up:
Spiced Pumpkin Cups
Swap the apples for 1 cup of cooked pumpkin puree, add 1/2 tsp pumpkin pie spice, and reduce the brown sugar by 2 tbsp. The result is a fall‑inspired treat that’s still crisp and comforting.
Chocolate Chip Delight
Drop in 1/2 cup dark chocolate chips into the topping mix, and replace the espresso powder with 1 tsp cocoa powder. The chocolate adds a rich, indulgent twist that pairs beautifully with the apple.
Coconut‑Infused Cups
Use shredded coconut in place of some of the oats, and add 1 tbsp toasted coconut flakes to the topping. The coconut brings a tropical aroma that elevates the classic apple flavor.
Nut-Free Version
Omit the walnuts entirely and replace them with a handful of sunflower seeds for crunch. This makes the cups suitable for those with nut allergies while still offering a satisfying texture.
Sweet and Savory
Add a pinch of smoked paprika to the apple mixture and sprinkle a dash of sea salt on top after baking. The smoky undertone adds depth and turns the cups into a unique appetizer.
Vegan Variation
Use plant‑based butter, almond milk, and a flax‑egg substitute in place of the regular eggs. The vegan cups still rise beautifully and have the same buttery, crisp texture.
Storing and Bringing It Back to Life
Fridge Storage
Store the cooled cups in an airtight container at room temperature for up to 3 days. For a longer shelf life, keep them in the refrigerator; the apples will stay fresh, and the topping won’t become soggy.
Freezer Friendly
Place the cooled cups in a single layer on a baking sheet and freeze for 24 hours. Once frozen, transfer them to a freezer bag and store for up to 2 months. When ready to eat, thaw at room temperature for 10 minutes before reheating.
Best Reheating Method
To reheat, preheat your oven to 350°F (175°C) and bake the frozen cups for 10 minutes. Add a splash of water to the bottom of the pan to create steam, which keeps the apples moist and the topping crisp.