I remember the night I was supposed to impress a friend who had a taste for culinary adventure. I opened the fridge, stared at the lonely chicken breasts, and thought, “What if I could turn this into a dish that feels like a secret handshake between sweet, salty, and nutty?” The kitchen was a battlefield of aromas: raw chicken, the sharp sting of garlic, the mellow hum of soy sauce simmering. My stove was a small, unassuming ally, but it was about to become the stage for a flavor revolution. I dared myself—and you—to taste this and not go back for seconds. That night, I discovered the Peanut Butter Soy Chicken Brea, a dish that whispers confidence in every bite, and I’m here to share every detail, from the first sizzling sound to the final flourish of crushed peanuts.
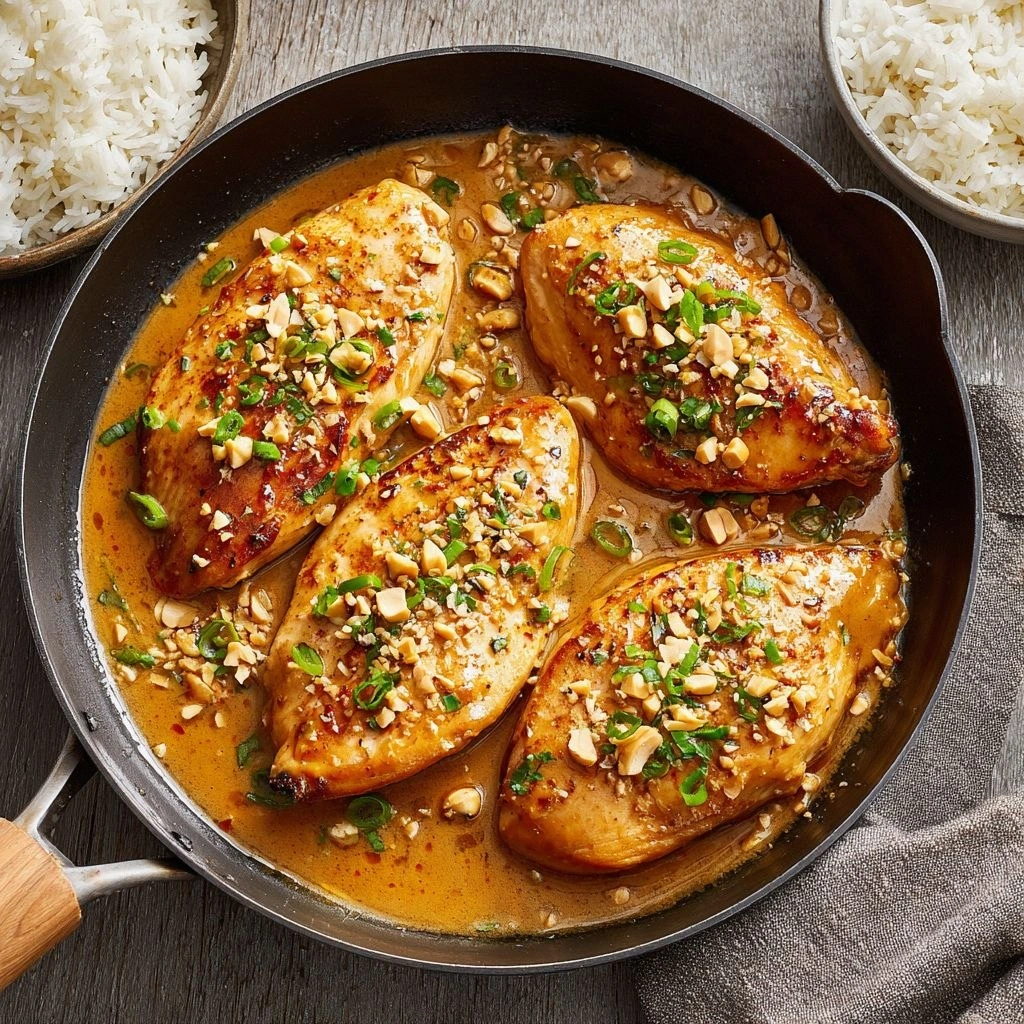
Picture yourself pulling this out of the skillet, the whole kitchen smelling incredible, a golden glaze glistening on the tender chicken. The first bite is a velvet caress of peanut butter, the second a punch of umami from soy, and the third a whisper of heat from chili flakes. The texture is a paradox: the chicken is juicy inside, yet the glaze caramelizes to a crisp crust that shatters like thin ice. It’s not just a meal; it’s a performance. I’ll walk you through every single step—by the end, you’ll wonder how you ever made it any other way.
I’ve spent months perfecting this version, and I’m proud to say it’s hands down the best version you’ll ever make at home. Most recipes get this completely wrong by overcooking the chicken or under-seasoning the sauce. The secret? A balanced ratio of peanut butter to soy, a quick cornstarch slurry to thicken, and a final splash of rice vinegar to cut through the sweetness. The result is a dish that’s simultaneously comforting and daring, suitable for dinner parties or a quick weeknight hit. If you’ve ever struggled with peanut butter sauces that taste too thick or too thin, you’re not alone—and I’ve got the fix. Let’s dive in.
Before we get to the meat of the story, let’s talk about why this dish is a game-changer. It’s not just the flavor; it’s the technique, the ingredients, the timing, and the sheer joy of watching the glaze coat the chicken like a second skin. And trust me, the moment you see the glaze thicken and the aroma fill the room, you’ll know you’re onto something special. Now, let’s break down exactly what goes into this masterpiece.
What Makes This Version Stand Out
- Flavor Depth: The marriage of peanut butter and soy sauce creates a layered profile—sweet, salty, and nutty—without overpowering each other. The subtle heat from chili flakes adds a finish that lingers.
- Texture Contrast: A silky sauce that clings to the chicken, paired with a crisp exterior achieved by quick searing, gives a satisfying bite that feels both comforting and adventurous.
- Ingredient Simplicity: With only a handful of pantry staples, you can whip up a gourmet dish in under an hour.
- Make‑Ahead Potential: The glaze can be pre‑made and stored in the fridge; just reheat gently to avoid separation.
- Crowd‑Pleaser: The dish balances familiar flavors with a twist, making it perfect for both family dinners and dinner parties.
- Quick Cooking Method: The chicken cooks in just 10 minutes per side, while the sauce reduces in 10 minutes—no long simmering required.
- Versatile Pairings: Serve over steamed rice, quinoa, or a bed of fresh greens; the sauce adapts beautifully.
- Health‑Friendly: Using lean chicken breast and natural peanut butter keeps the dish lower in saturated fat than many fried alternatives.
Alright, let's break down exactly what goes into this masterpiece... and remember: the next step is where the magic happens.
Inside the Ingredient List
The Flavor Base
The foundation of this dish is a harmonious blend of savory and sweet. Soy sauce provides the umami backbone, while honey adds a natural sweetness that balances the saltiness. Rice vinegar cuts through the richness, giving the sauce a bright, almost citrusy lift. Without any of these, the glaze would feel flat. If you’re missing rice vinegar, a splash of apple cider vinegar works as a decent stand‑in, though the final flavor will shift slightly toward fruitiness.
The Texture Crew
Cornstarch is the unsung hero that thickens the sauce into a glossy coat. It’s essential for that snap when you bite through the chicken. If you’re avoiding gluten, substitute with arrowroot powder or potato starch. The crushed peanuts add a satisfying crunch and a nutty undertone that complements the peanut butter. If you prefer a smoother texture, you can reserve a small portion of the peanuts for garnish only.
The Unexpected Star
Peanut butter is the star, but its quality makes a world of difference. A creamy, natural peanut butter without added sugars or hydrogenated oils will give a richer, more authentic taste. If you’re in a hurry, a store‑bought creamy variety works fine, but remember to adjust the honey to avoid over‑sweetening. A pinch of cayenne or red pepper flakes injects heat that plays against the sweetness, creating a balanced profile.
The Final Flourish
Freshly sliced green onions and a drizzle of sesame oil finish the dish with a bright, aromatic lift. The green onions bring a fresh, slightly sharp contrast to the deep, nutty sauce, while sesame oil adds a toasty, nutty aroma that ties everything together. If you’re vegan, simply omit the sesame oil or use a neutral oil; the dish will still shine.
Everything's prepped? Good. Let's get into the real action...
The Method — Step by Step
- Start by patting the chicken breasts dry with paper towels. This step is crucial; a dry surface ensures a golden sear. Season both sides generously with salt and pepper. Let the chicken rest for 5 minutes while you prepare the sauce. This allows the seasoning to penetrate.
- Heat a large skillet over medium‑high heat. Add a splash of vegetable oil and swirl to coat. When the oil shimmers, add the chicken. Sear for 4–5 minutes on each side until a golden crust forms. The sizzle is the soundtrack of success. Flip carefully to avoid tearing the skin.
- While the chicken sears, whisk together soy sauce, honey, rice vinegar, minced garlic, grated ginger, and chili flakes in a bowl. This is the flavor base that will envelop the meat. Keep the mixture at a low simmer once you add it to the pan.
- Add the peanut butter to the skillet, stirring to combine with the sauce. The mixture will bubble; reduce heat to medium. The sauce should thicken slightly and coat the back of a spoon. If it’s too thick, add a tablespoon of water to loosen.
- Stir in the cornstarch slurry (cornstarch mixed with cold water). This is where the sauce transforms into a glossy glaze. Stir constantly to avoid lumps. The sauce should cling to the chicken like a second skin.
- Reduce heat to low and let the chicken cook in the sauce for an additional 3–4 minutes. This allows the flavors to meld and the chicken to finish cooking. The sauce should reduce by about a third.
- Add the crushed peanuts, green onions, and sesame oil. Toss gently so the peanuts coat the chicken and the onions add a fresh crunch. The aroma at this point is irresistible.
- Turn off the heat and let the chicken rest for 2 minutes. The residual heat will finish cooking the interior, and the glaze will settle. Serve immediately over rice or noodles.
That’s it— you did it. But hold on, I've got a few more tricks that'll take this to another level. Remember the crunch of the peanuts? You can toast them lightly to intensify their flavor. Also, if you prefer a milder sauce, reduce the honey by a tablespoon and add a dash of lime juice for brightness.
Insider Tricks for Flawless Results
The Temperature Rule Nobody Follows
Many cooks assume any high heat is fine for searing. In reality, a medium‑high setting (around 375°F) gives the chicken a crisp exterior while preventing the interior from drying out. If you’re using a cast iron skillet, preheat it for at least 5 minutes before adding oil. This ensures an even sear and a beautiful caramelized crust.
Why Your Nose Knows Best
Trust the aroma. When the sauce starts to thicken, you’ll notice a nutty, slightly sweet smell that’s almost intoxicating. This is the cue that the glaze is ready. If the sauce still smells raw or too watery, give it a few more minutes on low heat.
The 5‑Minute Rest That Changes Everything
After cooking, let the chicken rest for 5 minutes. This allows the juices to redistribute, ensuring each bite stays moist. It also lets the glaze thicken slightly, giving that glossy finish. Skipping this step often results in a dry center.
Use Fresh Ginger, Not Powder
Fresh ginger brings a bright, zesty note that powder can’t match. If you’re short on time, a 1‑inch piece of fresh ginger will suffice. Grate or finely mince it for maximum flavor release.
Add a Splash of Water at the End
If the sauce feels too thick before serving, whisk in a tablespoon of cold water. This loosens the glaze without diluting the flavor. It’s a quick fix that keeps the sauce silky.
Creative Twists and Variations
This recipe is a playground. Here are some of my favorite ways to switch things up:
Spicy Sriracha Kick
Swap the chili flakes for a tablespoon of Sriracha. The heat will be more pronounced, and the sauce will acquire a smoky undertone. Perfect for those who love a fiery finish.
Coconut Cream Fusion
Replace half the peanut butter with coconut cream. The result is a tropical twist that pairs beautifully with jasmine rice.
Teriyaki Twist
Use teriyaki sauce instead of soy sauce and reduce the honey. The glaze becomes sweeter and slightly caramelized, ideal for a Japanese‑inspired plate.
Vegetarian Version
Swap the chicken for firm tofu, pan‑frying it until golden before adding the sauce. The tofu absorbs the glaze, delivering a satisfying bite.
Gluten‑Free Upgrade
Ensure the soy sauce is gluten‑free and use cornstarch instead of wheat flour for thickening. The dish remains delicious and safe for celiac diners.
Breakfast Boost
Serve the glaze over scrambled eggs and toast. The sweet‑savory sauce complements the eggs, creating a hearty breakfast.
Storing and Bringing It Back to Life
Fridge Storage
Store leftovers in an airtight container for up to 3 days. The glaze will thicken slightly; reheat gently on low heat, stirring frequently.
Freezer Friendly
Freeze the dish in a freezer‑safe container for up to 2 months. Thaw overnight in the fridge, then reheat on low heat, adding a splash of water if the sauce feels thick.
Best Reheating Method
Reheat on the stove over low heat, stirring constantly. If the sauce has separated, whisk in a tablespoon of cold water to restore its silky texture. Finish with a drizzle of sesame oil for aroma.